Oreo cheesecake. Just the name conjures up images of creamy, dreamy cheesecake, studded with the unmistakable crunch of Oreo cookies. This isn’t just a dessert; it’s an experience. It’s the perfect ending to a romantic dinner, a celebratory centerpiece for a birthday, or a simple yet satisfying treat for a quiet night in. This recipe isn’t just about following instructions; it’s about creating a culinary masterpiece that will leave you and your guests utterly captivated. We’re going to guide you through each step, from crafting the perfect Oreo crust to achieving that flawlessly smooth, rich cheesecake filling. Get ready to embark on a delicious journey, and prepare to be amazed by the incredible results you can achieve with this easy-to-follow recipe. You’ll be surprised how straightforward it is to create a dessert that tastes like it came from a high-end bakery.
Why You’ll Love This Oreo Cheesecake Recipe
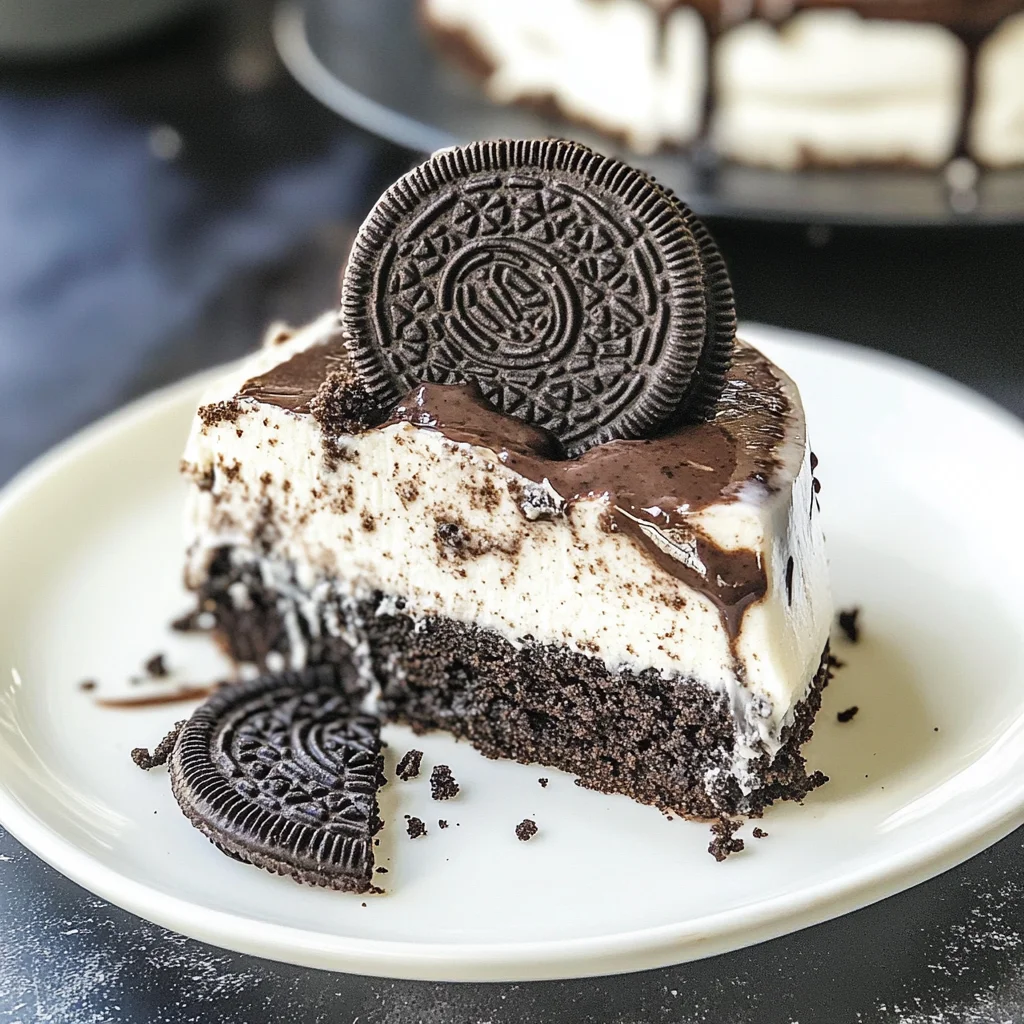
This Oreo cheesecake recipe isn’t just another cheesecake recipe; it’s a celebration of texture and taste. Imagine the delightful contrast between the crisp, chocolatey Oreo crust and the luxuriously smooth, creamy cheesecake filling. Every bite is a symphony of flavors and textures, a perfect balance of sweetness, chocolatey richness, and creamy indulgence. This recipe is designed for ease of use, even for novice bakers. We’ve broken down each step into simple, manageable instructions, ensuring that even those without extensive baking experience can achieve professional-looking and tasting results. This recipe is versatile. You can easily adjust the sweetness, add different toppings, or even experiment with variations to suit your taste. The possibilities are endless! Whether you’re a seasoned baker or a kitchen novice, you’re guaranteed to fall in love with this incredible dessert. It’s the kind of recipe you’ll want to make again and again, and it always impresses.
Furthermore, this Oreo cheesecake recipe offers a stunning visual appeal. The deep, rich brown of the Oreo crust contrasts beautifully with the creamy white filling, creating a visually striking dessert that’s as pleasing to the eye as it is to the palate. This makes it the perfect choice for special occasions or gatherings where you want to impress your guests with a show-stopping dessert. It’s the kind of dessert that speaks volumes about your baking prowess without requiring hours of complex techniques. The simple elegance of the presentation is part of its charm, and you’ll be proud to serve it to friends and family.
Why You Should Try This Oreo Cheesecake Recipe
Beyond its delicious taste and stunning presentation, this Oreo cheesecake recipe offers several compelling reasons to give it a try. First and foremost, it’s incredibly rewarding. The process of creating this masterpiece from scratch is deeply satisfying, and the feeling of accomplishment you’ll get after successfully baking and serving it is unparalleled. It’s a fantastic way to challenge yourself in the kitchen and hone your baking skills. This recipe is also incredibly adaptable. It’s a perfect base for experimentation. Feel free to add fresh berries, chocolate shavings, or even a swirl of caramel for an extra layer of deliciousness. The possibilities are endless!
Moreover, this Oreo cheesecake recipe is perfect for sharing. It’s a generous-sized dessert that’s perfect for sharing with loved ones, making it an ideal choice for parties, holidays, or any special occasion. It’s a dessert that brings people together, creating lasting memories and delicious moments. Finally, it’s a recipe you can confidently share with others. The detailed instructions and helpful tips make it easy to follow, ensuring that anyone can recreate this delicious dessert with ease. You can even adapt this recipe to create a variety of other cheesecakes, demonstrating your newfound baking expertise!
Ingredients and Necessary Utensils for the Best Oreo Cheesecake
- For the Oreo Crust:
- 20 Oreo cookies (about 200g), finely crushed – *provides the chocolatey base*
- 6 tablespoons (85g) unsalted butter, melted – *binds the crust*
- For the Cheesecake Filling:
- 3 (8 ounce) packages cream cheese, softened – *essential for creamy texture*
- 1 ½ cups (300g) granulated sugar – *sweetens the filling*
- ¼ cup (60ml) sour cream – *adds tang and creaminess*
- 2 teaspoons vanilla extract – *enhances the flavor*
- 4 large eggs – *binds the filling and adds richness*
- 1 cup (240ml) heavy cream – *increases richness and creates a lighter texture*
- Optional Toppings:
- Whipped cream – *classic topping for cheesecake*
- Chocolate shavings – *adds extra chocolatey flavor*
- Fresh berries – *adds a touch of freshness and sweetness*
- Oreo cookie crumbs – *for extra texture and crunch*
Utensils: 9-inch springform pan, food processor (or zip-top bag and rolling pin for crushing Oreos), mixing bowls (large and medium), electric mixer (handheld or stand), rubber spatula, measuring cups and spoons, parchment paper, baking sheet.
Detailed Recipe Steps for a Perfect Oreo Cheesecake
- Prepare the Oreo Crust: Preheat your oven to 350°F (175°C). Crush the Oreo cookies into fine crumbs using a food processor. Alternatively, place cookies in a zip-top bag and crush them using a rolling pin. Combine the crushed Oreos and melted butter in a medium bowl. Press the mixture firmly into the bottom of your 9-inch springform pan. **Ensure the crust is evenly distributed and compacted.** Bake for 8-10 minutes, or until lightly golden. Let it cool completely.
- Make the Cheesecake Filling: In a large bowl, beat the softened cream cheese and sugar together using an electric mixer until smooth and creamy. **Make sure the cream cheese is completely softened to avoid lumps.** Beat in the sour cream and vanilla extract until well combined.
- Add the Eggs: Add the eggs one at a time, beating well after each addition. **Don’t overmix; just until the ingredients are combined.** Scrape down the sides of the bowl as needed. Slowly add the heavy cream and mix until everything is just combined.
- Bake the Cheesecake: Pour the cheesecake filling over the cooled Oreo crust. Place the springform pan into a larger baking pan. Pour enough hot water into the larger pan to come about halfway up the sides of the springform pan. This creates a water bath, which helps prevent cracking. **This step is crucial for a smooth, creamy cheesecake.**
- Bake and Cool: Bake for 50-60 minutes, or until the cheesecake is set around the edges but still slightly jiggly in the center. **Do not overbake.** Turn off the oven and leave the cheesecake in the oven with the door slightly ajar for 1 hour. This slow cooling prevents cracking. Remove the cheesecake from the water bath and let it cool completely on a wire rack. Once completely cool, refrigerate for at least 4 hours, or preferably overnight. This allows the cheesecake to set completely and develop its rich flavor.
- Serve and Enjoy: Carefully run a thin knife around the edges of the cheesecake to release it from the springform pan. Garnish with your desired toppings – whipped cream, chocolate shavings, fresh berries, or additional Oreo crumbs. Serve and enjoy your delicious Oreo cheesecake!
Tips, Variations, and Troubleshooting for Your Oreo Cheesecake
Tips for Success: Ensure your cream cheese is completely softened to prevent lumps. Don’t overmix the batter, as overmixing can incorporate too much air and lead to cracks. Use a water bath to create a more even bake and prevent cracking. Let the cheesecake cool gradually to avoid cracking. Refrigerate for at least 4 hours to allow it to set properly.
Variations: For a vegan Oreo cheesecake, use vegan cream cheese and a vegan egg substitute. You can also experiment with different types of cookies for the crust, such as chocolate graham crackers or digestive biscuits. For a gluten-free version, use gluten-free Oreo cookies or a gluten-free crust alternative. Add a swirl of peanut butter or caramel to the filling for an extra flavor dimension.
Troubleshooting: If your cheesecake cracks, it’s likely due to overbaking or rapid cooling. To avoid cracking, use a water bath and let the cheesecake cool slowly. If your crust is too crumbly, you may need to add more melted butter. If your filling is too runny, it may need to bake for a longer time or the cream cheese wasn’t fully softened.
Nutritional Values and Health Benefits of Oreo Cheesecake
(Note: Nutritional information is approximate and will vary depending on specific ingredients and serving size. This section provides general information and does not constitute nutritional advice.)
A typical slice of Oreo cheesecake is relatively high in calories, fat, and sugar. However, it does provide some nutritional benefits from its ingredients. The cream cheese contains some protein and calcium. The Oreo cookies provide some carbohydrates for energy. The sour cream and heavy cream contain fats, which provide essential fatty acids (although these should be consumed in moderation as part of a balanced diet). The exact nutritional values will vary based on the specific ingredients used. It’s important to enjoy this dessert in moderation as part of a healthy and balanced diet. If you have any specific dietary requirements or concerns, it is recommended to consult a nutritionist or registered dietitian for personalized advice. There are also many ways to make healthier versions of this recipe.
It’s important to remember that while Oreo cheesecake can be a delicious treat, it should be enjoyed sparingly as part of a balanced diet rich in fruits, vegetables, and whole grains. For a more health-conscious approach, you could consider using reduced-fat cream cheese and experimenting with healthier crust alternatives, such as almond flour or oat flour. While this adaptation might slightly change the taste and texture, the resulting dessert would still be enjoyable, lighter, and more nutritious.
FAQ: Frequently Asked Questions about Oreo Cheesecake
Q: Can I use different types of cookies for the crust?
A: Yes, you can experiment with other chocolate cookies, graham crackers, or even digestive biscuits. Just ensure they are finely crushed.
Q: What if my cheesecake cracks?
A: Cracking is often caused by overbaking or rapid cooling. Use a water bath and cool the cheesecake slowly to prevent cracking. You can also top it with extra whipped cream or berries to help hide any cracks.
Q: How long can I store the Oreo cheesecake?
A: Store leftovers in the refrigerator, tightly covered, for up to 3-4 days. The flavor will be best within the first 2 days.
Q: Can I freeze Oreo cheesecake?
A: Yes, you can freeze Oreo cheesecake for up to 2 months. Wrap it tightly in plastic wrap and then in aluminum foil before freezing. Thaw in the refrigerator overnight before serving.
Q: Can I make this recipe ahead of time?
A: Yes, you can make the crust and filling ahead of time, but assemble and bake the cheesecake on the day you plan to serve it. The cheesecake needs to chill in the refrigerator for at least 4 hours to properly set.
Conclusion: Your Journey to the Perfect Oreo Cheesecake
Creating this Oreo cheesecake is more than just baking; it’s about crafting a memorable dessert. From the initial crush of the Oreo cookies to the final flourish of whipped cream, each step contributes to the overall experience. Remember the importance of using softened cream cheese, a water bath, and gradual cooling. Experiment with variations, add your personal touch, and share your creations. Don’t forget to let us know your thoughts in the comments section below. We’d love to hear about your Oreo cheesecake baking journey, your modifications, and if you tried any of our suggested variations! Share your photos on social media and tag us! Happy baking, and enjoy the rich, decadent goodness of your homemade Oreo cheesecake! For more incredible dessert recipes, be sure to check out our extensive collection on seemorerecipes.com.
Learn more about cheesecakes in general from this informative resource: Wikipedia’s entry on Cheesecake.
No-Bake Oreo Cheesecake
Ingredients
Equipment
Method
- Crush Oreo cookies in a food processor until finely ground.
- Combine crushed Oreos and melted butter in a bowl, mix well.
- Press the mixture into the bottom of a 9-inch springform pan.
- In a large bowl, beat cream cheese and sugar until smooth and creamy.
- Beat in sour cream and vanilla extract.
- In a separate bowl, whip the cold heavy cream until stiff peaks form. Gently fold the whipped cream into the cream cheese mixture.
- Pour the filling over the Oreo crust and spread evenly.
- Refrigerate for at least 4 hours, or preferably overnight, before serving.


