There are desserts, and then there are legends. The Chocolate Silk Pie Recipe falls firmly into the latter category. This isn’t just a dessert; it’s an experience a decadent, ethereal cloud of chocolate that melts the moment it touches your tongue. Unlike many baked chocolate pies, the beauty of the Chocolate Silk Pie lies in its light, airy, and intensely chocolatey filling that requires absolutely no baking. It sets up perfectly in the refrigerator, nestled inside a crisp, buttery chocolate crumb crust.
If you’ve been searching for that classic diner-style silk pie the one with the mile-high whipped topping and the deeply satisfying richness you’ve found it. This recipe is a meticulous guide to achieving that signature “silky” texture, which comes from a careful balance of high-quality chocolate, butter, and a prolonged whipping process that incorporates just the right amount of air. We’ll walk you through every step, ensuring your homemade silk pie turns out restaurant-perfect, making this the only Chocolate Silk Pie Recipe you’ll ever need to save. Prepare your stand mixer, because a world of chocolate indulgence awaits!
Why You’ll Love This Decadent Chocolate Silk Pie Recipe
The term “silk” isn’t an exaggeration; it perfectly describes the texture of this filling. It’s lighter than fudge, yet richer than mousse, offering a sophisticated dessert experience that appeals to every chocolate lover. But beyond the taste and texture, there are several compelling reasons why this classic no-bake chocolate pie will become a permanent fixture in your dessert rotation (and why we highly recommend bookmarking this page).
The Effortless No-Bake Filling
While the crust is briefly baked to set its structure, the heart of this dish the chocolate filling is entirely no-bake. This makes it an ideal dessert for warm weather, holidays when oven space is precious, or simply when you want a rich treat without the hassle of monitoring oven temperatures. The minimal active cooking time allows you to focus on the essential technique: whipping that filling into submission. Achieving the perfect light and fluffy texture for this Chocolate Silk Pie Recipe truly relies on the magic of the stand mixer.
Unbeatable Richness and Flavor Intensity
Unlike many quick pudding pies, this recipe uses a substantial amount of high-quality unsweetened baking chocolate, yielding a deep, complex, and intensely chocolatey flavor. This isn’t just sweet; it has a profound cocoa character that contrasts beautifully with the sweetness of the powdered sugar and the simplicity of the cookie crust. Each slice delivers a concentrated burst of flavor, satisfying even the most serious chocolate craving. This level of decadence is unmatched by simpler chocolate desserts. For another supremely rich chocolate dessert, check out our guide to making a Triple Chocolate Pie if you dare!
The Critical Texture Difference
Many homemade chocolate pies end up dense or grainy. This Chocolate Silk Pie Recipe guarantees a light, almost whipped-butter texture. The secret is the incredibly long beating time (a full five minutes on high speed) once the eggs are added. This process incorporates vast amounts of air into the butter and sugar matrix, creating the signature ‘silky’ mouthfeel that gives this dessert its name. It’s the difference between eating a heavy cream filling and savoring an airy, chocolate-infused cloud.
A Stunning Presentation
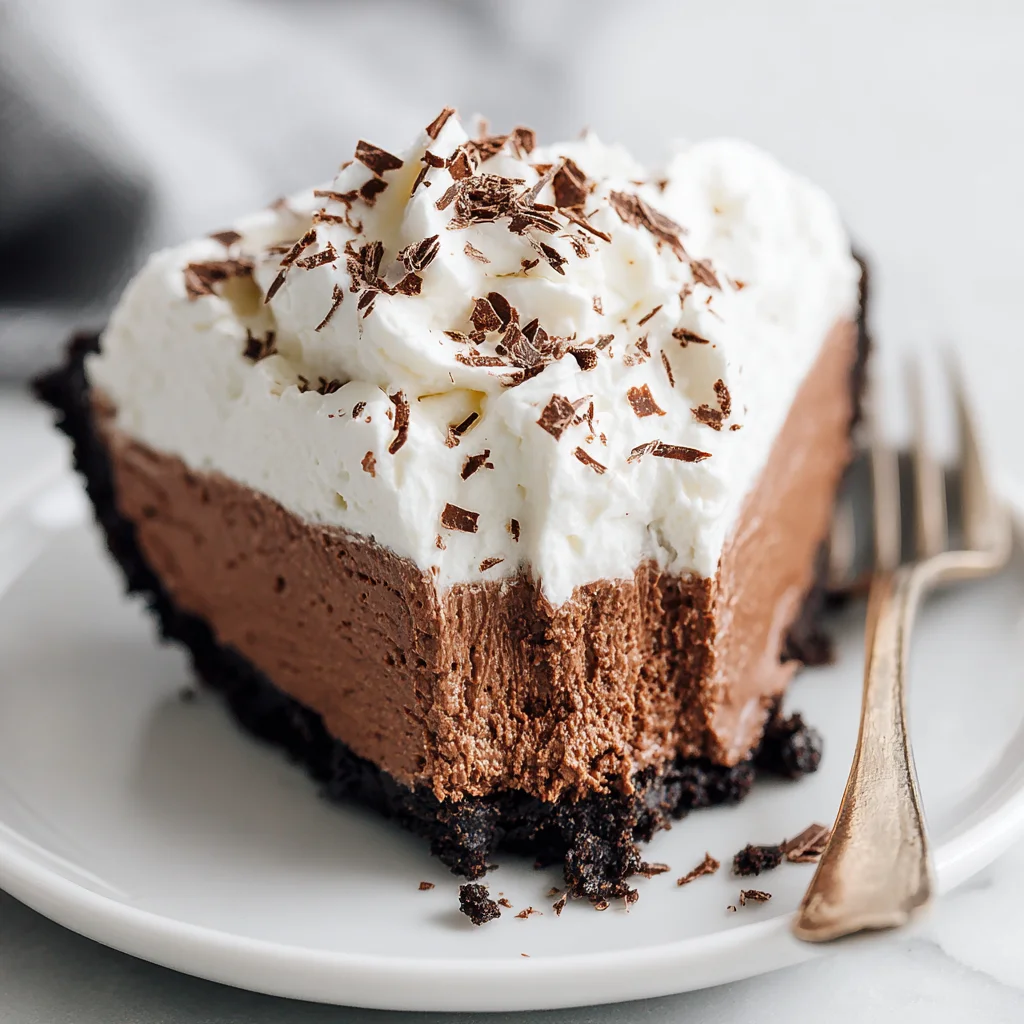
Finished with a mountain of fresh, homemade whipped cream and elegant chocolate shavings, the silk pie is a showstopper. It looks far more complicated than it actually is, making it the perfect dessert to impress guests at dinner parties, holidays, or potlucks. The deep, dark chocolate filling contrasted against the white, fluffy topping creates visual appeal that promises pure indulgence before the first bite is even taken.
Why You Should Try This Homemade Silk Pie Recipe
If you’ve historically relied on boxed mixes or store-bought desserts for your chocolate fix, diving into making a classic Chocolate Silk Pie Recipe from scratch is a rewarding endeavor. This pie represents the pinnacle of classic American dessert making simple ingredients, executed with precision, resulting in extraordinary flavor. This is more than just following steps; it’s learning the technique that transforms basic ingredients into something truly luxurious.
Mastering a Time-Honored Classic
The Chocolate Silk Pie is a beloved staple. By mastering this recipe, you add a truly impressive dessert to your repertoire. It’s a versatile dessert that travels well (once chilled) and holds its shape beautifully when sliced. Unlike fussy cakes or delicate pastries, the structure of this pie is robust, provided you chill it thoroughly, making it surprisingly reliable for entertaining. If you love classic, no-fail desserts that deliver maximum flavor, then adding this homemade silk pie to your skillset is a must.
The Importance of Quality Ingredients
Because the ingredient list is short and focused, the quality of each component shines through. Trying this recipe encourages you to seek out better ingredients high-fat butter, pure vanilla, and especially high-quality unsweetened chocolate. When you taste the difference that quality cocoa solids make in the finished silky chocolate filling, you’ll understand why skipping shortcuts here is non-negotiable. For instance, using 60% or 70% cacao baking chocolate (instead of standard chips) ensures depth and complexity that elevates this dessert far beyond the average pie.
Safety First: Using Pasteurized Eggs
A crucial component of the classic Chocolate Silk Pie Recipe is the use of raw eggs, which are essential for creating the incredibly light, fluffy texture. Since the filling is no-bake, it is paramount that you use pasteurized eggs (sometimes labeled “safe for raw consumption”). Pasteurized eggs have been gently heated to eliminate any bacteria without cooking the egg, making them safe for recipes where the eggs remain uncooked. If pasteurized eggs are unavailable, you can also temper regular eggs by gently heating them with the melted chocolate mixture to 160°F, but this requires precision and alters the traditional texture slightly. Sticking to pasteurized eggs is the easiest and safest route to achieving the signature silky texture of this pie.
For more decadent, easy-to-make desserts that rely on simple steps for spectacular results, you might also be interested in our guide to Texas Sheet Cake or this excellent No-Bake Peanut Butter Pie. These are perfect complements to the richness of the classic chocolate silk pie.
Ingredients and Necessary Utensils for the Chocolate Silk Pie Recipe
Success in this Chocolate Silk Pie Recipe hinges on precise measurements and the temperature of your ingredients, especially the butter. Gathering everything beforehand (mise en place) is essential for a seamless process. Below is the detailed ingredient list and the tools you’ll need.
I. Ingredients for the Crust
We are opting for a classic chocolate cookie crust here, which enhances the overall chocolate experience. The goal is a crust that is stable and crunchy, providing necessary textural contrast to the soft filling.
- 1 1/2 cups finely crushed chocolate cookie crumbs: High-quality chocolate sandwich cookies (like Oreos, filling removed for a less sweet crust) or wafer cookies work best. Ensure they are ground finely into a powdery consistency.
- 1/4 cup granulated sugar: Adds just enough sweetness and helps stabilize the structure during baking.
- 6 tablespoons unsalted butter, melted: The binding agent. Melt it completely but allow it to cool slightly so it doesn’t cook the sugar or crumbs.
II. Ingredients for the Silky Chocolate Filling
This is where the magic happens. Note the emphasis on softening the butter and sifting the powdered sugar these steps prevent lumpiness and aid in aeration.
- 1 cup (2 sticks) unsalted butter, softened to room temperature: This must be truly soft not melted, but easily yielding to a gentle poke. Cold butter will result in a dense, granular filling.
- 1 1/2 cups powdered sugar, sifted: Sifting is critical! Powdered sugar compacts easily, and sifting removes lumps and ensures the smoothest incorporation into the butter.
- 1 teaspoon pure vanilla extract: Enhances the chocolate flavor.
- 4 ounces high-quality unsweetened baking chocolate, melted and cooled slightly: Use good quality chocolate (like Ghirardelli, Baker’s, or Valrhona). Unsweetened chocolate provides the deep cocoa punch. It must be melted and then cooled until barely warm if it’s too hot, it will melt the softened butter, ruining the texture.
- 4 large eggs (Must be pasteurized for safety): As discussed, pasteurized eggs are vital here since they are consumed raw. They provide the necessary structure and contribute significantly to the lightness of the filling.
III. Ingredients for the Topping
Don’t settle for aerosol whipped cream! A freshly made topping elevates this decadent dessert.
- 1 1/2 cups cold heavy whipping cream: Must be very cold to whip properly and hold stiff peaks.
- 1/4 cup powdered sugar: Sweetens the cream without making it gritty.
- 1/2 teaspoon pure vanilla extract: For flavor.
- Chocolate shavings, for garnish (optional): Use a vegetable peeler on a block of chocolate for beautiful, delicate curls.
Essential Tools and Utensils for the Chocolate Silk Pie Recipe
Having the right tools is key to achieving the signature “silk” texture. This recipe demands power and patience, which is why a stand mixer is highly recommended.
Must-Have Equipment:
- Stand Mixer (or powerful Hand Mixer): Essential for the long, high-speed whipping necessary to aerate the butter and eggs for the silky chocolate filling. The paddle attachment is used for the creaming process, and the whisk attachment is used for the topping.
- 9-inch Deep-Dish Pie Plate: Needed for baking the crust and assembling the final pie.
- Measuring Cups and Spoons: For accurate ingredient quantities.
- Rubber Spatulas: Crucial for scraping down the sides of the mixing bowl often during the creaming process.
- Small Microwave-Safe Bowl or Double Boiler: For melting the unsweetened chocolate.
- Wire Rack: For cooling the crust completely.
- Sifter or Fine Mesh Strainer: Absolutely necessary for the powdered sugar.
For more baking inspiration and visual guides on preparing ingredients, you can find many great ideas on my dedicated Pinterest page here.
Detailed Recipe Steps: Creating the Silky Chocolate Filling
Follow these steps precisely to ensure your no-bake chocolate pie sets up perfectly with that light, airy, and truly “silky” texture.
Step 1: Prepare and Bake the Crust
A firm, cooled crust is the foundation of a successful Chocolate Silk Pie Recipe.
- Preheat your oven to 350°F (175°C).
- In a medium mixing bowl, combine the finely crushed cookie crumbs and the 1/4 cup of granulated sugar.
- Pour the melted butter over the crumb mixture. Stir thoroughly until all the crumbs are evenly moistened and resemble wet sand.
- Press the mixture firmly and evenly into the bottom and up the sides of your 9-inch deep-dish pie plate. Tip: Use the smooth bottom of a dry measuring cup to press the crust down firmly and compact it, ensuring a stable base.
- Bake the crust for 8 to 10 minutes until set and fragrant.
- Remove from the oven and allow the crust to cool completely on a wire rack before attempting to fill it. A warm crust will immediately melt your silk filling.
Step 2: Preparing the Chocolate Silk Filling (The Secret Step)
This stage is the most critical. You must allow for ample beating time to incorporate enough air for the signature light texture.
- Start by melting the 4 ounces of unsweetened chocolate and set it aside to cool slightly. It should be barely warm to the touch.
- In the bowl of a stand mixer fitted with the paddle attachment, cream the softened 1 cup of butter on medium speed until it is perfectly smooth and uniformly light, about 1 minute.
- Gradually add the 1 1/2 cups of sifted powdered sugar to the butter. Beat on medium-high speed. This creaming process must continue until the mixture is exceptionally light, fluffy, and visibly pale in color. This takes approximately 4 to 5 minutes. Stop and scrape down the sides and bottom of the bowl frequently to ensure even aeration.
- Reduce the speed to low. Add the melted and cooled chocolate and the vanilla extract. Beat until the chocolate is just combined, then increase to medium speed and beat for 1 minute until fully integrated.
- Stop the mixer and scrape the bowl one last time.
- The Egg Incorporation: Add the four pasteurized eggs one at a time, beating well for 30 seconds after each addition. The mixture will look slightly loose or curdled at this point do not worry!
- The Key to Silkiness: Once all four eggs have been added, immediately increase the mixer speed to HIGH. Beat the filling vigorously for a full 5 minutes. This long, high-speed beating time is non-negotiable for achieving that light, voluminous, “silky” texture. The mixture will transform, becoming much lighter in color, doubling slightly in volume, and appearing almost like a thick, airy frosting.
Step 3: Assemble and Chill the Pie
Patience is required now the filling needs sufficient time to set.
- Carefully spoon the prepared chocolate silk filling into the completely cooled pie crust.
- Use a rubber spatula or the back of a spoon to gently smooth the top of the filling, ensuring it is level.
- Cover the pie loosely with plastic wrap or foil. Make sure the wrap does not touch the filling surface.
- Refrigerate the pie for a minimum of 6 hours, or preferably overnight, until the silky chocolate filling is firm and fully set. A properly set pie should feel solid when lightly touched.
Step 4: Prepare the Whipped Topping and Serve
Finish your homemade silk pie just before serving for the freshest taste and best texture.
- Just before you are ready to serve, prepare the topping. Ensure your heavy whipping cream, bowl, and whisk attachment are very cold.
- Place the cold heavy whipping cream, 1/4 cup powdered sugar, and 1/2 teaspoon vanilla extract in the mixer bowl fitted with the whisk attachment.
- Start on low speed, then increase to medium-high speed. Beat until stiff peaks form. Watch closely: stop immediately once stiff peaks form to avoid turning the cream into butter.
- Spread or pipe the freshly whipped cream over the chilled Chocolate Silk Pie Recipe.
- Garnish with chocolate shavings or cocoa powder, if desired.
- Slice and serve immediately. Store any leftovers tightly covered in the refrigerator.
Tips, Variations, and Common Mistakes for the Chocolate Silk Pie
Even though this no-bake pie is relatively straightforward, a few key elements can make or break the final texture. Here is how to ensure success and explore exciting variations.
Avoiding Common Chocolate Silk Pie Mistakes
- Mistake 1: Using Cold Butter. If your butter is not perfectly soft (room temperature), it won’t cream properly with the sugar, resulting in a grainy, dense filling texture. Plan ahead and let the butter sit out for at least an hour.
- Mistake 2: Not Beating Long Enough. This is the most frequent failure point. The 5-minute high-speed beat with the eggs is crucial. If you skip this, the filling will taste delicious but will resemble heavy fudge rather than the light, airy “silk” consistency. Trust the recipe, and let the mixer run!
- Mistake 3: Hot Chocolate. Adding warm or hot melted chocolate to the creamed butter mixture will cause the butter to melt and separate, resulting in an oily filling. The melted chocolate must be cooled until it is just lukewarm or barely warm.
- Mistake 4: Not Sifting the Sugar. Powdered sugar clumps heavily. If you don’t sift it, those small lumps will remain in your finished pie, ruining the smooth texture of the filling.
Ingredient Alternatives and Variations
Crust Variations:
- Traditional Flaky Pastry: For a more traditional look, use a pre-baked flaky pie crust instead of the chocolate crumb base. Ensure it is fully cooled before filling.
- Gluten-Free Crust: Use gluten-free chocolate wafers or crushed almonds/pecans mixed with butter and a touch of sugar for a nutty, gluten-free base.
- Graham Cracker Crust: If you prefer a lighter, less intense crust, substitute the chocolate crumbs with graham cracker crumbs (1 1/2 cups), keeping the butter and sugar amounts the same.
Filling Substitutions and Flavor Boosts:
- Vegan Chocolate Silk Pie: Achieving the “silk” texture without eggs or dairy is challenging, but possible. Substitute the butter with vegan butter sticks (ensure they have high-fat content) and use an equal amount of firm silken tofu or a non-dairy whipped cream alternative (like full-fat coconut cream) stabilized with melted chocolate. Omit the eggs entirely and increase the chilling time dramatically.
- Coffee Infusion: Add 1 teaspoon of espresso powder along with the vanilla extract to enhance the chocolate flavor and give the silky chocolate filling a mocha note.
- Boozy Silk Pie: Replace 1/2 teaspoon of the vanilla extract with 1/2 teaspoon of high-quality rum, bourbon, or Kahlua for a mature flavor profile.
Topping Alternatives:
- Cinnamon Whipped Cream: Add a pinch of ground cinnamon to the heavy cream for a subtle warmth, perfect for a holiday Chocolate Silk Pie Recipe.
- Cream Cheese Topping: For a tangier finish, whip softened cream cheese with powdered sugar and a touch of cream until fluffy, then spread over the pie.
Remember that this Chocolate Silk Pie Recipe is fundamentally a classic. While variations are fun, the core integrity of the butter/sugar/egg/chocolate ratio must be maintained for the signature silky texture. If substituting key components, be prepared for textural changes.
Nutritional Values and Benefits of the Decadent Chocolate Pie
It is important to acknowledge that this classic Chocolate Silk Pie Recipe is a rich, indulgent dessert meant for enjoyment and special occasions. It is calorie-dense, primarily due to the substantial amounts of butter and sugar required to create the smooth, stable structure of the filling. However, looking beyond the indulgence, we can appreciate the components this homemade silk pie brings to the table.
Disclaimer: Nutritional values are estimates based on standard ingredients and a pie cut into 8 generous slices. Actual values may vary based on exact brands and measurements.
Estimated Nutritional Breakdown (Per Slice, 1/8th of Pie):
- Calories: 550 – 700 kcal (Highly variable based on topping thickness and crust size)
- Total Fat: 40 – 50g
- Saturated Fat: 25 – 30g
- Carbohydrates: 50 – 65g (Primarily from refined sugar and cookie crumbs)
- Protein: 5 – 8g (From eggs and dairy)
Ingredient Benefits: The Unexpected Upsides
The Power of Unsweetened Dark Chocolate
This recipe uses high-quality unsweetened baking chocolate, which is rich in cocoa solids. Cocoa solids are renowned for being packed with antioxidants, particularly polyphenols like flavonoids. These compounds are linked to benefits such as improved blood flow and heart health. While the high sugar and fat content of the pie mitigate many of these health benefits, using true unsweetened chocolate ensures you are getting the purest, most concentrated form of cocoa flavor and its associated antioxidants.
Dairy and Protein Content
The use of butter, heavy cream, and eggs ensures this pie provides essential macronutrients. Butter contains fat-soluble vitamins (A, D, E, and K), and the eggs contribute high-quality protein and essential fatty acids. The pasteurized eggs are integral not just to the pie’s structure but also add a nutritional boost often missing in other sweet treats.
Ultimately, the main benefit of enjoying this Chocolate Silk Pie Recipe is psychological the pure, unadulterated joy of indulging in a perfectly executed, classic dessert. Desserts like this are essential for celebrations and for elevating a regular meal into a memorable event. Enjoy it in moderation, savoring every rich, silky bite.
FAQs: Your Questions About the Classic Chocolate Silk Pie Recipe Answered
Is the Classic Chocolate Silk Pie Recipe truly safe to eat since it contains raw eggs?
Yes, the pie is safe to eat provided you use pasteurized eggs. Pasteurized eggs have been treated to eliminate harmful bacteria without cooking them, making them safe for recipes where the eggs remain raw. Always look for the “pasteurized” label when buying eggs for this recipe.
How do I get the filling to be perfectly “silky” and not dense?
The silky texture is achieved through a technique known as aeration. This requires the butter to be perfectly softened and a non-negotiable, full 5-minute high-speed beat once the eggs are incorporated. This long mixing process whips air into the mixture, resulting in the light, mousse-like consistency characteristic of a quality homemade silk pie.
Can I use milk chocolate instead of unsweetened baking chocolate in this Chocolate Silk Pie Recipe?
It is highly recommended to stick to unsweetened baking chocolate. Using milk chocolate will make the pie significantly sweeter and less intensely chocolatey, often leading to a texture that is too soft and runny. If you desire a slightly sweeter chocolate, you could substitute 1 ounce of the unsweetened chocolate with an ounce of bittersweet chocolate, but adjust the powdered sugar slightly.
How long does Chocolate Silk Pie need to chill before serving?
The pie requires a minimum of 6 hours in the refrigerator to fully set. For the best texture and stability, chilling the pie overnight (8–12 hours) is strongly recommended. This ensures the butter solids firm up completely, allowing for clean, perfect slices.
How should I store leftover Chocolate Silk Pie?
Leftover Chocolate Silk Pie Recipe must be stored in the refrigerator due to the dairy and egg content. Keep it covered loosely with plastic wrap or a pie dome. It will maintain its best texture and flavor for 3 to 4 days, though the crust may soften slightly after the first day.
Conclusion: Your New Favorite No-Bake Chocolate Pie
The journey to creating the perfect Chocolate Silk Pie Recipe might seem detailed, but the results are unequivocally worth the effort. This dessert is the embodiment of comfort and luxury, combining a crisp, stable crust with a filling that lives up to its name silky, smooth, rich, and utterly divine.
We’ve emphasized the critical steps: ensuring your butter is perfectly soft, your chocolate is cooled, and most importantly, giving that mixture the full, vigorous 5-minute beat. These small details are what separate a good chocolate pie from a truly legendary one. By using pasteurized eggs, you ensure safety while maintaining the traditional, airy lightness that makes this pie so irresistible.
Whether you are preparing this for a special holiday gathering or simply indulging in a moment of chocolate bliss, this homemade silk pie recipe delivers every single time. Stop dreaming about that perfect bite of velvety chocolate and start baking (or, well, assembling and chilling!).
We hope this definitive guide helps you master this classic. Try this Chocolate Silk Pie Recipe today, and don’t forget to share your success stories and pictures in the comments below! If you are interested in exploring other cozy, comforting recipes, be sure to check out our Pumpkin Magic Bars or a fantastic guide to Creamy Garlic Parmesan Pasta for a perfect dinner pairing before dessert!
Classic Chocolate Silk Pie
Ingredients
Equipment
Method
- Preheat oven to 350°F (175°C).
- In a medium mixing bowl, combine the cookie crumbs and the 1/4 cup of granulated sugar.
- Pour the melted butter over the crumb mixture and stir until everything is evenly moistened and resembles wet sand.
- Press the mixture firmly and evenly into the bottom and up the sides of a 9-inch deep-dish pie plate. Use the bottom of a measuring cup to help compact the crust.
- Bake the crust for 8 to 10 minutes until set. Remove from the oven and allow the crust to cool completely on a wire rack before filling.
- In the bowl of a stand mixer fitted with the paddle attachment, cream the softened 1 cup of butter on medium speed until smooth, about 1 minute.
- Gradually add the 1 1/2 cups of sifted powdered sugar to the butter and beat on medium-high speed until the mixture is light, fluffy, and very pale in color, scraping down the sides of the bowl often. This process should take approximately 4 to 5 minutes.
- Add the melted and cooled chocolate and the vanilla extract to the creamed mixture. Beat on low speed until just combined, then increase to medium speed and beat for 1 minute.
- Ensure the mixture is fully incorporated, then stop the mixer and scrape down the sides.
- Add the eggs one at a time, beating well after each addition.
- Once all four eggs have been added, increase the mixer speed to high and beat the filling vigorously for a full 5 minutes. This long beating time is crucial for achieving the light, airy, and 'silky' texture. The mixture will lighten in color and volume significantly.
- Carefully spoon the prepared chocolate silk filling into the cooled pie crust.
- Use a rubber spatula or the back of a spoon to smooth the top of the filling.
- Cover the pie loosely with plastic wrap or foil (be careful not to touch the filling).
- Refrigerate the pie for a minimum of 6 hours, or preferably overnight, until the filling is firm and fully set.
- Just before serving, place the cold heavy whipping cream, 1/4 cup powdered sugar, and 1/2 teaspoon vanilla extract in the bowl of a stand mixer fitted with the whisk attachment.
- Beat on medium-high speed until stiff peaks form. Be careful not to over-beat, which can turn the cream into butter.
- Spread or pipe the freshly whipped cream over the chilled chocolate silk pie.
- Garnish with chocolate shavings, if desired.
- Slice and serve immediately. Store leftovers in the refrigerator.


