There is something inherently joyful about a cookie that brings a smile to your face before you even take the first bite. These Peanut Butter Paw Print Cookies are exactly that a nostalgic, deeply comforting dessert that is as fun to look at as it is delicious to eat. Combining the classic, rich flavor of double peanut butter with a delightful touch of chocolate, these cookies feature an adorable design that makes them perfect for parties, bake sales, or simply a cozy afternoon snack.
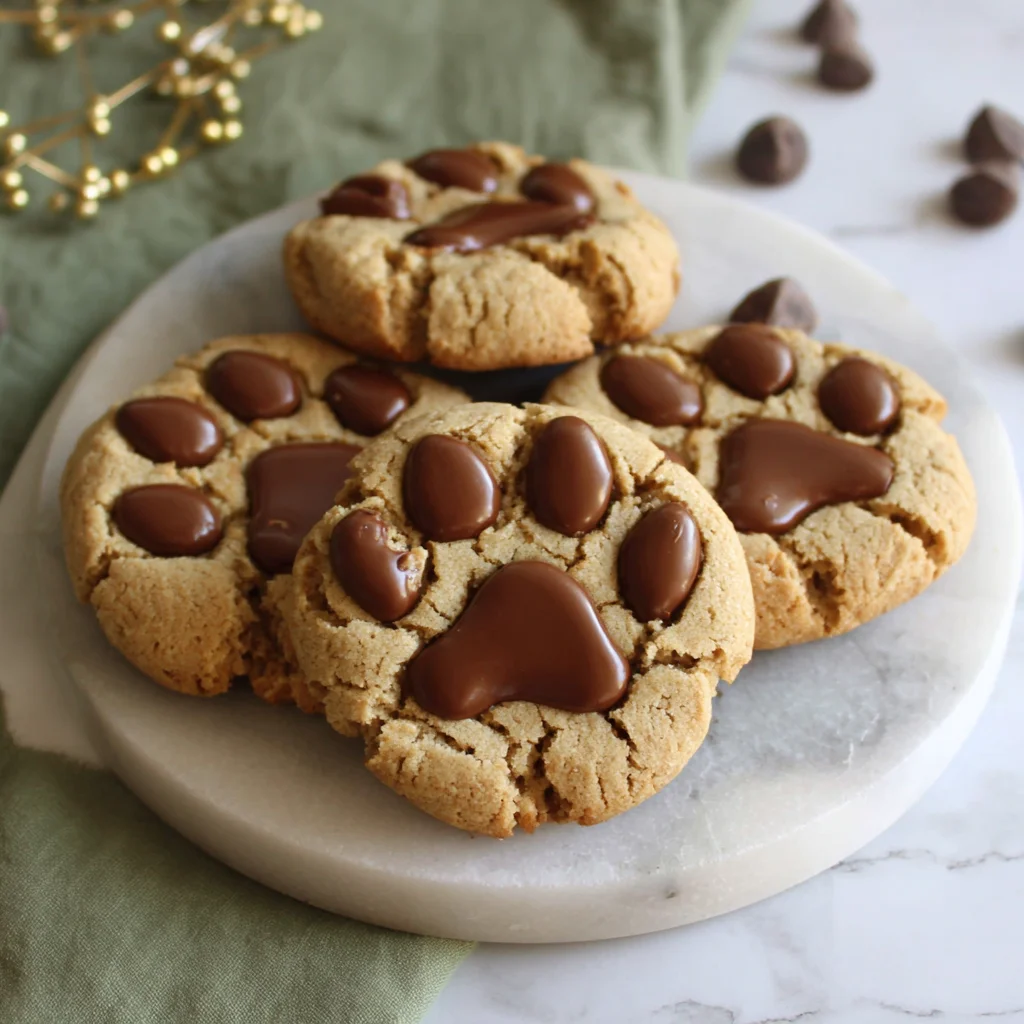
Forget the flat, dry peanut butter cookies of your past. Our recipe delivers a thick, soft, and chewy texture every single time. The secret lies in the perfect balance of sugars and a generous amount of creamy peanut butter incorporated directly into the dough. But what truly sets these apart is the cute ‘paw print’ topping, achieved with a softened, chilled peanut butter pad and three mini chocolate chip “toes.” If you are ready to bake a batch of treats that celebrate the simple joy of comfort food, scroll down to learn exactly how to master these iconic Peanut Butter Paw Print Cookies.
Why You’ll Love These Adorable Peanut Butter Paw Print Cookies
If you are searching for a standout cookie recipe that transcends the ordinary, the Peanut Butter Paw Print Cookies are your answer. This isn’t just a recipe; it’s a guaranteed crowd-pleaser that delivers on flavor, texture, and visual appeal. Here is a deeper dive into why this specific recipe will become a permanent fixture in your baking rotation:
The Perfect Texture Balance: Soft, Chewy, and Thick
Unlike some traditional peanut butter cookies that can end up dry or crumbly, this recipe focuses on achieving the ideal balance. We use a high ratio of brown sugar to granulated white sugar, which introduces more moisture (thanks to the molasses in the brown sugar) and creates that signature chewiness. The generous amount of butter and peanut butter keeps the dough rich and prevents over-spreading, resulting in cookies that are delightfully thick and remain soft even days after baking. When you bite into one of these Peanut Butter Paw Print Cookies, you get a satisfying, melt-in-your-mouth experience that is truly unmatched.
Double the Peanut Butter Delight
We don’t just stop at peanut butter in the dough we double down on the flavor! The ‘paw pad’ centerpiece is created using a small ball of slightly chilled peanut butter pressed into the hot cookie. This added layer of creamy, rich flavor melts slightly upon contact with the warmth of the fresh-baked cookie, intensifying the overall peanut butter profile and providing a secondary, distinct texture component. If you are a peanut butter enthusiast, the layered richness of these Peanut Butter Paw Print Cookies will absolutely satisfy that craving.
An Effortlessly Adorable Design
The aesthetic appeal of the paw print is undeniable, and the best part? It requires zero specialized tools. There is no tricky frosting or intricate piping work involved. The design is achieved simply by placing a small ball of peanut butter for the “pad” and three mini chocolate chips for the “toes.” This makes the decorating process incredibly simple and fun, even for novice bakers. Whether you are baking for a child’s birthday, a pet-themed event, or just want a cookie that sparks joy, these adorable Peanut Butter Paw Print Cookies are instantly recognizable and universally loved. For more adorable, easy-to-make treats, you might also enjoy checking out our recipe for Puppy Chow Chocolate Truffles!
Why You Should Try These Classic Peanut Butter Paw Print Cookies Today
In a world of complicated desserts, sometimes the greatest triumphs come from mastering a classic, especially when you can add a charming, unique twist. These Peanut Butter Paw Print Cookies are more than just a sweet treat; they offer several practical reasons why they should be moved to the top of your baking list immediately.
The Ultimate Comfort Food with a Whimsical Edge
Peanut butter cookies are the definition of comfort food they evoke memories of childhood and simple pleasures. This recipe takes that nostalgia and adds a playful, whimsical touch with the paw print design. They are the perfect embodiment of cozy baking. They are substantial, satisfying, and have that familiar salty-sweet balance that makes peanut butter so irresistible. This unique presentation makes them suitable for a huge variety of occasions, from holiday platters to everyday snacking.
Simple Technique, Professional Results
Despite their intricate appearance, the method for making these cookies is incredibly straightforward. The dough uses the classic creaming method, which is the foundation of almost all great cookie recipes. The decoration happens while the cookies are still warm, ensuring the “paw” elements melt just enough to securely adhere without requiring any extra binding agent. This simplicity means that bakers of any skill level can achieve beautiful, bakery-quality results. Mastering these Peanut Butter Paw Print Cookies is a great way to boost your baking confidence.
They Make Perfect Gifts and Shareable Treats
Looking for a unique item for a care package, a hostess gift, or a potluck dessert? These cookies travel well and hold their shape beautifully. Because of the distinct paw print design, they make excellent themed treats for animal lovers, veterinary staff, or anyone who appreciates cute food art. They stand out beautifully on a dessert table next to other classics. We even found great success pairing these with complementary flavors, such as our Soft Peanut Butter Cookies for a variety platter, ensuring everyone finds a favorite.
The Consistency Factor
Consistency is key in baking, and this recipe is highly reliable. We utilize a cookie scoop to ensure every single ball of dough is uniform in size. Uniformity in size is critical for even baking. If you follow the provided steps closely especially the instruction to keep the dough balls slightly mounded and not flattened before baking you will guarantee a batch of beautiful, thick, and perfectly baked Peanut Butter Paw Print Cookies every time. This robust recipe minimizes common cookie pitfalls, such as excessive spreading or dry centers.
Mastering the Ingredients for the Best Peanut Butter Paw Print Cookies
Great cookies start with great ingredients. For these Peanut Butter Paw Print Cookies, precision in measurement and quality of components are non-negotiable. Below is a detailed look at the necessary ingredients and the essential tools that will ensure your baking success.
The Essential Ingredients
The quality of your ingredients directly impacts the texture and flavor profile of the final product. Here is what you need for this recipe:
For the Cookies:
- 1 cup (2 sticks) Unsalted Butter, softened: Butter is the base for richness. Using unsalted allows you to control the salt content precisely. Ensure it is truly softened (room temperature, but not melted) for proper creaming.
- 1 cup Creamy Peanut Butter: Use a standard, commercial peanut butter (like Jif or Skippy) rather than natural separation-style peanut butter. The added stabilizers in commercial varieties are crucial for cookie structure and preventing excessive spreading.
- 1 cup Granulated White Sugar: Provides crispness and helps the cookies spread slightly.
- 1 cup Packed Light Brown Sugar: The molasses in brown sugar is key. It adds depth of flavor, moisture, and ensures that wonderful chewy texture. Make sure it is packed firmly when measuring.
- 2 large Eggs: These act as the primary binder and add necessary richness and moisture. Ensure they are also at room temperature so they incorporate seamlessly into the creamed butter and sugar mixture.
- 1 tablespoon Vanilla Extract: A crucial flavor enhancer that elevates the sweetness and depth of the cookie.
- 3 cups All-Purpose Flour: The structure of the cookie. Measure correctly by spooning the flour into the measuring cup and leveling off. Avoid scooping directly from the bag, which can compact the flour and lead to dry, dense cookies.
- 2 teaspoons Baking Soda: Our main leavening agent. Baking soda reacts with the acidic brown sugar to provide lift and contribute to browning.
- 1 teaspoon Salt: Essential for balancing the sweetness and enhancing the inherent flavor of the peanut butter.
For the Paw Prints:
- 1/4 cup Creamy Peanut Butter (extra, kept slightly chilled): This is dedicated solely to the paw pad decoration. Keeping it slightly chilled helps you roll small, neat balls that hold their shape better when pressed into the hot cookie.
- 1/2 cup Mini Chocolate Chips: We recommend mini chips for a proportional and delicate ‘toe’ design, but regular sized chips can be used for a more dramatic look.
Recommended Tools and Utensils for Baking Success
Having the right equipment will streamline the baking process and improve the final outcome of your Peanut Butter Paw Print Cookies.
Essential Baking Tools:
- Electric Mixer (Stand or Handheld): Absolutely necessary for achieving a light and fluffy creamed mixture (Step 2). This step is impossible to replicate manually with the same effectiveness.
- Large Mixing Bowl: Needed for combining the wet ingredients, especially when using an electric mixer.
- Medium Separate Bowl: For whisking the dry ingredients. Combining the flour, salt, and baking soda beforehand ensures the leavening agent is evenly distributed.
- Rubber Spatula: Indispensable for scraping down the sides of the bowl during mixing and folding in the final dry ingredients.
- Baking Sheets: Two to three large, light-colored baking sheets are ideal. Light-colored pans prevent the bottom of the cookies from browning too quickly.
- Parchment Paper or Silicone Baking Mats: Crucial for non-stick results and easy cleanup. Parchment paper also helps moderate the bottom heat.
- Small Cookie Scoop (1.5 Tablespoons size): Using a scoop guarantees uniform size, which ensures all your Peanut Butter Paw Print Cookies bake simultaneously and evenly.
- Wire Cooling Rack: Necessary for cooling the cookies after their initial rest on the baking sheet.
Pro Tip on Measuring: Remember that baking is a science. If you have a kitchen scale, using grams for flour (approximately 375g for 3 cups) will always yield the most consistent results, guaranteeing the perfect base for your Peanut Butter Paw Print Cookies.
Detailed Step-by-Step Guide to Baking Peanut Butter Paw Print Cookies
Creating these adorable cookies involves precision timing, particularly when applying the paw print decorations. Follow these detailed steps for guaranteed success.
Step 1: Preheat and Prepare
- Preheat your oven to the standard cookie temperature: 350°F (175°C). Accurate oven temperature is vital for the texture of these thick cookies.
- Line two or three large baking sheets with parchment paper or silicone baking mats. This prevents sticking and makes the delicate process of decorating the warm cookies easier. Set the sheets aside.
Step 2: Cream Wet Ingredients
- In a large mixing bowl, combine the softened butter, 1 cup of creamy peanut butter, granulated white sugar, and light brown sugar.
- Using an electric mixer (stand or handheld) on medium speed, beat these ingredients together until the mixture is visibly lightened in color and fluffy. This should take approximately 2 to 3 minutes. This creaming process incorporates air, which contributes significantly to the cookie’s final lift and texture.
- Add the two large eggs, one at a time. Mix thoroughly after the first egg is incorporated before adding the second.
- Stir in the vanilla extract until fully incorporated. Stop the mixer and use your rubber spatula to scrape down the sides and bottom of the bowl, ensuring all ingredients are evenly mixed.
Step 3: Combine Dry Ingredients
- In a separate medium bowl, whisk together the all-purpose flour, baking soda, and salt. Whisking ensures the leavening agent is distributed evenly throughout the flour.
- Gradually add the dry ingredient mixture into the wet ingredient mixture. Turn your mixer to low speed. Mix only until the flour streaks have just disappeared.
- Crucial Tip: Be careful not to overmix the dough. Overmixing develops the gluten in the flour, leading to tougher, less chewy Peanut Butter Paw Print Cookies. A few lingering flour streaks are better than an overworked dough.
Step 4: Shape the Cookies
- Using a small cookie scoop (about 1.5 tablespoons), form the dough into uniform balls. If you don’t have a scoop, aim for balls roughly the size of a golf ball.
- Place the cookie dough balls onto the prepared baking sheets, ensuring they are spaced about 2 inches apart to allow for proper airflow and moderate spreading.
- Note on Shape: Unlike classic crosshatch peanut butter cookies, do not press these balls down. Leave them mounded; this is how they achieve their desirable thick center.
Step 5: Bake the Cookies
- Bake the cookies for 9 to 11 minutes. Start checking at the 9-minute mark.
- The Peanut Butter Paw Print Cookies are done when the edges are lightly golden brown, but the centers still look slightly soft, puffy, and underbaked.
- Remove the baking sheets from the oven and immediately place them on a cooling rack. Do not delay, as the next steps must be performed while the cookies are piping hot.
Step 6: Create the Paw Pad (The Center)
- While the cookies are still very hot, work quickly. Take the 1/4 cup of extra chilled peanut butter.
- Roll this chilled peanut butter into very small pea-sized balls (these will form the central pads of the paw).
- Gently press one small peanut butter ball into the center of each warm cookie. The warmth of the cookie is essential here it slightly softens the chilled peanut butter, allowing it to adhere smoothly and create that signature soft center.
Step 7: Add the Toes
- For the “toes,” take three mini chocolate chips.
- Arrange them in a tight arc directly above the central peanut butter pad on each cookie. Press them gently into the cookie so they stick. The heat will ensure they settle nicely into the dough.
- Repeat this adorable process for all baked Peanut Butter Paw Print Cookies.
Step 8: Cool Completely
- Allow the cookies to cool completely on the baking sheet for 10 minutes. This resting period allows the structure to set and ensures the paw prints remain intact when moved.
- Carefully transfer the cookies to a wire rack to finish cooling completely.
- Store cooled Peanut Butter Paw Print Cookies in an airtight container at room temperature. They remain soft and delicious for up to 5 days.
Tips, Variations, and Troubleshooting for Peanut Butter Paw Print Cookies
Elevating a great recipe often comes down to mastering the subtle nuances and knowing how to adapt. Here are our top tips and tricks for perfect Peanut Butter Paw Print Cookies, along with creative ways to change things up.
Practical Baking Tips to Avoid Common Mistakes
Preventing Excessive Cookie Spread:
If your cookies are spreading too thin, the culprit is usually temperature or fat content.
- Chill the Dough: If your kitchen is warm or if you over-creamed your butter, chilling the dough balls for 20–30 minutes before baking helps solidify the fats and limits spreading.
- Avoid Natural Peanut Butter: As mentioned in the ingredient section, natural peanut butter (the kind that separates) is too oily for this recipe and will cause the cookies to flatten significantly. Stick to commercial varieties.
- Don’t Over-Softened Butter: If the butter is greasy or melted, it will ruin the creaming process and lead to flat cookies. Softened means cool to the touch, not oily.
Achieving the Perfect Paw Print Adhesion:
The timing in Step 6 is everything. If you wait too long, the surface of the cookie will set, and the peanut butter pad won’t stick or melt properly.
- Work Quickly: Immediately after removing the sheets from the oven, start placing the peanut butter pads. If your batch is large, consider baking in smaller rounds so you can decorate while the cookies are still steaming hot.
- Use Chilled Peanut Butter: The decorating peanut butter needs to be slightly firmer than the dough mixture so it holds its pea-sized shape.
Creative Variations on the Paw Print Theme
While the classic Peanut Butter Paw Print Cookies are perfect as written, you can easily switch up the decoration for different holidays or preferences:
- Vegan Paw Prints: Substitute the butter with vegan stick butter and use an egg replacement (like flax eggs or a commercial binder). Ensure your peanut butter and chocolate chips are also vegan-certified.
- Gluten-Free Version: Replace the all-purpose flour with a high-quality 1:1 gluten-free baking blend that includes xanthan gum. You may need to slightly increase the liquid (add 1 teaspoon of milk) if the dough seems too dry, as GF flours are highly absorbent.
- Different Toes: Instead of mini chocolate chips, try pressing small white chocolate chips, butterscotch chips, or even M&M’s (great for themed colors!) into the dough for the toes.
- Chocolate Paw Pads: For a twist, roll small balls of chilled chocolate fudge or even store-bought chocolate frosting instead of peanut butter for the center pad.
For more inspiration and visual variations on these and other fantastic cookie designs, be sure to visit our Pinterest page for baking ideas!
Nutritional Values and Benefits of Peanut Butter Paw Print Cookies
While these Peanut Butter Paw Print Cookies are undoubtedly a treat, they do offer some surprising nutritional advantages thanks to the main ingredient: peanut butter. Understanding the breakdown of this delicious dessert can help you enjoy them mindfully.
Estimated Nutritional Breakdown (Per Cookie)
Please note: These values are approximations based on the ingredients used and the yield of approximately 36 cookies. For exact figures, professional analysis is required.
| Nutrient | Approximate Value |
|---|---|
| Calories | ~180–200 kcal |
| Total Fat | ~10–12 g |
| Saturated Fat | ~4–5 g |
| Cholesterol | ~20 mg |
| Sodium | ~110 mg |
| Total Carbohydrates | ~20–25 g |
| Dietary Fiber | ~1 g |
| Total Sugars | ~15 g |
| Protein | ~4–5 g |
Benefits of Peanut Butter (In Moderation)
The high quantity of peanut butter in these cookies isn’t just for flavor; it provides valuable macronutrients:
- Excellent Source of Protein: Peanut butter is famously packed with protein (around 4-5 grams per cookie in this recipe). Protein is essential for muscle repair and keeping you feeling fuller longer, making these cookies a more satiating treat compared to standard sugar cookies.
- Healthy Fats: Peanut butter primarily contains monounsaturated and polyunsaturated fats, which are considered heart-healthy fats when consumed in moderation.
- Vitamins and Minerals: Peanuts are a good source of B vitamins (like Niacin/B3) and Vitamin E, which is a powerful antioxidant. They also contain magnesium, which is important for bone health and muscle function.
- Mental Health Benefits of Baking: Beyond the physical nutrition, the act of baking these charming Peanut Butter Paw Print Cookies is a wonderful form of self-care. It engages the senses, reduces stress, and provides a rewarding, tangible product, boosting creativity and mood.
These Peanut Butter Paw Print Cookies, while sweet, are a delightful indulgence that provides a good dose of protein and healthy fats, making them a balanced treat in your rotation.
FAQs about Peanut Butter Paw Print Cookies
Can I freeze the dough for Peanut Butter Paw Print Cookies?
Yes, the dough freezes exceptionally well. Roll the dough into balls as directed, place them on a baking sheet, and flash freeze them for one hour. Once firm, transfer the balls to a freezer-safe bag or container and store them for up to 3 months. To bake, place the frozen balls on a prepared sheet and add 2–3 minutes to the baking time. The paw print decoration should still be added immediately after removal from the oven.
What is the best type of peanut butter to use for this recipe?
It is highly recommended to use smooth, commercial creamy peanut butter (such as Jif, Skippy, or Peter Pan). Natural peanut butter, which separates oil, has a thinner consistency and a higher fat content which can cause the cookies to spread too much and become greasy. The stabilizers in commercial varieties ensure the cookies hold their thick, chewy shape perfectly.
Why are my Peanut Butter Paw Print Cookies flat?
Flat cookies are usually caused by too much softened fat or too little flour. Ensure your butter is only slightly softened, not melted. You must also measure your flour correctly by spooning it into the measuring cup and leveling it off. If the problem persists, try chilling the dough for 30 minutes before scooping and baking to help solidify the fats.
Can I use milk chocolate chips instead of mini chocolate chips for the “toes”?
Absolutely! You can use any type of small chocolate chip you prefer, including milk chocolate, dark chocolate, or even white chocolate. We suggest using mini chips as they are more proportional to the size of the paw pad, giving a neat, delicate look to the finished Peanut Butter Paw Print Cookies.
How do I store these cookies to keep them soft?
Store fully cooled Peanut Butter Paw Print Cookies in an airtight container at room temperature. To help maintain moisture and keep them extra soft, try adding half a slice of plain bread inside the container. The cookies will absorb moisture from the bread, maintaining that delightful chewy texture for up to a week.
Conclusion: Baking the Perfect Batch of Peanut Butter Paw Print Cookies
The simple joy derived from a homemade cookie is magnified tenfold when that cookie is as charming as these Peanut Butter Paw Print Cookies. We have walked through every essential step, from mastering the creamy, rich dough base to executing the perfect, timely decoration that makes these treats so memorable.
What makes this recipe truly special is the dedication to achieving a superior texture chewy, thick, and profoundly peanut buttery paired with an easy-to-create design that captivates both children and adults. Whether you are seeking a comforting snack to enjoy with a cup of coffee or a novel treat for your next gathering, these cookies deliver on every promise of flavor and fun. Remember the key takeaways: use commercial peanut butter for structure, don’t overmix the dough, and decorate while the cookies are piping hot to ensure adhesion of the adorable paw prints.
Now that you have the detailed guide and the secrets to baking success, it’s time to preheat your oven and enjoy the delightful aroma of baking peanut butter filling your kitchen. We encourage you to try this recipe for Peanut Butter Paw Print Cookies today. They are guaranteed to leave a lasting, positive impression! We love hearing about your baking adventures feel free to drop a comment below and let us know how your batch of soft, chewy, and cute paw print treats turned out! Happy baking!


