There are sugar cookies, and then there are Chewy Sugar Cookies. If your experience with sugar cookies has been limited to those dry, crumbly disks that shatter upon biting, prepare yourself for a culinary revolution. This recipe guarantees a profound depth of flavor and a texture that is truly irresistible: beautifully soft, plush centers framed by just a hint of golden crispness around the edges.
Sugar cookies are often seen as a simple, foundational bake, but mastering the balance between soft and structural is a subtle art. Our secret lies in two key components: a blend of white and brown sugars for moisture and depth, and an extra egg yolk to boost richness and tenderness. Forget the rolling pins and complicated decorations for a moment this is the recipe you turn to when pure, unadulterated comfort is the goal. Whether you need a quick weekday treat, a stellar base for holiday decorating, or just a cookie that genuinely satisfies that dessert craving, these Chewy Sugar Cookies are your new holy grail. Get ready to bake the best sugar cookie you’ve ever tasted!
This comprehensive guide will walk you through the precise techniques necessary to achieve cookie perfection, ensuring every batch comes out thick, golden, and wonderfully chewy. We’ll cover everything from proper ingredient preparation to troubleshooting common baking errors, guaranteeing you’ll become a master of the perfect Chewy Sugar Cookies.
Why You’ll Fall Head Over Heels for These Chewy Sugar Cookies (The Irresistible Texture)
What makes a sugar cookie transcend its basic classification? It’s the texture. Many recipes yield a cookie that is either too cakey or too flat and crunchy. This recipe for Chewy Sugar Cookies hits that elusive sweet spot, offering multiple sensory pleasures in every bite. This unique combination of texture and flavor is precisely why this recipe becomes a permanent staple in countless kitchen repertoires.
A Symphony of Texture and Flavor
First and foremost, the chewiness factor is unmatched. We are specifically engineering these cookies to stay soft days after baking, thanks to crucial ingredient ratios, which we will discuss in detail later. When you pull these Chewy Sugar Cookies from the oven, they appear slightly puffy, maintaining a substantial height. As they cool, the centers settle just enough to create that delightful, dense chew that makes them truly addictive. They don’t dry out immediately; instead, they develop a butterscotch-like depth due to the inclusion of brown sugar, setting them apart from standard, one-note sugary treats.
Secondly, these cookies offer unmatched versatility. While they are phenomenal simply rolled in granulated sugar giving them that sparkling, crackly crust they also provide the perfect canvas for customization. Are you baking for the holidays? These cookies hold up beautifully to light icing or sprinkles. Are you looking for a comforting fall treat? Try adding a dash of nutmeg or replacing some of the vanilla extract with almond extract for a subtle, sophisticated twist. Their robust structure, achieved by chilling the dough, ensures they don’t crumble when handled, making them ideal for dipping in milk or even pairing with a festive drink, perhaps a Sugar Cookie Martini during the holiday season.
This recipe is also incredibly reliable. Consistency is paramount in baking, and the precise measurements provided here, coupled with the detailed technique, virtually eliminate failure. There is no guesswork involved; simply follow the steps for perfectly thick, soft, and Chewy Sugar Cookies every time. If you’ve struggled with cookies spreading too thin or burning too quickly, this process which emphasizes the chilling and proper creaming solves those common issues.
Finally, the sheer comfort these cookies provide is reason enough to try them. Sugar cookies evoke nostalgia, reminding us of childhood baking sessions and simple pleasures. Elevating that classic memory with a superior, professional-quality texture makes this recipe a true winner. When you hand someone one of these homemade, perfectly soft Chewy Sugar Cookies, you are offering them a hug in cookie form. This is more than just a recipe; it’s a guaranteed crowd-pleaser and a staple for any serious home baker seeking the best possible sugar cookie experience.
The Secret to Baking the Perfect Batch of Soft and Chewy Sugar Cookies
Achieving a truly chewy sugar cookie isn’t accidental; it’s a direct result of understanding the fundamental roles of key ingredients and utilizing smart techniques. If you want consistently soft results that resist turning crispy, pay close attention to the following chemical and physical properties we leverage in this perfect Chewy Sugar Cookies formula.
Ingredient Science and the Chew Factor
The primary difference between a flat, crisp cookie and a thick, soft one lies in the moisture content and the ratio of fats to sugars.
1. The Power of Brown Sugar
Unlike traditional recipes that rely solely on granulated white sugar, we incorporate a significant portion of packed light brown sugar (1/4 cup). Why is this critical? Brown sugar contains molasses, which is naturally acidic and hygroscopic (meaning it attracts and retains moisture). This molasses is the secret ingredient for maintaining that plush, moist center, resulting in the desired Chewy Sugar Cookies texture. The acid in the brown sugar also slightly tenderizes the gluten, further contributing to a softer bite. Granulated sugar, while necessary for spreading and structure, tends to dry out the cookie faster, leading to crispiness.
2. The Extra Egg Yolk (Fat is Flavor and Texture)
This recipe calls for one large egg PLUS an extra large egg yolk. Egg yolks are almost pure fat and emulsifiers. Adding an extra yolk without the corresponding white (which is mostly water and protein) increases the overall fat content of the dough. High-fat content inhibits gluten development, keeping the texture tender. Furthermore, the extra fat provides richness and promotes a gorgeous golden color around the edges without over-baking the center. This simple addition is one of the most effective tricks for baking moist, Chewy Sugar Cookies.
3. Creaming Technique
The way you mix the butter and sugar the creaming process defines the final structure of the cookie. When you beat softened butter with sugar for 3 to 4 minutes, the sugar crystals cut into the butter, creating tiny air pockets. This process is called aeration. These pockets trap steam during baking, giving the cookies their initial lift and ensuring they remain thick and slightly puffy. If you under-cream, the cookies will be dense; if you over-cream, they can collapse or spread excessively. Aim for a mixture that is truly light, fluffy, and pale yellow.
Technique Matters: Controlling the Spread
To ensure our Chewy Sugar Cookies bake up thick instead of thin and flat, we use two essential techniques:
1. The Chill Time
Chilling the dough for at least 30 minutes is non-negotiable for achieving thick, soft sugar cookies. Chilling does two things: it solidifies the butter, making it slower to melt in the hot oven, and it allows the flour to fully hydrate. When the butter stays solid longer, the cookie spreads less, maintaining its height and thickness. This directly correlates to a thicker, chewier final product. Skipping this step often results in flat, overly crispy cookies.
2. Minimal Mixing of Flour
Once you add the flour, your goal is to mix as little as possible. Flour contains proteins that form gluten when agitated and mixed with liquid. Developing too much gluten turns cookies tough, chewy in a bad way (leathery), and dense. We reduce the risk of overmixing by stopping the mixer when flour streaks are still visible, and then finishing the combining process gently by hand with a rubber spatula. This delicate approach is essential for soft, melt-in-your-mouth Chewy Sugar Cookies.
By focusing on these principles the molasses in brown sugar, the richness of the extra yolk, precise creaming, and strategic chilling you are setting yourself up for guaranteed success with the ultimate Chewy Sugar Cookies recipe.
Ingredients and Essential Tools for Making Delicious Chewy Sugar Cookies
Success in baking hinges on preparation. Having your ingredients measured precisely and at the correct temperature, along with the right tools, will make the process smooth and enjoyable. This section details exactly what you need and why each component is crucial for your perfect batch of soft, Chewy Sugar Cookies.
Precise Quantities: The Foundation of Perfect Chewiness
We need to pay specific attention to the moisture levels and leavening agents to ensure maximum chewiness. Remember, precision is key!
- 2 3/4 cups All-Purpose Flour: Use the “spooned and leveled” method. Scooping directly from the bag compacts the flour, adding too much weight, resulting in dry, dense cookies. Spoon the flour into your measuring cup and level it off with a straight edge. Flour provides the necessary structure.
- 1 teaspoon Baking Powder: This provides the lift (leavening) for the cookies, ensuring they are slightly puffy and thick, which is critical for that chewy center.
- 1/2 teaspoon Salt: Essential for balancing the sweetness and enhancing the overall flavor of the butter and vanilla. Don’t skip it!
- 1 cup (2 sticks) Unsalted Butter: Must be softened to true room temperature. If the butter is too cold, it won’t cream properly, leading to a dense cookie. If it’s melted or greasy, the cookie will spread excessively. Unsalted butter allows you to control the total salt content.
- 1 cup Granulated White Sugar: Provides structure, aids in creaming, and gives the cookies their classic “sugar cookie” sweetness and crisp shell when rolled.
- 1/4 cup Packed Light Brown Sugar: As discussed, this is the secret weapon for moisture retention and chewiness, thanks to the molasses content. Ensure it is tightly packed when measuring.
- 1 large Egg: Acts as a binder and contributes moisture. Ensure this, along with the extra yolk, is also at room temperature for better emulsification.
- 1 large Egg Yolk: The star ingredient for enhanced richness, tenderness, and chewiness (less water, more fat).
- 1 Tablespoon Milk: A little extra liquid is required to keep the dough moist and aids in combining the ingredients, contributing to a smoother, pliable dough texture.
- 1 teaspoon Vanilla Extract: Use high-quality pure vanilla extract for the best flavor profile.
- 1/4 cup Granulated White Sugar (for rolling the dough): This is used externally to create that beautiful, sparkling crust when baked.
Essential Tools for Chewy Sugar Cookie Success
Having the right equipment can drastically improve the consistency and quality of your cookies. Investing in a few key items will make baking these Chewy Sugar Cookies a breeze:
The Mixing Station: Stand Mixer vs. Hand Mixer
While you can certainly make this dough by hand, a mixer is highly recommended, especially for the crucial creaming step.
- Stand Mixer with Paddle Attachment: (Highly Recommended) This provides consistent power necessary for beating the butter and sugars for the required 3-4 minutes until truly fluffy. The paddle attachment prevents incorporating too much air too quickly, unlike a whisk attachment.
- Large Mixing Bowl and Hand Mixer: A viable alternative if you don’t own a stand mixer. Just be prepared to dedicate your time to holding the mixer steady during the full creaming process.
Measuring and Prep Tools
- Digital Kitchen Scale: While the recipe uses volumetric measurements, a scale is the gold standard for accuracy, especially when measuring flour (target weight for 2 3/4 cups AP flour is approximately 330-340 grams).
- Rubber Spatula: Absolutely necessary for scraping down the sides of the bowl during creaming and, most importantly, for gently folding in the remaining dry ingredients at the end to prevent over-mixing.
- Wire Whisk: For combining the dry ingredients thoroughly before adding them to the wet mixture.
Baking and Cooling Essentials
- Parchment Paper or Silicone Baking Mats: (Non-Negotiable) These prevent sticking and promote even baking. Silicone mats (like Silpat) are reusable and provide excellent insulation for the bottom of the cookies, preventing overly browned bottoms while keeping the centers soft.
- Light-Colored Baking Sheets: Darker metal sheets absorb and retain heat faster, often leading to burnt bottoms. Use light-colored, heavy-duty aluminum sheets for the most consistent baking temperature.
- 1.5 Tablespoon Cookie Scoop: (The Key to Uniformity) Using a scoop ensures every cookie is the same size, guaranteeing they all bake evenly. Uniformity is crucial for hitting that 8-11 minute perfect bake time. This size yields beautifully large, bakery-style Chewy Sugar Cookies.
- Wire Cooling Rack: Essential for allowing air to circulate around the cookies immediately after they come off the baking sheet, preventing steam buildup that can ruin the crispness of the edges.
By preparing your space and ensuring all ingredients, especially the butter and eggs, are at room temperature, you are setting the stage for a flawless batch of the best Chewy Sugar Cookies you’ve ever baked. This detailed approach is what separates a good sugar cookie from a truly great one.
Detailed Step-by-Step Guide: How to Bake Chewy Sugar Cookies Like a Professional
Follow these instructions precisely to maximize the soft, chewy texture. Every step, from preparation to cooling, plays a vital role in achieving cookie perfection.
Step 1: Preparation and Combining Dry Ingredients (Mise en Place)
Goal: Prepare your workspace and ensure dry ingredients are evenly distributed.
- Preheat: Preheat your oven to 350°F (175°C). Temperature accuracy is crucial; consider using an oven thermometer to verify.
- Prepare Pans: Line two large, light-colored baking sheets with parchment paper or silicone baking mats. This prevents sticking and ensures easy removal.
- Whisk Dry Ingredients: In a medium bowl, whisk together the measured 2 3/4 cups of all-purpose flour (remember: spooned and leveled!), 1 teaspoon of baking powder, and 1/2 teaspoon of salt. Thoroughly whisking prevents pockets of leavening agent or salt and ensures consistent rise. Set this mixture aside.
Step 2: Creaming the Fats and Sugars (The Aeration Stage)
Goal: Incorporate air into the butter and sugar mixture to create a light, fluffy base that will prevent the cookies from spreading too flat.
- Combine Fats and Sugars: Place the softened 1 cup of butter, 1 cup of granulated white sugar, and the 1/4 cup of packed light brown sugar into the bowl of a stand mixer fitted with the paddle attachment.
- The Creaming Process: Beat the mixture together on medium speed for a full 3 to 4 minutes. This is the single most important step for achieving a thick, soft cookie. The mixture should dramatically change in appearance, becoming significantly lighter in color (pale yellow) and fluffy in texture.
- Scrape Down: Stop the mixer halfway through and scrape down the sides and bottom of the bowl using your rubber spatula to ensure everything is evenly incorporated.
⭐ Practical Tip: If your butter is too cold, the mixture will look lumpy and dense after 4 minutes. If your butter is too warm, the mixture might look greasy. Room temperature is paramount!
Step 3: Adding Wet Ingredients (Emulsification)
Goal: Incorporate the high-moisture/high-fat components without disrupting the air pockets created during creaming.
- Add Liquids: Add the large egg, the extra egg yolk, 1 tablespoon of milk, and 1 teaspoon of vanilla extract to the creamed butter/sugar mixture.
- Mix Carefully: Beat on medium-low speed until the ingredients are just combined. This usually takes about 30 seconds to 1 minute. Do not overmix at this stage. Overmixing here can cause the emulsion to break, leading to separation. Scrape down the sides of the bowl once more.
Step 4: Combining Wet and Dry Ingredients (Gluten Control)
Goal: Introduce the flour mixture while minimizing gluten development to ensure a tender final texture.
- Slow Addition: Reduce the mixer speed to the absolute lowest setting. Gradually add the dry ingredient mixture (from Step 1) to the wet ingredients in 2 or 3 additions.
- Stop Early: Mix only until the flour streaks have almost disappeared. The dough will look shaggy and slightly incomplete.
- Finish by Hand: Stop the mixer immediately. Use a rubber spatula to gently fold in the remaining dry ingredients by hand. This manual folding prevents developing too much gluten, which can make the finished Chewy Sugar Cookies tough. The final dough should be uniform but not overworked.
For more great comfort recipes, check out this classic: Creamy Corn Pudding Casserole.
Step 5: Chilling the Dough (The Thickness Insurance)
Goal: Solidify the fats to prevent spreading during baking, guaranteeing thick, Chewy Sugar Cookies.
- Cover and Chill: Cover the bowl containing the finished dough tightly with plastic wrap.
- Refrigerate: Chill the dough in the refrigerator for a minimum of 30 minutes. If you are short on time, 15 minutes in the freezer works in a pinch. If chilling longer than 2 hours, allow the dough to sit at room temperature for 10 minutes before scooping, as it will become quite hard.
Step 6: Shaping and Rolling (The Sparkly Crust)
Goal: Create uniform dough balls coated in sugar for texture and visual appeal.
- Prepare Rolling Sugar: Place the remaining 1/4 cup of granulated white sugar into a small, shallow bowl.
- Scoop: Scoop the chilled dough using a 1.5 tablespoon cookie scoop. Roll the scooped dough between your palms to form neat balls approximately 1.5 inches in diameter.
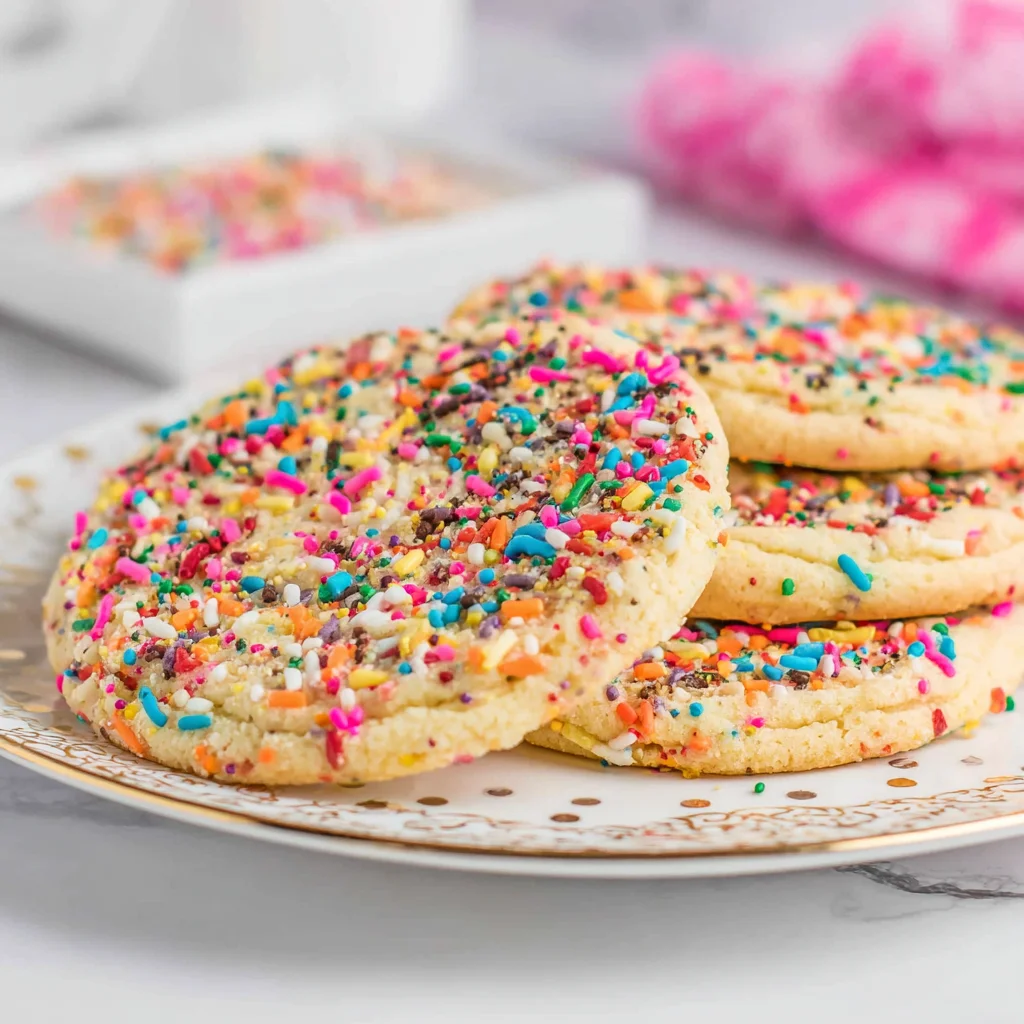
- Roll: Roll each dough ball thoroughly in the bowl of sugar until it is completely coated. This step adds texture and that signature sparkle to your Chewy Sugar Cookies.
Step 7: Baking to Perfection (The Underbake Secret)
Goal: Bake until the edges are set but the center remains slightly undercooked for ultimate chewiness.
- Placement: Place the sugar-coated dough balls onto the prepared baking sheets, spacing them about 2 inches apart. Do not press them down.
- Bake Time: Bake one sheet at a time (this ensures consistent heat and better results) for 8 to 11 minutes at 350°F (175°C).
- Checking for Doneness: The cookies are ready when the edges are lightly golden brown and set, but the centers still look slightly soft, puffy, and perhaps a touch underdone. Do not wait for the centers to look fully set or dry. This slight underbake is the secret to a truly chewy result.
Step 8: Cooling and Storing
Goal: Ensure the cookies finish setting up correctly and maintain their soft texture.
- Sheet Cooling: Remove the baking sheets from the oven. Let the cookies cool on the sheet for 5 minutes. This crucial rest period allows the residual heat to finish cooking the centers without drying them out.
- Rack Cooling: Carefully transfer the slightly cooled Chewy Sugar Cookies to a wire rack using a spatula to cool completely.
- Storage: Once completely cool, store the cookies in an airtight container at room temperature for up to 5 days. For long-term storage, they can be frozen (see Tips section).
Tips, Troubleshooting, and Variations for the Best Sugar Cookie Recipe
Now that you have the core recipe down, let’s explore how to customize, troubleshoot, and adapt these Chewy Sugar Cookies for any occasion or dietary preference.
Troubleshooting Common Cookie Mistakes
My Cookies Spread Too Much!
This is the most frequent issue. Here are the likely culprits and how to fix them:
- Butter Temperature: The butter was too soft or melted. If your kitchen is warm, chill the dough for 45-60 minutes instead of 30.
- Chilling Step Skipped: The dough must be chilled. If you skipped Step 5, the butter melted immediately, causing the spread.
- Too Much Flour: Though less common with this recipe, if you didn’t spoon and level your flour, too much butter/sugar ratio can cause spread. Invest in a digital scale for ultimate precision.
- Oven Temperature: If your oven runs cool, the cookies take longer to set, allowing them more time to spread. Verify your oven temperature!
My Cookies are Cakey, Not Chewy!
If your cookies resemble a dense mini-cake, you likely added too much flour or over-baked them. Remember, under-baking slightly is essential for Chewy Sugar Cookies. If the centers look fully dry or firm in the oven, you’ve gone too far. Next time, pull them out 1-2 minutes earlier.
Ingredient Alternatives and Flavor Boosts
This recipe provides a fantastic base, but don’t hesitate to experiment once you’ve mastered the classic Chewy Sugar Cookies.
Gluten-Free Variation
For gluten-free Chewy Sugar Cookies, substitute the all-purpose flour with a high-quality 1:1 gluten-free baking blend that contains xanthan gum. You might need to add an extra tablespoon of milk or slightly reduce the chilling time, as GF flours tend to absorb moisture differently. The texture remains surprisingly close to the original!
Vegan Adaptation
To make this recipe plant-based, substitute the dairy butter with a high-quality vegan butter stick (avoid margarine tubs, as the water content is too high). For the egg/egg yolk: use a flax egg (1 Tbsp flax meal + 3 Tbsp water per egg) or commercial egg replacer for the large egg. Omit the extra yolk, or substitute it with 1 teaspoon of cornstarch mixed with 1 tablespoon of milk alternative for binding and thickening. Use a non-dairy milk alternative (like almond or oat milk) for the tablespoon of milk.
Flavor Variations (Elevating Your Chewy Sugar Cookies)
These simple additions can transform the profile:
- Almond Delight: Substitute 1/2 teaspoon of the vanilla extract with 1/2 teaspoon of almond extract for a delicate, marzipan-like flavor.
- Citrus Zest: Add 1 tablespoon of finely grated lemon or orange zest during the creaming stage. The oils release beautifully into the dough, resulting in bright, zesty Chewy Sugar Cookies.
- Cinnamon Roll Cookies: Instead of rolling the dough in plain sugar, mix 1/2 teaspoon of ground cinnamon into the rolling sugar before coating.
For bakers who love to customize, these cookies are as perfect for the holiday season as our Christmas Thumbprint Cookies (External Link to Pinterest).
Storage Tips and Make-Ahead Magic
Storing Baked Cookies: Ensure the Chewy Sugar Cookies are completely cool before storing. Keep them in an airtight container at room temperature. To maintain freshness and chewiness, you can add half a slice of sandwich bread to the container; the cookies will absorb the bread’s moisture, keeping them softer longer. Change the slice of bread every few days.
Freezing Dough: This dough freezes beautifully! Shape the dough balls (Step 6) and place them on a parchment-lined tray. Freeze until solid (about 2 hours), then transfer the frozen dough balls to a freezer-safe zip-top bag. They can be stored for up to 3 months. When ready to bake, roll them in sugar while frozen and bake, adding 2-4 minutes to the original bake time (do not thaw).
Nutritional Insights: Understanding Your Homemade Chewy Sugar Cookies
While home-baked goods are certainly treats, understanding the components of these Chewy Sugar Cookies allows for mindful enjoyment. Since this is a homemade recipe, specific nutritional data requires laboratory testing, but we can analyze the components and benefits provided by the whole ingredients used.
Disclaimer: The following nutritional analysis provides estimated values based on standard USDA data for the ingredients used. Values are highly dependent on the size of the cookie scoop (1.5 Tbsp) and preparation method.
Estimated Nutritional Values (Per 1.5 Tbsp Cookie)
| Component | Estimated Value | Benefit/Role |
|---|---|---|
| Calories | Approx. 130 – 160 kcal | Source of immediate energy |
| Total Fat | Approx. 7g – 9g | Essential for fat-soluble vitamin absorption; flavor and texture (from butter and yolk) |
| Saturated Fat | Approx. 4g – 5g | Contributes to the cookie’s structure and mouthfeel |
| Carbohydrates | Approx. 18g – 22g | Primary energy source (from flours and sugars) |
| Sugar | Approx. 12g – 15g | Sweetness, browning, and structure |
| Protein | Approx. 1.5g – 2g | Small contribution from flour and eggs |
The Benefits of Quality Ingredients in Chewy Sugar Cookies
The beauty of baking from scratch is the control you maintain over ingredient quality. By using whole, identifiable components, you avoid the preservatives and artificial flavors found in store-bought cookies.
1. High-Quality Fats (Butter and Egg Yolk)
We use unsalted butter, which provides a rich source of Vitamin A, necessary for immune function and vision. The fat content is crucial, not just for the soft texture of the Chewy Sugar Cookies, but also because dietary fats provide a slow-release energy source, making these treats satiating. The egg yolk contributes choline, which is important for brain health, and additional fat-soluble vitamins.
2. Energy and Fuel (Flour and Sugars)
The primary role of the flour and sugars is to provide energy (calories). Carbohydrates are the body’s preferred fuel source. While cookies are a high-carb treat, the combination of complex carbs (flour) and simple sugars provides both immediate sweetness and sustained energy, making them excellent recovery snacks or enjoyable indulgences. The brown sugar, thanks to its molasses content, offers trace minerals like iron and calcium, though in small amounts.
3. The Role of Leavening
Baking powder is a leavening agent that helps the cookie dough rise. It consists of a combination of an acid and sodium bicarbonate. When activated by moisture and heat, it releases carbon dioxide gas, which creates those small air pockets we discussed earlier. This process ensures the Chewy Sugar Cookies have the volume necessary to hold their soft center structure.
Enjoying homemade Chewy Sugar Cookies is all about moderation and quality. Knowing exactly what goes into your dessert allows you to appreciate the richness and flavor of the carefully balanced ingredients, turning a simple sweet treat into a satisfying homemade delight. For another rich, high-quality dessert option, consider our Fudgy Chocolate Brownie Cookies.
Frequently Asked Questions About Baking Chewy Sugar Cookies
Why are my sugar cookies dry instead of chewy sugar cookies?
The primary reason cookies turn out dry is over-baking. For truly chewy sugar cookies, you must pull them out of the oven when the edges are set and golden, but the centers still look soft and slightly underdone. Additionally, measuring too much flour (by scooping instead of spooning and leveling) can drastically reduce the dough’s moisture content.
Can I skip the chilling step for these Chewy Sugar Cookies?
Skipping the chilling step is highly discouraged. Chilling the dough solidifies the butter, which prevents the cookies from spreading too quickly in the oven. Without chilling, these Chewy Sugar Cookies will likely spread too thin, resulting in a crispy, flat texture rather than the thick, chewy center desired.
What is the role of brown sugar in this Chewy Sugar Cookies recipe?
The 1/4 cup of light brown sugar is essential for chewiness. Brown sugar contains molasses, which adds moisture, depth of flavor, and helps the cookies retain softness longer than if only white sugar were used. It also contributes to the beautiful, slightly golden edge.
How should I store leftover Chewy Sugar Cookies to maintain softness?
Store cooled Chewy Sugar Cookies in an airtight container at room temperature. For an extra tip to maintain ultimate softness, place half a slice of plain white bread inside the container; the bread’s moisture will be absorbed by the cookies, keeping them fresh and tender for several days.
Can I use cookie cutters with this particular Chewy Sugar Cookies dough?
This recipe is designed for thick, drop-style Chewy Sugar Cookies and has a higher moisture content than typical cutout cookie recipes. If you want to use cutters, you may need to add an extra 1/4 cup of flour to the dough and chill it for at least 2 hours until it is very firm. Be aware the cookies may still puff up more than a traditional flat cutout cookie.
Conclusion: Your New Favorite Chewy Sugar Cookies
You have now unlocked the secrets to baking the ultimate Chewy Sugar Cookies. This recipe is a testament to the fact that small adjustments namely the strategic use of brown sugar, the richness of an extra egg yolk, and the mandatory chilling period can elevate a classic dessert to an entirely new level of perfection. Gone are the days of dry, bland sugar cookies; you now possess the formula for treats that boast thick, soft centers and just the right amount of sugary crispness.
We’ve covered everything: the exact ratios necessary for the perfect spread, the importance of proper creaming to incorporate necessary air, and the critical step of under-baking to seal in moisture and guarantee that irresistible chew. This isn’t just a recipe; it’s a baking blueprint designed for consistent success, whether you are a novice baker or a seasoned pro.
We highly encourage you to try this technique, especially if you have struggled with achieving a genuinely soft sugar cookie in the past. These Chewy Sugar Cookies are ideal for sharing, perfect for gifting, and absolutely necessary for satisfying that deep-seated need for comfort food. Don’t forget to explore our tips on variations from adding citrus zest to making them gluten-free to ensure this recipe can adapt to any occasion. If you love discovering new comfort desserts, make sure to check out our recipe for Apple Crumble Pie.
Bake a batch today, share your results, and let us know in the comments how much you enjoyed the unparalleled chewiness of these remarkable Chewy Sugar Cookies!
CHEWY SUGAR COOKIES RECIPE
Ingredients
Equipment
Method
- Preparation and Dry Ingredients: Preheat your oven to 350°F (175°C). Line two large baking sheets with parchment paper or silicone baking mats. In a medium bowl, whisk together the all-purpose flour, baking powder, and salt. Set the bowl aside.
- Creaming the Fats and Sugars: In the bowl of a stand mixer fitted with the paddle attachment, or using a large bowl and a hand mixer, beat the softened butter, 1 cup of granulated white sugar, and the 1/4 cup of light brown sugar together on medium speed until the mixture is light, fluffy, and pale yellow, about 3 to 4 minutes. Stop the mixer halfway through to scrape down the sides of the bowl.
- Adding Wet Ingredients: Add the large egg, the extra egg yolk, milk, and vanilla extract to the creamed mixture. Beat on medium-low speed until the ingredients are just combined, scraping down the sides as necessary. Be careful not to overmix at this stage.
- Combining Wet and Dry: Reduce the mixer speed to low. Gradually add the dry ingredient mixture to the wet ingredients, mixing only until the flour streaks have almost disappeared. Stop the mixer just before the dough is fully combined; use a rubber spatula to fold in the remaining dry ingredients by hand to prevent developing too much gluten.
- Chilling the Dough: Cover the bowl with plastic wrap and chill the dough in the refrigerator for 30 minutes. This mandatory step helps the cookies hold their shape and ensures a thick, chewy texture.
- Shaping and Rolling: Place the remaining 1/4 cup of granulated white sugar into a small, shallow bowl. Scoop the chilled dough using a 1.5 tablespoon cookie scoop (or roll balls approximately 1.5 inches in diameter). Roll each dough ball in the bowl of sugar until it is completely coated.
- Baking: Place the sugar-coated dough balls onto the prepared baking sheets, spacing them about 2 inches apart. Bake one sheet at a time for 8 to 11 minutes. The cookies are done when the edges are lightly golden brown and the centers still look slightly soft or puffy. For max chewiness, do not overbake.
- Cooling and Storing: Remove the baking sheets from the oven and let the cookies cool on the sheet for 5 minutes before carefully transferring them to a wire rack to cool completely. Store airtight at room temperature for up to 5 days.


