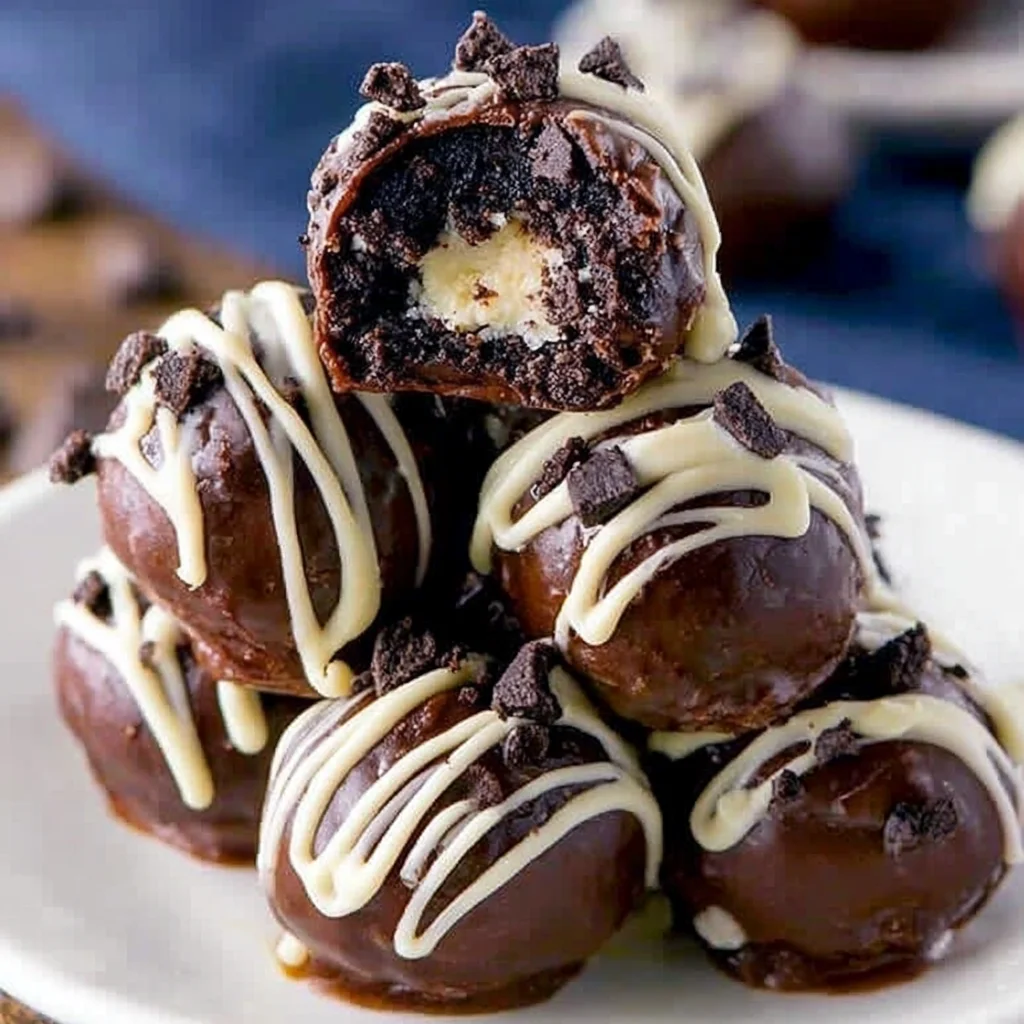
Welcome to the easiest, most crowd-pleasing dessert recipe you will ever encounter. We are talking about the mythical combination of convenience and decadence: the 3-Ingredient No-Bake Oreo Balls. If you’ve been searching for a recipe that requires absolutely zero baking skills, minimal clean-up, and delivers maximum flavor impact, stop right here. These incredible little truffles often called Oreo Truffles are rich, creamy, and coated in a snap-perfect layer of chocolate. They are the definition of a foolproof treat, perfect for holiday gatherings, casual snacking, or satisfying that late-night chocolate craving. Forget complicated desserts; with just three simple ingredients (Oreos, cream cheese, and chocolate), you can create approximately 40 delicious, gourmet-quality treats that will disappear as quickly as you make them. Trust us, once you make these 3-Ingredient No-Bake Oreo Balls, they will become a permanent staple in your kitchen repertoire.
This recipe is not just about simplicity; it’s about transformation. Taking the classic, recognizable flavor of the Oreo cookie and elevating it into a rich, dense truffle texture. The cream cheese binds the fine crumbs into a luxurious, almost fudge-like interior, perfectly contrasted by the crisp, sweet exterior of the chocolate shell. Whether you’re a seasoned baker or someone who rarely ventures into the kitchen, the process for making these 3-Ingredient No-Bake Oreo Balls is entirely straightforward and nearly impossible to mess up. Get ready to impress everyone with this quick-fix masterpiece!
—
PREP TIME: 15 Minutes
CHILL TIME: 1 Hour (Minimum)
YIELD: Approximately 40-45 balls
—
Why You’ll Fall Head Over Heels for These 3-Ingredient No-Bake Oreo Balls
In the expansive world of desserts, few recipes manage to strike the perfect balance between gourmet indulgence and sheer, effortless convenience. These 3-Ingredient No-Bake Oreo Balls manage to do both spectacularly. They are more than just a quick snack; they are a customizable, versatile foundation for dozens of dessert ideas. If you need convincing to add this to your weekly rotation, consider these compelling reasons why this recipe earns its spot as a dessert superstar.
Unbeatable Simplicity and Speed
The foremost reason to adore this recipe is its astonishing simplicity. As the name suggests, you only need three core ingredients. There’s no measuring flour, no kneading dough, and crucially, no oven required. The entire hands-on process, from crushing the cookies to rolling the mixture, takes less than 20 minutes. This makes them ideal for last-minute party preparations or when you need a speedy treat without committing hours to the kitchen. For comparison, while traditional baking often involves rising times, cooling periods, and intricate frosting steps, these 3-Ingredient No-Bake Oreo Balls ask only for a bit of chilling time before the final glamorous dip.
A Flavor That Everyone Loves
Oreos are universally beloved. By combining them with the tangy richness of cream cheese, you create a flavor profile that is both familiar and unexpectedly sophisticated. The cream cheese cuts through the sweetness of the cookies, preventing the balls from tasting overly sugary. The result is a dense, creamy center reminiscent of the finest fudge or chocolate no-bake truffles. They appeal to kids and adults alike, making them the ultimate democratic dessert choice for any gathering.
Perfectly Portable and Giftable
Because these truffles are stable once the chocolate shell sets, they are incredibly easy to transport. They hold up well in a cool environment, making them fantastic treats for potlucks, bake sales, or packing into lunch boxes. Furthermore, when arranged in decorative tins or cellophane bags, these 3-Ingredient No-Bake Oreo Balls transform into beautiful, thoughtful gifts. Homemade gifts are always special, and the rich, dark appearance of these truffles elevates them far beyond their simple construction.
Year-Round Versatility
While often popular during the Christmas and holiday seasons (check out our specific seasonal version Christmas Oreo Balls), these treats can be adapted for any time of year simply by changing the chocolate coating or decorations. Use white chocolate and pastel sprinkles for spring events, dark chocolate and sea salt for an elegant dinner party, or even theme them for holidays like Halloween or Valentine’s Day. They require no seasonal ingredients, meaning the base recipe for these amazing 3-Ingredient No-Bake Oreo Balls is ready whenever the mood strikes.
The Undeniable Reasons You Should Try This Quick Recipe Today
If the simplicity and delicious flavor haven’t quite convinced you yet, let’s delve into why making these 3-Ingredient No-Bake Oreo Balls should move to the top of your to-do list. This isn’t just a recipe; it’s a guaranteed kitchen win, suitable for every level of cooking expertise and every occasion life throws at you.
A True “No-Fail” Experience
For those who feel intimidated by baking where oven temperatures, yeast activation, and precise timings can make or break a dish this recipe offers liberation. Because there is no baking involved, the risk of common cooking failures (like burning, sinking, or undercooking) is entirely eliminated. The most complicated step is melting the chocolate, which is easily managed with a microwave and careful stirring. If your dough is too sticky, you add more crumbs. If it’s too dry, you add a splash of milk or soft butter. It is truly a forgiving recipe, resulting in beautifully smooth, uniform truffles every single time. This is the perfect entry point for beginner bakers or a relaxing project for seasoned cooks.
Ideal for Engaging the Whole Family
The process of creating these 3-Ingredient No-Bake Oreo Balls involves several fun, sensory steps that are perfect for involving children. Crushing the Oreos (either in a food processor or a plastic bag with a rolling pin) is a satisfying task. Rolling the dough into balls is akin to playing with edible clay, and the final step of dipping and decorating is where creativity shines. This recipe moves beyond mere consumption and becomes a memorable, shared kitchen activity, creating treats and happy memories simultaneously.
Cost-Effective Indulgence
Compared to buying gourmet truffles or complicated ingredients, the base components for these Oreo balls are very affordable and widely accessible. A package of Oreos, a block of cream cheese, and a bag of melting chocolate are the only purchases required. This makes the 3-Ingredient No-Bake Oreo Balls an excellent choice for those needing to produce a large volume of high-quality treats on a budget, such as for large parties, school functions, or community events.
Mastering the Art of Chilling
One key skill this recipe reinforces is the critical importance of chilling in no-bake desserts. While you might be tempted to rush the process, the mandatory chill time (at least 60 minutes) is what transitions the sticky dough into a firm, rollable, and dip-ready canvas. Understanding this temperature control is a fundamental element in mastering many easy dessert techniques, particularly those involving cream cheese or butter, and this recipe provides a perfect, low-stakes environment to practice that patience.
These reasons combine to make the 3-Ingredient No-Bake Oreo Balls not just a delightful dessert, but a smart choice for efficiency, enjoyment, and guaranteed success. They truly are the quick-prep hero of the dessert world.
Everything You Need: Ingredients and Essential Utensils
The magic of the 3-Ingredient No-Bake Oreo Balls lies in the short ingredient list. Quality matters, however, particularly with the cream cheese and the chocolate coating, as they define the texture and final flavor. Let’s break down exactly what you need and the best tools to ensure perfection.
The Three Magical Ingredients
Achieving the rich, dense texture of these truffles depends entirely on using the correct quantity and quality of these three components.
1. Oreo Sandwich Cookies (14.3 oz package)
- Quantity: One standard package (usually around 36 cookies).
- Recommendation: We highly recommend starting with the original flavor Oreos. They provide the classic chocolate-vanilla contrast that works perfectly with the cream cheese.
- Why this works: Crucially, you must include the creamy filling when crushing the cookies. This filling contains fats and sugars that help the dough bind together smoothly and adds necessary moisture to the mixture.
- Preparation Note: Remember to reserve about 1/4 cup of the crushed cookies for decoration before mixing them with the cream cheese if you plan on garnishing the truffles.
2. Cream Cheese (8 oz block)
- Quantity: One standard 8-ounce block.
- Requirement: This ingredient must be fully softened to room temperature. This is a non-negotiable step for truly smooth 3-Ingredient No-Bake Oreo Balls. Cold cream cheese will result in a lumpy, difficult-to-mix dough.
- Recommendation: Use full-fat block cream cheese, not the whipped variety, which has too much air and moisture content, potentially making the dough too soft.
- Function: The cream cheese acts as the binding agent, transforming the dry cookie crumbs into a rich, truffle-like dough.
3. Dipping Chocolate (16 ounces)
- Quantity: Approximately 16 ounces. This amount is usually sufficient for coating the entire batch of 40–45 balls.
- Options: You have several choices here:
- Melting Wafers/Candy Melts: These are specifically designed for dipping and melt beautifully without seizing, requiring no tempering.
- Almond Bark: A cost-effective, easy-to-melt choice that provides a firm shell.
- High-Quality Chocolate Chips/Bars: If using standard chocolate chips or baking bars, you may need to add a teaspoon of coconut oil or shortening to the mixture to ensure the chocolate melts thinly and smoothly for easier dipping.
- Flavor Variation: Milk chocolate, dark chocolate, or white chocolate all work wonderfully. Choose your preference, or mix and match for contrast!
Necessary Kitchen Tools for Success
While the ingredient list is short, the proper tools ensure efficiency and a professional finish for your 3-Ingredient No-Bake Oreo Balls.
H4: Processing and Mixing Equipment
- Food Processor: This is the most critical tool for Step 1. A good food processor will pulverize the Oreos into uniform, “flour-like” crumbs in seconds. This consistency is essential for the dough to bind properly. If you don’t have one, a sturdy sealable plastic bag and a rolling pin are the next best alternatives, though this requires more effort to ensure all chunks are eliminated.
- Large Mixing Bowl: Necessary for combining the crumbs and cream cheese.
- Rubber Spatula or Sturdy Wooden Spoon: Ideal for mixing, especially if the dough gets very stiff, which it should. An electric hand mixer on low speed can also be used, but be careful not to overwork the dough.
H4: Shaping and Chilling Tools
- Small Cookie Scoop (1 tablespoon size): Using a scoop ensures that all your 3-Ingredient No-Bake Oreo Balls are uniform in size, making the dipping process easier and the final presentation cleaner.
- Baking Sheet(s): You will need a large, flat surface to place the rolled balls.
- Parchment Paper or Wax Paper: Absolutely essential for lining the baking sheet. This prevents the chilled balls from sticking before dipping and keeps the finished, chocolate-coated truffles from adhering to the tray while they set.
H4: Dipping and Finishing Tools
- Microwave-Safe Bowl: For melting the dipping chocolate. A bowl that is deep but narrow works best for dipping, as it allows the chocolate to pool, ensuring a thorough coating.
- Chocolate Dipping Tools:
- Dipping Fork: A spiral or specialized chocolate dipping fork is highly recommended as it allows excess chocolate to drain away quickly and neatly.
- Standard Forks or Toothpicks: If you don’t have a dipping fork, two standard forks (used simultaneously) or a sturdy toothpick can work, but you must work quickly to avoid excess chocolate buildup.
Preparation is key, and having these simple tools and the right ingredients ensures your experience making these 3-Ingredient No-Bake Oreo Balls is smooth, fast, and successful.
Mastering the Method: Detailed Instructions for the 3-Ingredient No-Bake Oreo Balls
While the instructions are simple, paying attention to the details of each step especially temperature and consistency will guarantee you achieve perfectly textured truffles every time.
Step 1: Crushing the Oreos to Powder
- Preparation: Open the package of Oreos. If you desire a topping of crumbs on your finished truffles, set aside about 6 cookies (or 1/4 cup of crushed crumbs) before processing the rest.
- Processing: Place the remaining Oreo cookies, including the creamy filling, into a large food processor. Secure the lid.
- Pulse to Perfection: Pulse the processor continuously until the cookies are finely ground. The goal here is a consistency similar to flour or fine sand. There should be absolutely no large chunks or pieces remaining. Any large piece will destabilize the dough and make the rolling step difficult.
- Transfer: Pour the finely crushed Oreo crumbs into your large mixing bowl.
Tip: If using the bag and rolling pin method, ensure you seal the bag tightly and crush thoroughly. A few moments spent here preventing chunks will save you frustration during mixing.
Step 2: Mixing the Dough (The Binding Magic)
- Add Cream Cheese: Add the entire 8-ounce block of fully softened, room-temperature cream cheese directly into the bowl with the Oreo crumbs.
- Combine Thoroughly: Using your sturdy mixing tool (spatula, spoon, or electric mixer on low), begin folding and mixing the ingredients. At first, the mixture will look crumbly, but continue mixing until the cream cheese is fully distributed.
- Form the Dough: Continue mixing until a thick, uniform, dark dough forms. The dough should be sticky, but firm enough to hold its shape easily when pressed. This mixture should be stiff and uniform in color, almost like dark play-dough.
Crucial Trick: If your cream cheese wasn’t soft enough, you might notice small white lumps. Keep mixing, or use the warmth of your hands to briefly knead the dough until the lumps disappear. If the dough seems too soft or sticky (perhaps due to warm weather), add a couple more teaspoons of finely crushed dry Oreo crumbs.
Step 3: Scooping, Rolling, and the Essential Chill
- Portioning: Use a small cookie scoop (about 1 tablespoon) to portion the dough. Consistency in size is key for uniform dipping later.
- Rolling: Roll each portion firmly between the palms of your hands to create a smooth, dense ball. Pressing firmly helps keep the balls from crumbling later.
- Lining the Tray: Place the finished 3-Ingredient No-Bake Oreo Balls onto a baking sheet lined with parchment or wax paper.
- Chill Time: Place the entire baking sheet into the refrigerator and chill for a minimum of 60 minutes. Chilling is absolutely vital. If the balls are warm or soft, they will fall apart, melt, or leave crumbs in the warm melted chocolate during dipping. If you’re preparing these ahead of time, they can chill for up to 24 hours.
Step 4: Preparing the Dipping Chocolate
- Melting: Place your dipping chocolate (wafers, bark, or melts) in a deep, microwave-safe bowl.
- Heating: Heat in the microwave using short bursts 30-second intervals only. Stir thoroughly after each interval. Chocolate retains heat, so it’s crucial to rely on the residual heat to finish the melting process.
- Smooth Finish: Continue heating and stirring until the chocolate is completely smooth and lump-free. Do not overheat, as scorched chocolate will seize and become unusable.
- Thinning (Optional but Recommended): If the melted chocolate seems too thick or gloppy, stir in 1 teaspoon of coconut oil or vegetable shortening. This slightly thins the chocolate, creating a much thinner, cleaner, and faster-setting coating.
Step 5: Dipping the 3-Ingredient No-Bake Oreo Balls
Work quickly during this step, and keep the majority of the truffles chilled until you are ready to dip them.
- The Dip: Remove only a small batch (about 10–12 balls) from the fridge at a time. Using a specialized dipping fork or two standard forks, carefully submerge one cold Oreo ball into the melted chocolate. Turn it gently to ensure it is fully coated.
- Draining Excess: Lift the ball out and tap the dipping tool lightly on the edge of the bowl. This allows the excess chocolate to drip off. Draining the excess ensures a thin, professional-looking shell and prevents puddles of chocolate around the base.
- Setting: Return the dipped 3-Ingredient No-Bake Oreo Ball to the parchment-lined baking sheet.
Step 6: Decorate and Set
- Immediate Decoration: If you are using toppings (reserved Oreo crumbs, sprinkles, sea salt), apply them immediately while the chocolate coating is still wet. If you wait even a minute, the chocolate will start to set, and the decorations won’t adhere.
- Repeat: Continue the dipping and decorating process until all your chilled 3-Ingredient No-Bake Oreo Balls are coated.
- Final Set: Allow the dipped truffles to set completely. This can be done at cool room temperature (2–3 hours) or, much faster, by placing the baking sheet back into the refrigerator for 15–20 minutes until the chocolate shell is firm to the touch.
Storage: Once set, transfer the finished truffles to an airtight container. They must be stored in the refrigerator, where they will keep beautifully for up to 1 week. For longer storage, see our tips below.
Tips, Troubleshooting, and Delicious Variations
One of the best features of these simple 3-Ingredient No-Bake Oreo Balls is how easily they can be customized. However, even the simplest recipes can run into snags. Here are the best tips for variations and troubleshooting common issues.
Troubleshooting Common Issues
H4: My Dough is Too Sticky
If your Oreo and cream cheese mixture is too sticky to roll smoothly, it usually means your cream cheese was too warm or you used slightly less cookie product than needed (sometimes packages vary). The fix is easy: add 1-2 tablespoons of additional fine Oreo crumbs (pulverized without the filling, if possible) or a tablespoon of powdered sugar. Mix this in until the dough firms up enough to roll without sticking heavily to your palms.
H4: My Chocolate Seized (Turned Thick and Grainy)
Chocolate seizes when it gets too hot or when a tiny bit of water/liquid is introduced. If using melting wafers/almond bark, overheating is usually the culprit. Always melt in short bursts and stir frequently. If your chocolate does seize, sometimes you can salvage it by stirring in a spoonful of shortening or coconut oil, or for advanced repair, a spoonful of hot vegetable oil, stirring vigorously until smooth. If using standard chocolate chips, you might need to use a double boiler for more controlled heat.
H4: The Chocolate Coating Is Too Thick
A thick coating can overwhelm the truffle and make it difficult to drain smoothly. If your chocolate is too thick, melt in 1/2 teaspoon increments of coconut oil, shortening, or high-quality vegetable oil. This thins the viscosity, making the chocolate run smoothly off the truffles, resulting in a thin, elegant shell.
Exciting Variations to Elevate Your Truffles
The base recipe for 3-Ingredient No-Bake Oreo Balls is perfect, but it’s also highly adaptable. Try these delicious twists:
- Flavor Infusion: Add 1/2 teaspoon of pure vanilla extract, peppermint extract, or almond extract to the cream cheese mixture before combining. For a festive treat, peppermint extract pairs perfectly with dark chocolate.
- Peanut Butter Cream Cheese: For a richer, nuttier flavor, swap out 1-2 tablespoons of cream cheese for creamy peanut butter. This creates a decadent peanut butter truffle flavor base. This technique is similar to our Peanut Butter Oat Balls, but far richer.
- Red Velvet Oreo Balls: Use the limited-edition Red Velvet Oreos for a beautiful red interior and a slightly tangy flavor. Coat them in white chocolate for maximum visual impact.
- Vegan/Dairy-Free Options: Today, there are excellent vegan cream cheese alternatives and vegan-friendly Oreos (check labels, as some varieties are not vegan). Use a dairy-free melting chocolate to create a delicious, ethical version of these 3-Ingredient No-Bake Oreo Balls.
- Themed Decorations: Get creative with toppings!
- For elegance, drizzle a contrasting chocolate color (white chocolate drizzle over dark coating).
- For crunch, use finely chopped pecans, almonds, or walnuts.
- For fun, use brightly colored sprinkles (find more topping ideas on our Pinterest for more decorating inspiration).
- For savory contrast, sprinkle a tiny pinch of flaky sea salt immediately after dipping.
Freezing for Long-Term Storage
These truffles freeze incredibly well. Once the chocolate coating is completely set, place the balls in a single layer in a freezer-safe, airtight container (or stack them with parchment paper separating layers). They can be frozen for up to 3 months. Thaw them overnight in the refrigerator before serving.
Nutritional Insight and Ingredient Benefits
When indulging in a rich dessert like the 3-Ingredient No-Bake Oreo Balls, it’s natural to wonder about their composition. While these truffles are undeniably an indulgent treat, understanding the key components can offer a balanced perspective on their place in your diet. Please note that exact nutritional values will vary based on the specific brand of Oreos, cream cheese, and dipping chocolate used, particularly if choosing full-fat versus low-fat options or different chocolate types (milk vs. dark).
Estimated Nutritional Breakdown (Per 2 Balls, Standard Size)
| Nutrient | Approximate Value |
|---|---|
| Calories | 180–220 kcal |
| Total Fat | 12–15 g |
| Saturated Fat | 7–9 g |
| Carbohydrates | 20–25 g |
| Sugar | 15–20 g |
| Protein | 2–3 g |
Disclaimer: These values are estimations. For precise data, ingredients should be calculated using a nutritional tracker.
The Role of Each Ingredient
H4: Oreo Cookies (Carbohydrates and Energy)
Oreo cookies, being primarily flour and sugar, provide the bulk of the recipe’s carbohydrates and calories. They are an immediate source of energy. Consumed in moderation, they satisfy the craving for a sweet, comforting, and recognizable flavor. The small fiber content comes mostly from the cookie structure.
H4: Cream Cheese (Fats and Texture)
Cream cheese is essential for binding and texture. It contributes saturated fats and adds a rich, luxurious creaminess that is characteristic of a high-quality truffle.
Benefits of using full-fat cream cheese include:
- Improved Satiety: The fat content helps keep you feeling satisfied.
- Vitamin Absorption: Fats are crucial for the absorption of fat-soluble vitamins (A, D, E, K), though cream cheese contains these only in small amounts.
- Flavor Depth: The slight tang of the cream cheese balances the intense sweetness of the cookies and chocolate.
H4: Dipping Chocolate (Antioxidants and Mood Boost)
The benefits derived from the chocolate largely depend on the type you use. If you opt for dark chocolate melts (70% cocoa or higher), you gain additional benefits:
- Antioxidants: Dark chocolate is packed with powerful antioxidants, such as flavonoids, which help fight free radicals in the body.
- Minerals: Dark chocolate contains beneficial minerals like iron, magnesium, copper, and manganese.
- Mood Elevation: Chocolate contains compounds that can trigger positive emotions, making this indulgence a genuine “feel-good” dessert. Even milk and white chocolate provide the psychological comfort of a sweet treat.
Serving Size and Moderation
Like any rich dessert, 3-Ingredient No-Bake Oreo Balls are best enjoyed in moderation. Because they are intensely rich and dense, a serving size of one or two truffles is often enough to satisfy a strong sweet craving. They are designed to be decadent bites, perfect for enjoying alongside a cup of coffee or as a finisher to a light meal. Knowing exactly what goes into these quick-prep treats allows you to enjoy them fully and mindfully.
Frequently Asked Questions (FAQs) about 3-Ingredient No-Bake Oreo Balls
How long do 3-Ingredient No-Bake Oreo Balls last?
Once fully coated and set, these Oreo truffles must be stored in an airtight container in the refrigerator. They typically remain fresh and delicious for up to 1 week. For longer storage, they can be frozen for up to 3 months.
Can I use low-fat cream cheese in this recipe?
Yes, you can use low-fat (Neufchatel) cream cheese, but be aware that it contains more moisture than the full-fat block. You may need to add an extra tablespoon or two of finely crushed Oreo crumbs to the mixture to achieve the necessary stiff, rollable consistency. Always ensure it is fully softened regardless of the fat content.
Why do I need to chill the Oreo balls before dipping?
Chilling is absolutely crucial. It causes the cream cheese mixture to firm up completely, allowing the balls to hold their perfect spherical shape. If you dip warm or soft balls into warm chocolate, they will melt, crumble, and leave undesirable crumbs in your coating chocolate.
What is the best type of chocolate for dipping?
The best options are high-quality candy melts, melting wafers, or almond bark. These coatings contain stabilizers that ensure a smooth melt and a hard, quick-setting shell without needing complex tempering, leading to a much better finish for your 3-Ingredient No-Bake Oreo Balls.
Can I make 3-Ingredient No-Bake Oreo Balls gluten-free?
Absolutely! Many brands now offer certified gluten-free versions of chocolate sandwich cookies that are structurally identical to Oreos. Simply substitute the standard Oreos with the gluten-free variety, and follow the remaining steps exactly.
Conclusion: Your New Go-To No-Bake Treat
The journey to creating these spectacular 3-Ingredient No-Bake Oreo Balls is a testament to the fact that the most delicious treats often require the least effort. From the satisfying crunch of pulverizing the cookies to the smooth, meditative process of rolling and dipping, this recipe is as enjoyable to make as it is to eat. We’ve established that with just three widely available ingredients Oreos, cream cheese, and dipping chocolate you can produce 40+ decadent, professional-looking truffles that are guaranteed to earn rave reviews.
Remember the key takeaways for success: ensure your cream cheese is fully softened for a lump-free dough, commit to that crucial 60-minute chill time to prevent melting, and melt your chocolate slowly in short bursts. Once those steps are mastered, the rest is simple rolling and dipping, leaving you with a glorious tray of no-bake masterpieces.
These 3-Ingredient No-Bake Oreo Balls are perfect for beginners, excellent for gifting, and flexible enough for any occasion or dietary preference (with a few easy swaps). Next time you need a stunning dessert without the stress of an oven, turn to this reliable, foolproof recipe. We hope you dive into this project soon! If you try this recipe, we would absolutely love to hear about it. Please leave a comment below and share your favorite topping variations. Happy rolling!
3-Ingredient No-Bake Oreo Balls (Classic Oreo Truffles)
Ingredients
Equipment
Method
- Open the package of Oreos. Reserve 1/4 cup of the crushed cookies for decoration later, if desired. Place the remaining Oreo cookies, including the cream filling, into a large food processor and pulse until the cookies are finely ground into uniform, flour-like crumbs. If you do not have a food processor, use a rolling pin to crush them completely in a sealable bag. Pour the crumbs into a large mixing bowl.
- Add the fully softened, room-temperature cream cheese directly to the bowl containing the Oreo crumbs. Using a sturdy rubber spatula, wooden spoon, or electric hand mixer on low speed, mix the crumbs and cream cheese together until they are completely combined and a thick, uniform dark dough forms. Ensure there are no streaks of cream cheese remaining.
- Use a small cookie scoop (about 1 tablespoon in size) to portion the mixture. Roll each portion firmly between your palms to form smooth, uniform balls. Place the finished Oreo balls onto a large baking sheet lined with parchment paper or wax paper.
- Place the baking sheet into the refrigerator and chill the Oreo balls for at least 60 minutes (1 hour). Chilling is essential, as it helps the balls hold their shape and prevents them from falling apart when dipped in warm chocolate.
- Place the dipping chocolate in a microwave-safe bowl. Heat the chocolate in 30-second intervals, stirring thoroughly between each interval, until completely smooth, melted, and lump-free. Do not overheat the chocolate. If needed, add a small teaspoon of coconut oil or shortening to thin the chocolate slightly for easier dipping.
- Remove the chilled Oreo balls from the refrigerator (keep the remaining balls chilled while dipping). Using a chocolate dipping fork or two standard forks, carefully dip one Oreo ball into the melted chocolate, turning it gently until it is fully coated. Lift the ball out and tap the dipping tool lightly on the edge of the bowl to allow any excess chocolate to drip off. Return the dipped Oreo ball to the parchment-lined baking sheet.
- Immediately sprinkle the top of the wet chocolate coating with the reserved Oreo crumbs or any other desired topping (such as sprinkles, sea salt, or finely chopped nuts). Repeat the dipping process with all remaining Oreo balls.
- Allow the dipped balls to set completely at room temperature or speed up the process by placing the baking sheet back into the refrigerator for about 15–20 minutes, until the chocolate shell is firm to the touch.


