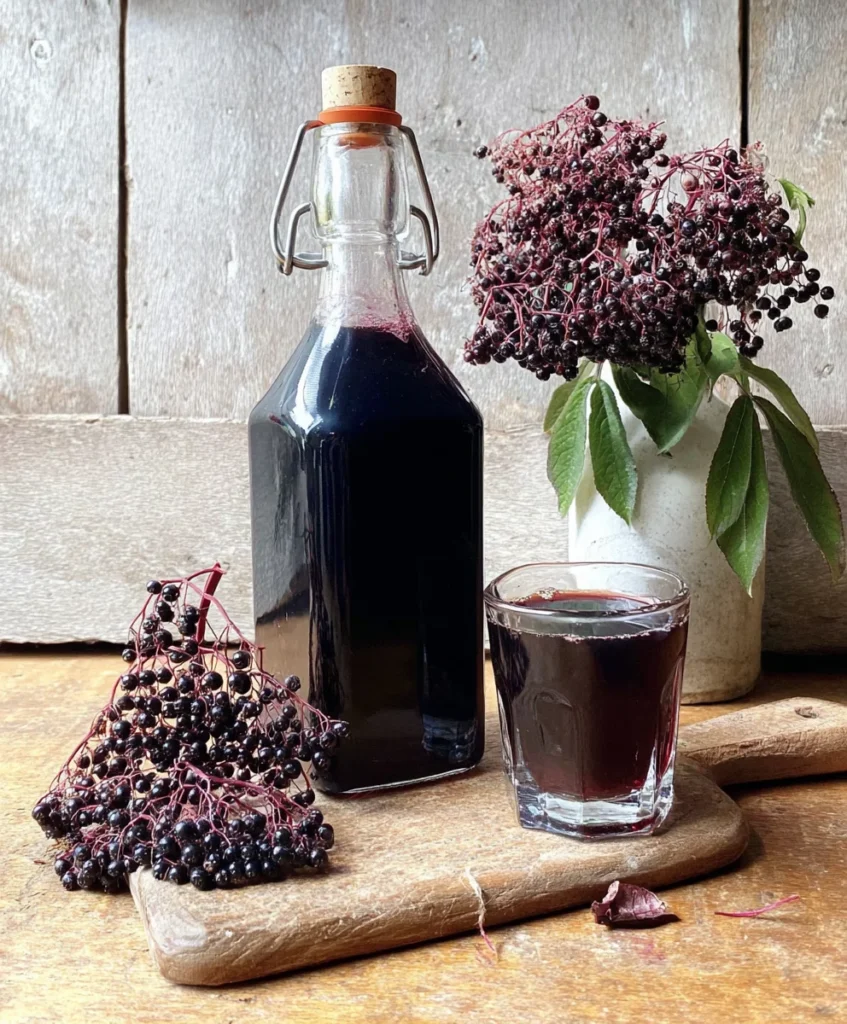
Elderberry syrup is not just a delightful addition to your pantry; it’s a powerhouse of health benefits too! This syrup, made from elderberries, has been used for centuries in traditional medicine for its immune-boosting properties. Whether you’re looking to ward off colds, soothe a sore throat, or simply enjoy a sweet and tangy treat, this homemade elderberry syrup recipe is perfect for you. In this article, we’ll explore why making your own elderberry syrup is a fantastic idea, the ingredients you’ll need, step-by-step instructions to create the syrup, and some tips and variations to make it your own. Get ready to dive into the world of elderberry syrup and discover why it’s a must-have in every kitchen!
Why You’ll Love This Recipe
There are countless reasons to love homemade elderberry syrup! First and foremost, it’s incredibly easy to make. With just three main ingredients dried elderberries, water, and honey you can whip up a batch in no time. The process is straightforward, making it a great project for novice cooks and seasoned chefs alike. Plus, the flavor is versatile; you can enjoy it on pancakes, in smoothies, or even as a soothing drink during cold seasons.
One of the standout features of elderberry syrup is its impressive health benefits. Elderberries are rich in antioxidants, vitamins, and minerals, particularly vitamin C, which is renowned for its immune-boosting capabilities. Consuming elderberry syrup regularly may help reduce the duration and severity of cold and flu symptoms. It’s a natural, safe alternative to over-the-counter remedies.
In addition to its health benefits, elderberry syrup is a delightful addition to various recipes. Use it as a sweetener in your morning oatmeal, drizzle it over yogurt, or mix it into cocktails for a unique twist. The possibilities are endless! You can also customize the flavor with spices like cinnamon and ginger, as well as a touch of vanilla, making it a truly personal creation.
Finally, making elderberry syrup at home allows you to control the ingredients and avoid unnecessary preservatives and additives found in store-bought versions. You can adjust the sweetness level to your liking, making it a healthier option for your family. With all these reasons, it’s clear why you’ll love this elderberry syrup recipe!
Why You Should Try This Recipe
Have you ever considered the importance of natural remedies in your health regimen? Elderberry syrup has gained popularity in recent years for its numerous benefits, and making it at home ensures you get the freshest and most potent version available. Here are more compelling reasons to try this easy elderberry syrup recipe:
- Natural Immunity Booster: Elderberries are packed with antioxidants and vitamins, making them a fantastic ally in boosting your immune system.
- Simple and Cost-Effective: Making elderberry syrup at home is much cheaper than purchasing it at a store, and it only requires a few ingredients.
- Customizable Flavors: You can experiment with various spices and sweeteners to create a syrup that suits your taste preferences perfectly.
- Versatile Usage: Elderberry syrup can be used in a variety of culinary applications, from desserts to beverages, giving you endless ways to enjoy its delicious flavor.
- Perfect for Family: This syrup is a great addition to your family’s health toolkit, especially during cold and flu season.
- A Fun Cooking Project: Making elderberry syrup can be a fun activity to do with kids or friends, teaching them about natural ingredients and cooking.
With all these benefits, trying your hand at making elderberry syrup is a no-brainer. You’ll find that it’s not only simple but also rewarding to create something so beneficial for your health.
Ingredients and Utensils Needed
To create the perfect elderberry syrup, you’ll need the following ingredients and utensils:
Ingredients
- 1 cup dried elderberries: This is the star ingredient; look for high-quality dried elderberries at health food stores or online.
- 4 cups water: Fresh, filtered water will yield the best flavor.
- 1 cup honey: Use raw or local honey for added health benefits. Adjust sweetness to your taste.
- 1 teaspoon cinnamon (optional): Adds warmth and depth to the syrup.
- 1 teaspoon ginger (optional): Offers a nice spicy kick and additional health benefits.
- 1 teaspoon vanilla extract (optional): Enhances the syrup’s flavor profile.
Utensils
- Medium saucepan: For boiling and simmering the elderberries.
- Fine-mesh strainer or cheesecloth: Essential for straining the syrup and removing the solids.
- Wooden spoon: For stirring the mixture.
- Measuring cups and spoons: To ensure accurate ingredient measurements.
- Clean glass bottle or jar: For storing your elderberry syrup.
Having these ingredients and utensils on hand will set you up for success as you embark on creating your homemade elderberry syrup. Plus, the process will be more enjoyable and efficient with everything organized!
Detailed Recipe Steps
Now that you have your ingredients and utensils ready, it’s time to dive into the step-by-step process of making elderberry syrup. Follow these detailed instructions for the best results:
- Combine the Ingredients: In a medium saucepan, combine 1 cup of dried elderberries and 4 cups of water. Make sure to stir to mix the ingredients properly.
- Bring to a Boil: Place the saucepan over medium-high heat and bring the mixture to a boil. Keep an eye on it to prevent overboiling.
- Simmer: Once boiling, reduce the heat to low and let the mixture simmer uncovered for about 30-45 minutes. This simmering process is essential as it extracts the flavor and nutrients from the elderberries. You’ll notice the liquid will reduce and become more concentrated.
- Cool Slightly: After simmering, remove the saucepan from heat and allow the mixture to cool slightly for about 10 minutes. This will make it easier to handle when straining.
- Strain the Mixture: Using a fine-mesh strainer or cheesecloth, strain the liquid into a clean bowl or jar. Press the berries down with a spoon to extract as much liquid as possible. Discard the solids, as they will no longer have flavor.
- Add Honey: While the strained liquid is still warm, add 1 cup of honey, stirring until fully dissolved. Taste and adjust the sweetness according to your preference. You can add more honey if you like it sweeter.
- Optional Flavor Additions: If desired, stir in 1 teaspoon of cinnamon, 1 teaspoon of ginger, and 1 teaspoon of vanilla extract. These spices will enhance the flavor of your syrup.
- Cool Completely: Allow the syrup to cool completely before transferring it to a clean glass bottle or jar. This step is crucial to prevent condensation and prolong shelf life.
- Store Your Syrup: Store the elderberry syrup in the refrigerator for up to 2-3 weeks. For longer shelf life, consider freezing it in ice cube trays for easy portioning.
By following these steps, you’ll have a beautiful, homemade elderberry syrup ready to enjoy in various ways. Remember, the key is to be patient during the simmering process to extract the most flavor and benefits from the elderberries!
Tips and Variations
While the basic elderberry syrup recipe is fantastic on its own, here are some tips and variations to consider for making it even better:
- Sweetener Alternatives: If you prefer a vegan option, you can substitute honey with agave syrup or maple syrup. Adjust the amount based on the sweetness of the alternative.
- Spice Variations: Experiment with other spices such as cloves or nutmeg for a unique flavor profile. You can also add fresh herbs like mint for a refreshing twist.
- Thickening Agents: If you want a thicker syrup, you can simmer it longer to reduce the liquid further. Alternatively, you can add a small amount of cornstarch mixed with cold water towards the end of the cooking process.
- Alcoholic Infusion: For an adult version, consider adding a splash of vodka or rum after removing the syrup from heat. This not only preserves the syrup but also adds depth to the flavor.
- Common Mistakes to Avoid: Ensure not to use raw elderberries. Always use dried or cooked elderberries to avoid potential toxicity. Also, be mindful of the simmering time; too short may result in a weak flavor, while too long can concentrate it too much.
These variations and tips can help you customize your elderberry syrup to suit your taste preferences and dietary needs. Enjoy experimenting with different flavors and ingredients!
Nutritional Values and Benefits
Understanding the nutritional benefits of your homemade elderberry syrup can help you appreciate its value even more. Here’s a breakdown of the nutritional content per tablespoon:
- Calories: 64
- Total Fat: 0g
- Sodium: 1mg
- Total Carbohydrates: 17g
- Dietary Fiber: 0g
- Sugars: 16g
- Protein: 0g
The health benefits of elderberries are well-documented. They are rich in vitamins A, B, and C, as well as antioxidants that help fight free radicals in the body. Regular consumption of elderberry syrup can support your immune system, reduce inflammation, and aid in respiratory health. The honey in the recipe also provides antibacterial properties and can soothe sore throats, making this syrup a powerhouse of wellness.
Frequently Asked Questions
What are the benefits of elderberry syrup?
Elderberry syrup is known for its immune-boosting properties, rich in antioxidants and vitamins, particularly vitamin C. It can help reduce the duration and severity of colds and flu.
How long does elderberry syrup last?
Homemade elderberry syrup can be stored in the refrigerator for up to 2-3 weeks. For longer storage, freeze it in ice cube trays.
Can I make elderberry syrup without honey?
Yes, you can use alternative sweeteners like agave syrup or maple syrup to make the syrup vegan-friendly.
How do I use elderberry syrup?
Elderberry syrup can be taken by the tablespoon as a supplement, added to teas or smoothies, or drizzled over pancakes and desserts.
Is elderberry syrup safe for children?
Yes, elderberry syrup is generally safe for children, but it’s always a good idea to consult with a pediatrician before introducing new supplements.
Conclusion
In conclusion, making your own elderberry syrup is a rewarding and beneficial project that not only enhances your culinary repertoire but also promotes health and wellness. With just a few ingredients and simple steps, you can create a delicious syrup that serves as a natural remedy for various ailments. Whether you enjoy it straight from the spoon or incorporated into your favorite recipes, elderberry syrup is sure to become a staple in your household.
We hope you give this elderberry syrup recipe a try! Your feedback is important to us, so feel free to leave a comment below sharing your experience or any variations you made. Don’t forget to share this recipe with your friends and family, and check out our other recipes for more delicious ideas. Happy cooking!
For more exciting recipes, visit our Pinterest page!
Explore more delicious dishes from our blog:

Homemade Elderberry Syrup
Ingredients
Equipment
Method
- In a medium saucepan, combine the dried elderberries and water. Bring to a boil over medium-high heat.
- Once boiling, reduce the heat to low and let the mixture simmer uncovered for about 30-45 minutes. Stir occasionally.
- After simmering, remove the saucepan from heat and allow the mixture to cool slightly.
- Using a fine-mesh strainer or cheesecloth, strain the liquid into a clean bowl or jar, pressing the berries to extract as much liquid as possible. Discard the solids.
- Add honey to the strained liquid while it is still warm, stirring until fully dissolved. Adjust the sweetness to your preference.
- If desired, stir in cinnamon, ginger, and vanilla extract for extra flavor.
- Allow the syrup to cool completely before transferring it to a clean glass bottle or jar.
- Store the elderberry syrup in the refrigerator for up to 2-3 weeks. For longer shelf life, consider freezing in ice cube trays.