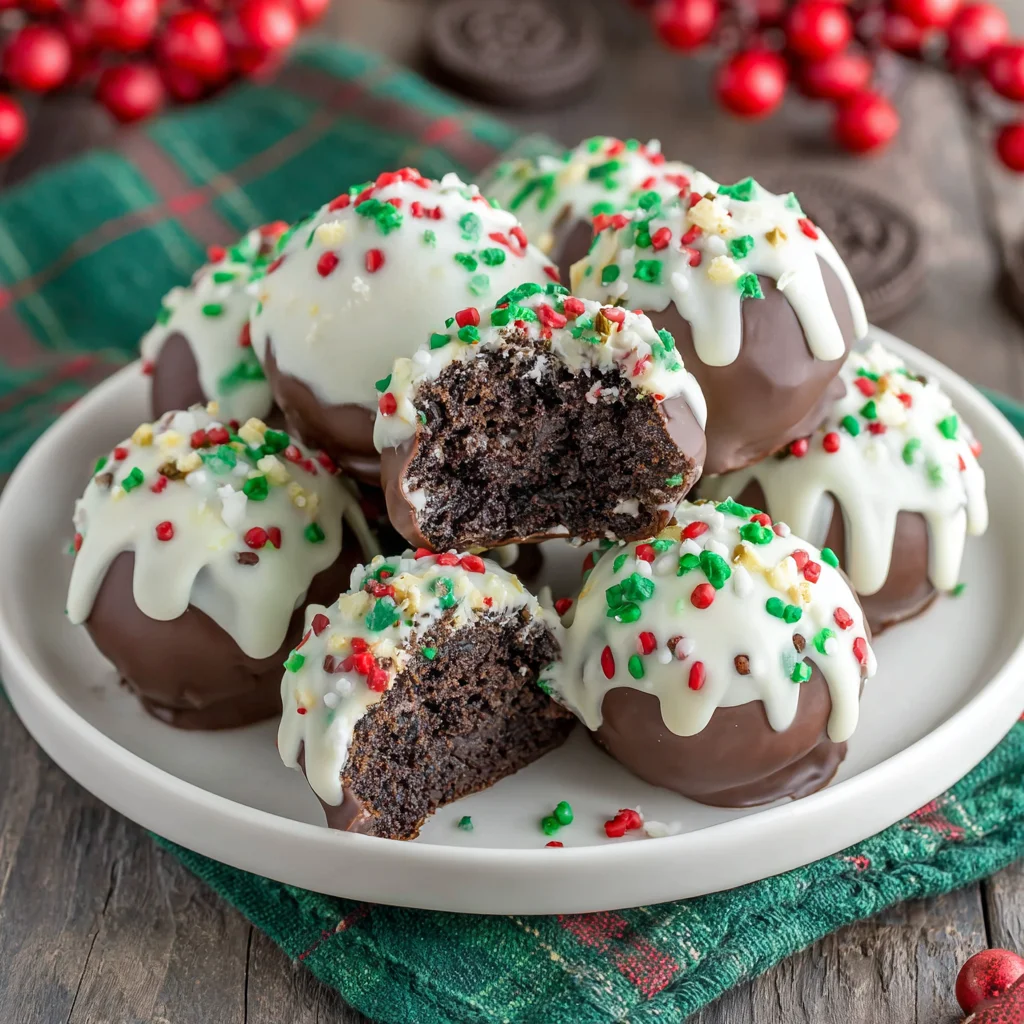
The holidays are a time for joyous gatherings, heartwarming traditions, and, of course, delicious treats! And what better way to add a touch of festive fun to your Christmas celebrations than with these irresistible Christmas Oreo Balls? These no-bake delights are surprisingly easy to make, requiring minimal effort while delivering maximum flavor and festive cheer. Imagine the look on your guests’ faces as they bite into these creamy, chocolate-covered Oreo balls, adorned with a vibrant Christmas-themed design. Whether you’re a seasoned baker or a kitchen novice, this recipe is guaranteed to impress. Get ready to create a holiday dessert sensation that will be the star of your Christmas spread! These Christmas Oreo Balls are the perfect addition to your holiday cookie trays, party platters, or even as a delightful little self-indulgence.
Why You’ll Love This Christmas Oreo Balls Recipe
This Christmas Oreo Balls recipe isn’t just another holiday dessert; it’s a delightful experience from start to finish. First and foremost, it’s incredibly easy. No oven is required, making it a perfect recipe for busy holiday schedules. The simple steps allow even novice bakers to create a show-stopping treat. This recipe is incredibly versatile, allowing for endless customization options to perfectly match your festive décor and personal preferences. Add sprinkles, festive candies, or even different colored chocolates to create unique and stunning Christmas Oreo Balls. The combination of creamy cream cheese, crunchy Oreos, and rich chocolate is simply heavenly, creating a delightful textural contrast that will leave you wanting more.
Beyond the ease and deliciousness, these Christmas Oreo Balls are also a fantastic way to get the whole family involved in the holiday baking fun. Kids will love participating in crushing the Oreos, rolling the dough into balls, and decorating the finished product. It’s a fun and engaging activity that fosters family bonding and creates lasting memories. Plus, imagine the pride your little ones will feel presenting their handcrafted treats to family and friends! Finally, these Christmas Oreo Balls are incredibly affordable to make, using ingredients readily available in most grocery stores. So you can enjoy a luxurious and festive dessert without breaking the bank.
These Christmas Oreo Balls also make excellent gifts! Beautifully packaged, these treats are perfect for neighbors, teachers, friends, or coworkers. They’re the perfect combination of delicious and festive, making them a truly memorable present for anyone who receives them. Moreover, their no-bake nature allows for last-minute gift preparation, removing the stress of complicated baking processes during the hectic holiday season.
Why You Should Try This Christmas Oreo Balls Recipe
In a world filled with complicated holiday baking recipes, this simple Christmas Oreo Balls recipe offers a refreshing alternative. It’s the perfect solution for those looking for a delicious, festive treat without the hassle of traditional baking. The no-bake nature significantly reduces preparation time, allowing you to spend more time enjoying the holiday season with loved ones instead of being stuck in the kitchen. It’s perfect for beginners and busy people alike.
The versatility of this recipe is another compelling reason to try it. You can customize the decoration to perfectly fit your holiday theme. Want a classic red and green design? Go for it! Prefer a more modern, minimalist look? That works too! The possibilities are endless. This allows you to create unique treats that truly reflect your personal style and preferences, ensuring your Christmas Oreo Balls stand out from the crowd. Moreover, the unique combination of flavors and textures creates an unforgettable culinary experience. The rich, creamy filling perfectly complements the crunchy Oreo base, creating a symphony of tastes that will leave you wanting more. The smooth, decadent chocolate coating adds a final touch of luxury to this already indulgent treat.
Beyond the taste and ease of preparation, making Christmas Oreo Balls provides a chance to create lasting memories. Get the kids involved in the preparation – it’s a fun and rewarding activity that will create a lasting bond and provide lots of laughs. Sharing the creation of these treats, followed by sharing them with others, enhances the overall festive experience.
Ingredients and Necessary Utensils for Christmas Oreo Balls
This section details the ingredients and tools needed to create the perfect batch of Christmas Oreo Balls. Accuracy is key to success, so carefully measure out your ingredients for the best results.
Ingredients:
- 1 package (16 ounces) Oreo cookies: The classic cookie provides the perfect base for these festive balls. You can experiment with different Oreo flavors, such as mint or double-stuffed, for a unique twist.
- 8 ounces cream cheese, softened: Softened cream cheese is crucial for a smooth and creamy filling. Ensure it’s at room temperature for optimal blending. Consider using reduced-fat cream cheese for a slightly healthier option.
- 12 ounces white chocolate chips: The base coating for your delicious balls. Choose high-quality chocolate chips for the best melt and flavor.
- 1/2 cup red candy melts: For a festive, Christmas touch. Look for candy melts specifically designed for melting and drizzling.
- 1/2 cup green candy melts: To complement the red candy melts for a classic Christmas color scheme.
- Sprinkles (optional): Add a dash of extra festive cheer! Choose Christmas-themed sprinkles for an extra touch of holiday magic.
- Milk (optional, 1 tsp at a time): If your mixture is too dry, add a teaspoon of milk at a time until it reaches the desired consistency.
Utensils:
- Food processor or rolling pin: For efficiently crushing the Oreo cookies. A food processor saves time, while a rolling pin offers a more hands-on approach.
- Medium bowl: To combine the crushed Oreos and cream cheese.
- Mixing spoon or spatula: For thoroughly blending the ingredients.
- Baking sheet: To hold the Oreo balls while chilling and setting.
- Parchment paper: To line the baking sheet, preventing sticking.
- Microwave-safe bowls (at least 3): For melting the chocolate and candy melts.
- Measuring cups and spoons: For precise measurements of ingredients.
- Spoon or small spatula: For dipping the Oreo balls in chocolate.
- Drizzling spoon or piping bag (optional): For creating decorative drizzles on the finished balls.
Detailed Recipe Steps for Christmas Oreo Balls
Follow these step-by-step instructions to create perfectly festive Christmas Oreo Balls.
Step 1: Crush the Oreos
The first step is to crush your Oreos into fine crumbs. You have two options here: a food processor or a rolling pin. If using a food processor, pulse the Oreos until they reach a fine, crumbly consistency. Be careful not to over-process; you don’t want Oreo dust! Alternatively, place the Oreos in a zip-top bag and crush them using a rolling pin. This method provides a more hands-on experience and is excellent for involving children in the process.
Step 2: Combine with Cream Cheese
In a medium bowl, add the crushed Oreos and the softened cream cheese. **Make sure your cream cheese is at room temperature**, otherwise, it will be difficult to mix. Use a mixing spoon or spatula to thoroughly combine the two ingredients until they form a dough-like consistency. If the mixture is too dry and difficult to work with, add a teaspoon of milk at a time until it becomes manageable. **Don’t add too much milk at once; start with small amounts.**
Step 3: Roll into Balls
Once the Oreo and cream cheese mixture is well combined, roll it into small, 1-inch balls. **Ensure the balls are relatively uniform in size** for even cooking and a visually appealing presentation. Place the balls on a baking sheet lined with parchment paper.
Step 4: Chill the Balls
Refrigerate the Oreo balls for at least 30 minutes. **This is a crucial step.** Chilling firms up the balls, making them easier to handle and preventing them from falling apart when dipped in chocolate.
Step 5: Melt the White Chocolate
While the Oreo balls are chilling, melt the white chocolate chips. Place the chips in a microwave-safe bowl. Microwave in 30-second intervals, stirring after each interval, until completely melted and smooth. **Avoid overheating**, as this can cause the chocolate to seize (become grainy and unusable). If necessary, you can use a double boiler for a gentler melting process.
Step 6: Dip the Balls
Once the Oreo balls are chilled, dip each ball into the melted white chocolate, ensuring it is fully coated. Gently tap off any excess chocolate. **Work quickly**, as the chocolate will start to set.
Step 7: Set the Balls
Place the chocolate-covered Oreo balls back onto the parchment-lined baking sheet.
Step 8: Melt the Candy Melts
Melt the red and green candy melts separately in microwave-safe bowls using the same method as the white chocolate. **Again, avoid overheating.**
Step 9: Decorate (Optional)
Once the white chocolate has set slightly (but is still a little tacky), drizzle the melted red and green candy melts over the Oreo balls in a festive pattern. Add sprinkles while the candy melts are still wet for extra sparkle. Get creative with your designs!
Step 10: Chill Again
Refrigerate the decorated Oreo balls for another 15-20 minutes to allow the chocolate to fully set.
Step 11: Enjoy!
Once set, your Christmas Oreo Balls are ready to enjoy! Store them in an airtight container in the refrigerator for up to a week.
Tips and Variations for Christmas Oreo Balls
Here are a few tips and variations to enhance your Christmas Oreo Balls experience:
- For a richer flavor: Use dark chocolate or milk chocolate instead of white chocolate.
- For a different festive look: Use different colored candy melts or edible glitter.
- Add some crunch: Incorporate chopped nuts, pretzels, or crushed candy canes into the Oreo mixture.
- For a vegan version: Use vegan cream cheese and vegan white chocolate chips. Make sure your sprinkles are also vegan.
- For a gluten-free version: Use gluten-free Oreo cookies.
- To avoid common mistakes: Ensure the cream cheese is softened to room temperature; otherwise, it will not blend well with the Oreo crumbs. Don’t overheat the chocolate while melting, or it will seize. Chill the Oreo balls thoroughly before dipping them in chocolate for a neat, clean finish.
Nutritional Values and Benefits of Christmas Oreo Balls
While Christmas Oreo Balls are undeniably indulgent, let’s explore their nutritional aspects. A single Oreo ball (approximately 1-inch diameter) will contain approximately 150-200 calories, depending on the specific ingredients used. The calorie count is primarily derived from the fat content of the cream cheese and chocolate, as well as the carbohydrates from the Oreos. Protein content will be relatively low, primarily from the cream cheese. Precise nutritional information will vary depending on the specific brands and types of ingredients used.
Despite the high calorie count, we can highlight some potential benefits of the ingredients. Cream cheese provides calcium and some protein. Oreos, while processed, contribute some energy for quick fuel. Dark chocolate, if substituted for white chocolate, offers antioxidants which can benefit heart health. However, it’s important to consume these treats in moderation as part of a balanced diet.
Remember that nutritional information is approximate and may vary. For detailed and accurate analysis, use a nutrition calculator with the specific ingredient brands you are using.
FAQs
How long do Christmas Oreo Balls last?
Can I make Christmas Oreo Balls ahead of time?
What kind of chocolate is best for dipping Christmas Oreo Balls?
Are there any variations for Christmas Oreo Balls?
Can I make these Christmas Oreo Balls gluten-free?
Conclusion
These Christmas Oreo Balls are the perfect holiday treat – simple to make, incredibly delicious, and endlessly customizable. They’re a fun project for the whole family, a delightful addition to your holiday spread, and a thoughtful homemade gift. So, gather your ingredients, get the family involved, and create a batch of these festive delights that are sure to be a hit with everyone! Don’t forget to share your Christmas Oreo Balls creations on social media and tag us – we’d love to see your festive masterpieces!
Have you tried this recipe? Let us know in the comments below! We’d love to hear about your experience and any variations you’ve created. And don’t forget to share this recipe with your friends and family – spread the holiday cheer (and the deliciousness!). Happy Holidays!
For more delicious holiday recipes, check out our other festive treats such as these Christmas Thumbprint Cookies and these Oreo Fudge. These are sure to be a hit at any holiday gathering!
Looking for more inspiration? Check out our Pinterest board for even more delicious recipes: Pinterest
Festive Christmas Oreo Balls
Ingredients
Equipment
Method
- Crush the Oreos: Pulse Oreos in a food processor until finely crushed. Alternatively, crush in a bag with a rolling pin.
- Combine with Cream Cheese: In a bowl, mix crushed Oreos and softened cream cheese until a dough forms. Add a teaspoon of milk at a time if needed.
- Roll into Balls: Roll the mixture into 1-inch balls and place them on a parchment-lined baking sheet.
- Chill: Refrigerate for at least 30 minutes to firm up.
- Melt White Chocolate: Melt white chocolate chips in a microwave-safe bowl in 30-second intervals, stirring until smooth.
- Dip and Set: Dip each Oreo ball in melted white chocolate, tapping off excess. Place back on the baking sheet.
- Melt Candy Melts & Decorate: Melt red and green candy melts separately. Drizzle over the slightly set white chocolate in a festive pattern. Add sprinkles if desired.
- Chill Again: Refrigerate for 15-20 minutes to set the chocolate completely.


