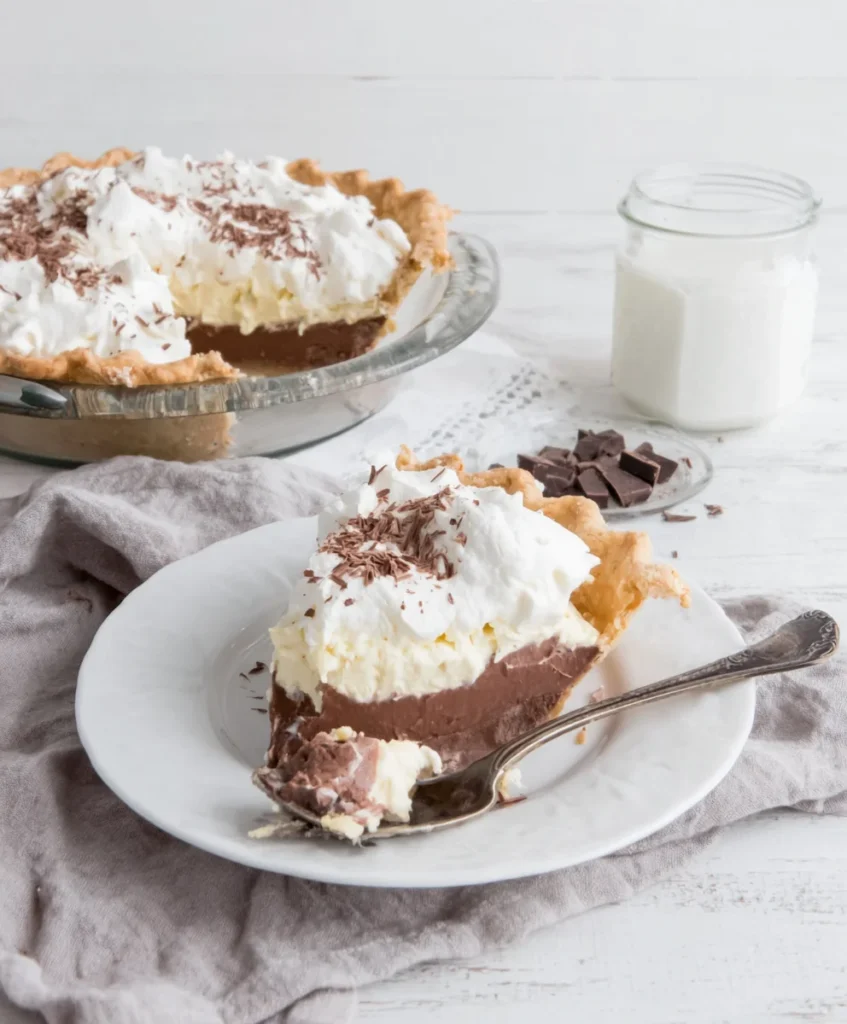
When it comes to classic desserts, few can hold a candle to the indulgent richness of a Chocolate Cream Pie. This luscious pie combines a velvety chocolate filling with a crisp, flaky crust, creating a heavenly treat that captures the hearts of chocolate lovers everywhere. Whether you’re celebrating a special occasion or simply craving something sweet, this Chocolate Cream Pie is sure to impress. With its creamy texture and deep chocolate flavor, it’s the kind of dessert that makes every bite feel like a special treat. In this article, we’ll walk you through a detailed recipe, tips for success, and even some variations to make this dessert your own. Get ready to dive into the world of chocolatey goodness!
Why You’ll Love This Recipe
There are countless reasons to fall in love with this Chocolate Cream Pie. Firstly, it’s incredibly simple to make, requiring just a handful of ingredients that are typically found in your pantry. Secondly, the recipe allows for flexibility; you can adjust the sweetness or even experiment with different types of chocolate to create a personalized touch. The rich chocolate filling is not only delicious but also beautifully contrasts with the light whipped cream topping, making it visually appealing. Each slice offers a perfect balance of creaminess and crunch, providing a delightful texture that will keep you coming back for more.
Another reason this recipe stands out is its versatility. You can serve it at a dinner party, holiday gathering, or simply as a weekend treat. It’s a dessert that pleases both kids and adults alike, making it a great choice for family gatherings. Plus, the satisfaction of making a pie from scratch is unmatched. You’ll find that your friends and family will be impressed with your baking skills, and you’ll enjoy the compliments that come your way!
Finally, this Chocolate Cream Pie is a great make-ahead dessert. Preparing it a day in advance allows the flavors to meld beautifully and ensures that it’s perfectly chilled and set when it’s time to serve. So, whether you’re looking to impress guests or satisfy a sweet craving at home, this pie is the answer!
Why You Should Try This Recipe
Trying your hand at making a Chocolate Cream Pie is a rewarding experience for several reasons. First and foremost, it’s an opportunity to hone your baking skills. The process of creating the filling and mastering the tempering of the eggs is an excellent way to learn about cooking techniques. You’ll gain confidence in the kitchen, and who knows what other delicious recipes you might tackle next!
Moreover, this pie is a nostalgic dessert for many. It brings back memories of family gatherings, special celebrations, and the joy of sharing good food with loved ones. By making this recipe, you’re not only creating a dessert but also a lasting memory. The process of baking together as a family is a wonderful way to bond, and this pie is a great project for kids and adults alike.
Additionally, the satisfaction that comes from enjoying a slice of homemade pie is unparalleled. Unlike store-bought options, making your own Chocolate Cream Pie allows you to control the ingredients and customize it to your taste. Want it a little sweeter? Go for it! Prefer a darker chocolate flavor? You can choose the cocoa powder or chocolate that suits your preference. Every element of this pie can be tailored to ensure it’s exactly how you like it.
Ingredients and Utensils Needed
Ingredients
- 1 pre-baked pie crust (9-inch)
- 1 cup heavy cream
- 1 cup whole milk
- 1 cup granulated sugar
- 1/3 cup unsweetened cocoa powder
- 1/4 cup cornstarch
- 1/4 teaspoon salt
- 4 large egg yolks
- 2 tablespoons unsalted butter
- 1 teaspoon vanilla extract
- Whipped cream (for topping)
- Chocolate shavings or cocoa powder (for garnish)
Recommended Utensils
To successfully prepare your Chocolate Cream Pie, the following utensils will be beneficial:
- Medium saucepan: For cooking the chocolate filling.
- Whisk: Essential for combining ingredients and ensuring a smooth filling.
- Mixing bowls: For whisking the egg yolks and combining dry ingredients.
- Measuring cups and spoons: To ensure accurate ingredient measurements.
- Spatula: Useful for pouring the filling into the pie crust and smoothing it out.
- Plastic wrap or parchment paper: To cover the pie while it chills.
- Pie dish: To hold your pre-baked pie crust.
With these ingredients and utensils at your disposal, you’re well on your way to making a delicious Chocolate Cream Pie that will wow your friends and family!
Detailed Recipe Steps
Now that you have your ingredients and utensils ready, let’s dive into the detailed steps to create your Chocolate Cream Pie.
- Prepare the Pie Crust: If you haven’t already, bake your pie crust according to the package instructions or your favorite recipe. Allow it to cool completely before adding the filling. A well-prepared crust is crucial for the overall success of your pie, ensuring a crisp and sturdy base.
- Combine Dry Ingredients: In a medium saucepan, whisk together the sugar, cocoa powder, cornstarch, and salt until well combined. This step is important to ensure there are no lumps in your filling, which could affect the texture.
- Whisk Egg Yolks: In a separate bowl, whisk the egg yolks until they are slightly thickened and pale in color. This process helps to create a rich and creamy filling when combined with the other ingredients.
- Add Milk and Cream: Gradually whisk in the whole milk and heavy cream into the dry mixture in the saucepan. Make sure there are no lumps; this will lead to a smooth and silky filling.
- Cook the Mixture: Place the saucepan over medium heat. Continuously whisk the mixture until it starts to thicken and bubble, about 5-7 minutes. Pay close attention to avoid burning; once thickened, remove from heat.
- Incorporate Egg Yolks: Slowly add a small amount of the hot mixture to the egg yolks, whisking constantly to temper them. This is a crucial step to prevent the yolks from scrambling. Then, gradually whisk the tempered egg mixture back into the saucepan with the chocolate mixture.
- Finish the Filling: Return the saucepan to the heat and cook for an additional 2-3 minutes, stirring constantly, until the filling is thick and glossy. This final cooking step enhances the flavor and ensures a creamy consistency. Remove from heat and stir in the butter and vanilla extract until smooth.
- Assemble the Pie: Pour the chocolate filling into the cooled pie crust, spreading it evenly. Cover the pie with plastic wrap or parchment paper, pressing it directly onto the surface of the filling to prevent a skin from forming.
- Chill: Refrigerate the pie for at least 4 hours, or until fully set. This chilling time is essential for achieving the right texture, allowing the filling to firm up beautifully.
- Serve: Before serving, top with whipped cream and garnish with chocolate shavings or a dusting of cocoa powder, as desired. A generous dollop of whipped cream adds a delightful lightness to each rich slice of pie!
By following these detailed steps, you will create a delicious Chocolate Cream Pie that is sure to be a hit at any gathering!
Tips and Variations
While the classic Chocolate Cream Pie is undoubtedly delicious, there are plenty of ways to customize it to suit your tastes or dietary needs. Here are some tips and variations to consider:
- Vegan Chocolate Cream Pie: Substitute the milk and cream with coconut milk or almond milk, and use a vegan butter alternative. For the egg yolks, you can use a commercial egg replacer to achieve a similar texture.
- Gluten-Free Option: Use a gluten-free pie crust or make your own using crushed gluten-free cookies and butter. This way, you can enjoy the pie without any gluten concerns.
- Flavor Variations: Experiment with different types of chocolate! Dark chocolate adds a rich, intense flavor, while milk chocolate creates a sweeter filling. You could also add a touch of espresso powder for a mocha twist.
- Nutty Crust: For added flavor, consider using crushed nuts mixed with the pie crust. Almonds or hazelnuts can add a delightful crunch and complement the chocolate.
- Fruity Twist: Adding a layer of fresh berries, such as raspberries or strawberries, on top of the chocolate filling before chilling can bring a refreshing contrast to the rich chocolate.
- Avoiding Common Mistakes: Ensure you whisk continuously while cooking the filling to prevent it from burning or sticking to the bottom of the pan. Also, make sure the pie crust is completely cooled before adding the filling to avoid a soggy bottom.
With these tips and variations, you can easily make this Chocolate Cream Pie your own, ensuring it’s a unique creation every time!
Nutritional Values and Benefits
Understanding the nutritional values of your Chocolate Cream Pie can help you make informed choices. Here’s a breakdown per slice (serves 8):
- Calories: 320
- Total Fat: 20g
- Saturated Fat: 10g
- Cholesterol: 100mg
- Sodium: 150mg
- Total Carbohydrates: 32g
- Dietary Fiber: 2g
- Sugars: 20g
- Protein: 4g
This pie, while indulgent, offers some benefits as well. The cocoa powder used in the filling is rich in antioxidants, which can help reduce inflammation and promote heart health. Additionally, the heavy cream provides a source of calcium and fat-soluble vitamins. However, it’s important to enjoy this dessert in moderation due to its calorie content.
Frequently Asked Questions
What can I substitute for heavy cream in the Chocolate Cream Pie?
You can substitute heavy cream with coconut cream or a combination of milk and butter for a lighter option. For a vegan version, try using coconut or almond milk instead.
Can I make Chocolate Cream Pie ahead of time?
Yes, Chocolate Cream Pie can be made a day in advance. Just ensure it’s properly covered and chilled in the refrigerator to maintain freshness.
How long does Chocolate Cream Pie last in the refrigerator?
The pie can last in the refrigerator for about 3-4 days. Make sure to keep it covered to prevent it from absorbing odors from other foods.
Can I freeze Chocolate Cream Pie?
Yes, you can freeze Chocolate Cream Pie. Wrap it tightly in plastic wrap or aluminum foil and store it in an airtight container. Thaw it in the refrigerator before serving.
What’s the best way to serve Chocolate Cream Pie?
Serve slices of Chocolate Cream Pie chilled, topped with freshly whipped cream and garnished with chocolate shavings or a dusting of cocoa powder for an elegant touch.
Conclusion
In conclusion, this Chocolate Cream Pie recipe is not only straightforward but also a delightful treat that is sure to satisfy any chocolate lover’s cravings. With its rich filling, crisp crust, and fluffy whipped cream topping, it is a dessert that can elevate any occasion. We encourage you to try this recipe at home, share it with your friends, and leave us a comment about your experience! Don’t forget to check out our other delicious recipes, such as Shrimp Aguachile and Leek and Camembert Tart. Happy baking!
For more delicious ideas, visit our Pinterest page: See More Recipes.

Chocolate Cream Pie
Ingredients
Equipment
Method
- Prepare the Pie Crust: If you haven't already, bake your pie crust according to the package instructions or your favorite recipe. Allow it to cool completely.
- Combine Dry Ingredients: In a medium saucepan, whisk together the sugar, cocoa powder, cornstarch, and salt until well combined.
- Whisk Egg Yolks: In a separate bowl, whisk the egg yolks until they are slightly thickened and pale in color.
- Add Milk and Cream: Gradually whisk in the whole milk and heavy cream into the dry mixture in the saucepan. Make sure there are no lumps.
- Cook the Mixture: Place the saucepan over medium heat. Continuously whisk the mixture until it starts to thicken and bubble, about 5-7 minutes. Once thickened, remove from heat.
- Incorporate Egg Yolks: Slowly add a small amount of the hot mixture to the egg yolks, whisking constantly to temper them. Then, gradually whisk the tempered egg mixture back into the saucepan.
- Finish the Filling: Return the saucepan to the heat and cook for an additional 2-3 minutes, stirring constantly, until the filling is thick and glossy. Remove from heat and stir in the butter and vanilla extract until smooth.
- Assemble the Pie: Pour the chocolate filling into the cooled pie crust, spreading it evenly. Cover the pie with plastic wrap or parchment paper, pressing it directly onto the surface of the filling to prevent a skin from forming.
- Chill: Refrigerate the pie for at least 4 hours, or until fully set.
- Serve: Before serving, top with whipped cream and garnish with chocolate shavings or a dusting of cocoa powder, as desired.