Are you searching for the perfect combination of convenience, nutrition, and irresistible flavor? Look no further than these spectacular Peanut Butter Coconut Protein Balls. These no-bake wonders require minimal effort but deliver maximum satisfaction, making them the ultimate grab-and-go snack for busy mornings, afternoon slumps, or post-workout fuel. We’re combining the creamy, salty delight of natural peanut butter with the tropical sweetness of shredded coconut, all bound together with wholesome oats and performance-boosting protein powder.
Forget spending hours in the kitchen. In just 15 minutes of active preparation time, you can create a batch of these delectable, chewy energy bites that will last you all week. Whether you call them energy balls, protein spheres, or simply the best treat you’ve made lately, these Peanut Butter Coconut Protein Balls are about to become a permanent fixture in your kitchen repertoire. Ready to roll up a storm? Let’s dive into the details of this exceptionally easy and ridiculously tasty recipe.
Why You’ll Love These Peanut Butter Coconut Protein Balls
The appeal of the no-bake format combined with the classic peanut butter and coconut flavor pairing is undeniably strong. But these Peanut Butter Coconut Protein Balls offer so much more than just a quick fix. They hit the trifecta of great flavor, perfect texture, and beneficial nutrition, ensuring they appeal to everyone from the fitness enthusiast counting macros to the busy parent needing a healthy snack solution for their kids.
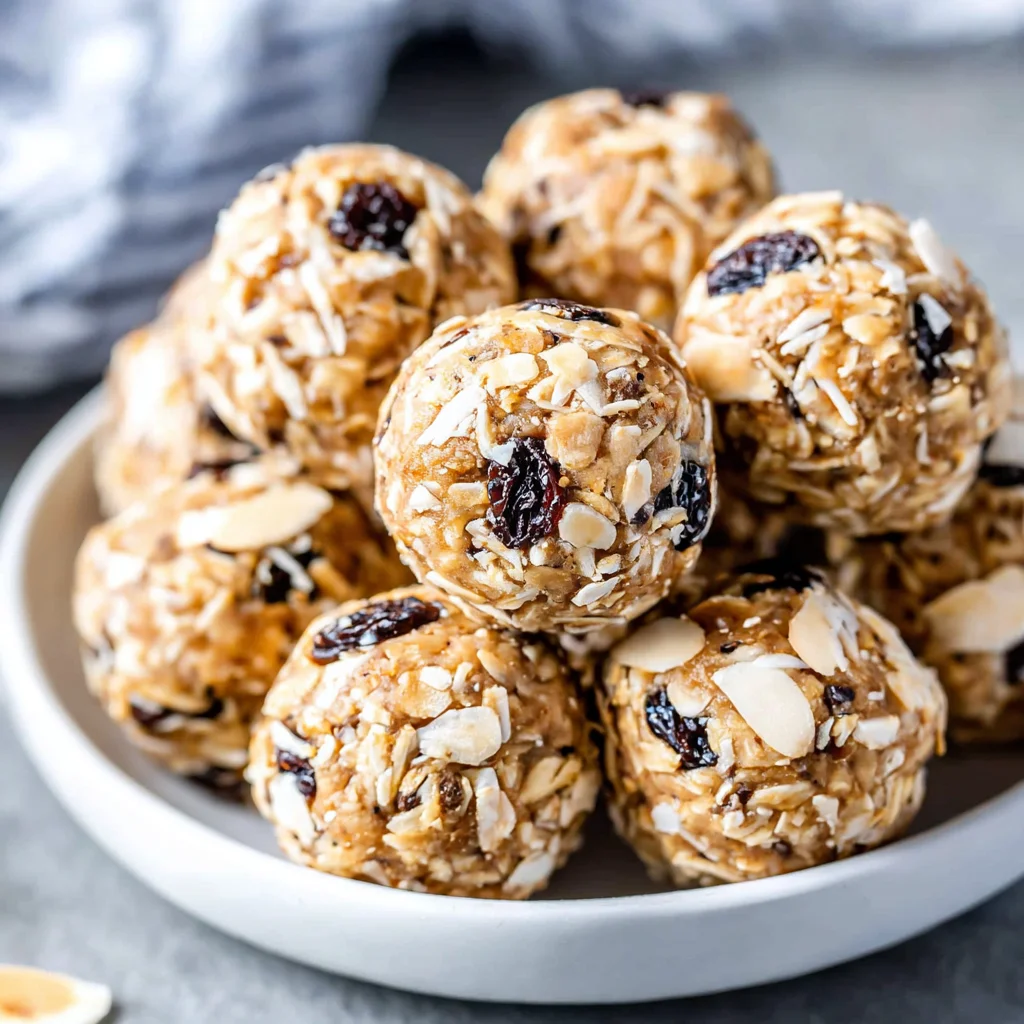
The first reason these are so beloved is the incredible texture. They are wonderfully chewy, thanks to the robust old-fashioned rolled oats, yet they melt in your mouth due to the creamy natural peanut butter and sticky liquid sweetener. The addition of shredded coconut on the inside provides little bursts of chewy texture, while the exterior coating adds a delightful, slightly crisp finish. This interplay of smooth, sticky, and chewy is simply addictive.
Secondly, the flavor profile is a harmonious blend of sweet and savory. The richness of the peanut butter is beautifully complemented by the bright, tropical notes of the coconut. Depending on your choice of liquid sweetener (honey offers a floral depth, while maple syrup provides a richer, earthy tone), you can fine-tune the sweetness to your liking. They satisfy that craving for something sweet without resorting to highly processed junk food. When you need a mid-afternoon pick-me-up that tastes like a decadent peanut butter desserts but functions like a power bar, these are your answer.
Finally, the sheer versatility is key. They are perfectly portable. Whether you’re heading to the gym, packing a lunch box, or embarking on a long commute, these Peanut Butter Coconut Protein Balls hold up beautifully and are less messy than a traditional protein shake or bar. They are portion-controlled, which is fantastic for managing caloric intake, allowing you to grab just one or two to curb your hunger effectively. The quick prep time means even if you have the busiest schedule, dedicating 15 minutes to meal prep for the week ahead is entirely feasible. Once you taste these fresh, homemade energy bites, you’ll never go back to store-bought options again.
Why You Should Try This Recipe Today: No-Bake Convenience
In the modern, fast-paced world, finding time for wholesome, homemade cooking can feel like a luxury. This is where the magic of no-bake recipes, particularly these Peanut Butter Coconut Protein Balls, comes into play. The convenience factor alone is a compelling reason to give this recipe a try immediately, offering a substantial return on your minimal time investment.
Maximum Nutrition, Minimum Effort: One of the most significant advantages is the efficiency. There is no preheating, no monitoring the oven, and virtually no cleanup beyond a single mixing bowl and a few measuring cups. This makes it an ideal recipe for novice cooks or anyone who dreads washing baking sheets. The entire process from gathering ingredients to placing the finished balls in the fridge can be completed in under 30 minutes, even accounting for the optional chilling time.
A Powerhouse of Healthy Ingredients: Unlike many store-bought snacks that rely on empty calories and artificial additives, these Peanut Butter Coconut Protein Balls utilize ingredients that actively contribute to your health. We use natural peanut butter (which often contains only peanuts and salt), old-fashioned oats (packed with fiber), and flax or chia seeds (omega-3 fatty acids). By making them yourself, you retain full control over the quality and sourcing of every component. If you prefer to use organic maple syrup or a specific kind of vanilla protein powder, you have that flexibility.
Perfect for Meal Prep and Batch Cooking: Consistency is often the key to maintaining a healthy lifestyle. Preparing a large batch of these peanut butter coconut energy bites allows you to have nutritious snacks ready for the entire week. They store exceptionally well in the refrigerator and even freeze perfectly, ensuring you never have an excuse to skip a healthy snack or recovery fuel. This kind of reliable, ready-made health food simplifies daily decision-making drastically.
Moreover, the recipe is inherently flexible. If you’ve enjoyed other quick and easy treats, like no-bake chocolate treats, you know the satisfaction that comes from a simple ingredient list transforming into something truly special. This recipe fits seamlessly into any healthy eating plan, whether you are trying to increase your protein intake, boost your fiber, or simply replace highly refined snacks with something cleaner and more sustaining. Give these protein balls a try; they are the definition of smart snacking and convenience combined.
Essential Ingredients and Necessary Utensils for No-Bake Success
The beauty of these Peanut Butter Coconut Protein Balls lies in their simplicity. You don’t need obscure ingredients or fancy kitchen equipment. However, choosing the right quality of a few core items is crucial for achieving the perfect texture and flavor. Pay special attention to the type of oats and peanut butter recommended below.
Essential Ingredients for Perfect Peanut Butter Coconut Protein Balls
Gathering your ingredients correctly is step zero in making these energy bites. Precise measurements are key to achieving a dough that is sticky enough to hold its shape but not overly wet.
- 1 1/2 cups Old-Fashioned Rolled Oats (not instant oats): The structure of the protein ball relies heavily on the oats. Old-fashioned oats (sometimes labeled “rolled oats”) provide necessary chewiness and bulk, absorbing moisture slowly. Instant or quick oats break down too quickly, which can result in a mushy, undesirable texture.
- 1/2 cup Vanilla or Unflavored Protein Powder: This is where the “protein” in protein balls comes from! Vanilla protein powder adds a subtle sweetness and flavor complexity, while unflavored powder allows the peanut butter and coconut flavors to truly shine. Whey, casein, or plant-based proteins (like pea or soy) all work, though plant-based proteins may absorb slightly more liquid, potentially requiring extra milk.
- 1/4 cup Ground Flaxseed or Chia Seeds: These are nutritional powerhouses, adding fiber and essential omega-3 fatty acids. More importantly for this recipe, they act as a fantastic binder. When mixed with liquid, they form a slightly gelled structure that helps keep the Peanut Butter Coconut Protein Balls firmly held together without baking.
- 1/2 teaspoon Fine Sea Salt: Salt is mandatory here. It balances the sweetness of the honey or maple syrup and enhances the deep, nutty flavor of the peanut butter, preventing the final product from tasting flat or overly sweet.
- 1 cup Creamy Natural Peanut Butter (ensure it is well-stirred): Use natural peanut butter (the kind that separates, requiring stirring). This type typically contains fewer additives and has a smoother, runnier consistency perfect for binding. Processed peanut butter (like major commercial brands with stabilizers) is often too thick and may result in a dry, crumbly dough. Make sure to stir it thoroughly before measuring to ensure you capture the oils.
- 1/2 cup Liquid Sweetener (such as Honey or Pure Maple Syrup): This is the primary sticky agent and sweetener. Honey gives a classic, rich flavor, while maple syrup makes the recipe fully vegan and adds a depth of flavor. Do not substitute this with granulated sugar or powdered sweeteners, as they lack the necessary liquid and adhesive properties.
- 1 teaspoon Pure Vanilla Extract: A crucial flavor enhancer that rounds out the sweetness and adds aromatic depth to the mix.
- 1/4 cup Milk (Dairy or Non-Dairy, use only if the mixture is too dry): This is your contingency ingredient. The need for milk depends heavily on the type of protein powder and the consistency of your peanut butter. Start by adding 1 tablespoon at a time if the dough is crumbly after mixing.
- 1/2 cup Shredded Coconut (Sweetened or Unsweetened, plus 1/4 cup extra for rolling): The star flavor! Sweetened coconut flakes provide extra moisture and sweetness, while unsweetened flakes offer a more robust coconut flavor with less sugar. The extra 1/4 cup is reserved for rolling the final protein balls, giving them their characteristic finish and preventing sticking.
Recommended Kitchen Tools for Easy Preparation
You truly don’t need much, but having the right tools on hand will make the preparation of these Peanut Butter Coconut Protein Balls effortless and mess-free.
- Very Large Mixing Bowl: Essential for combining all the bulky ingredients (oats, protein powder, peanut butter). Using a bowl larger than you think you need prevents spillage when mixing the wet and dry elements.
- Whisk and/or Sturdy Wooden Spoon/Rubber Spatula: A whisk is great for ensuring the dry ingredients are uniformly mixed (Step 1). Once the wet ingredients are added, you need a sturdy wooden spoon or a robust rubber spatula to handle the dense, sticky dough. A regular whisk will get hopelessly stuck.
- Measuring Cups and Spoons: Accuracy is vital in no-bake recipes. Use standard measuring tools.
- Small Cookie Scoop (1 to 1.5 tablespoons capacity): This is highly recommended. Using a scoop ensures every protein ball is the same size, which is great for portion control and achieving an attractive, uniform finished product.
- Plastic Wrap: Needed to cover the bowl during the optional, but recommended, chilling phase.
- Shallow Plate or Small Baking Sheet: Used for the rolling station (holding the extra shredded coconut) and later, a parchment-lined sheet for setting the finished balls.
- Airtight Storage Container: For keeping your finished Peanut Butter Coconut Protein Balls fresh in the refrigerator or freezer.
Detailed Recipe Steps: Creating the Perfect No-Bake Peanut Butter Coconut Protein Balls
Making these no-bake protein balls is incredibly straightforward, but following the steps sequentially ensures you achieve the ideal texture firm, sticky, and perfectly rollable. Attention to the mixing process is key to preventing a crumbly mess.
Step-by-Step Guide to No-Bake Success
Follow these detailed instructions to create your batch of creamy, chewy, and satisfying energy bites.
- Prepare the Dry Base (The Foundation):
In your chosen very large mixing bowl, combine the 1 1/2 cups of old-fashioned rolled oats, the 1/2 cup of protein powder (vanilla or unflavored), the 1/4 cup of ground flaxseed or chia seeds, and the 1/2 teaspoon of fine sea salt. Use a whisk or a large wooden spoon to stir these dry ingredients together thoroughly. Mixing the dry ingredients well at this stage is crucial. If the protein powder is clumped, you will end up with unevenly flavored balls.
- Add the Wet Ingredients (The Adhesive):
Pour the 1 cup of creamy, well-stirred natural peanut butter, the 1/2 cup of liquid sweetener (honey or maple syrup), and the 1 teaspoon of pure vanilla extract directly into the center of the dry mixture bowl. Try to dump all the wet ingredients in one spot for easier initial mixing.
- Combine and Mix (The Crucial Stage):
Begin mixing the ingredients using a strong wooden spoon or a robust rubber spatula. You must start folding and pressing the mixture. Initially, it will look like there is far too much dry matter. Continue to exert pressure and fold the dough from the bottom up. Keep mixing until all the dry ingredients are fully moistened by the peanut butter and sweetener. This stage requires patience and a good amount of arm strength. The resulting mixture should be very thick and highly sticky.
- Incorporate Coconut and Test Consistency:
Add the initial 1/2 cup of shredded coconut (sweetened or unsweetened) into the bowl. Mix again until the coconut is evenly distributed throughout the dough. Now, perform the pinch test: press a small amount of dough firmly between your fingers. It should hold together easily and not crumble. If the mixture seems crumbly or too dry to form a tight, smooth sphere, you need to add moisture. Add 1 to 2 tablespoons of milk (dairy or non-dairy) at a time, mixing thoroughly between additions, until the desired consistency is reached. Do not add too much milk at once; a little goes a long way.
- Chill the Dough (Optional but Recommended for Clean Rolling):
Cover the mixing bowl tightly with plastic wrap and place it into the refrigerator to chill for 30 minutes. While this step is technically optional, chilling solidifies the fats in the peanut butter and the sugars, making the dough much firmer, less sticky, and infinitely easier to roll. This prevents the dough from melting onto your hands during the forming process.
- Prepare Rolling Station:
While the dough is chilling, line a small baking sheet with parchment paper. Pour the extra 1/4 cup of shredded coconut onto a shallow plate or a second small baking sheet. This setup allows for a quick and efficient rolling and coating process.
- Form the Protein Balls:
Remove the dough from the refrigerator. Use a small cookie scoop (or measure out 1 to 1.5 tablespoons of mixture). Scoop the dough and roll each portion firmly between the palms of your hands. Apply consistent pressure to form a smooth, tight sphere. A firm roll ensures the balls won’t fall apart later. We often recommend having a bowl of warm water nearby to clean your hands halfway through, or, if you are making other comfort food classics, consider wearing disposable gloves for the rolling phase.
- Coat the Balls:
Immediately after forming each ball, roll it gently in the plate of extra shredded coconut. Press lightly but firmly to ensure the coconut adheres fully to the entire surface of the ball. This coating is essential both for visual appeal and for reducing stickiness when handling them later.
- Final Set and Storage:
Place the finished coconut-coated Peanut Butter Coconut Protein Balls onto your parchment-lined baking sheet. Once all the mixture is rolled, place the sheet back into the refrigerator for another 15 minutes. This final short rest allows the coating to set firmly against the ball. Store the protein balls in an airtight container in the refrigerator for up to 7 to 10 days, or freeze them for up to 3 months.
Tips, Variations, and Troubleshooting for Perfect Protein Balls
While the base recipe for these Peanut Butter Coconut Protein Balls is flawless, sometimes adjustments are needed based on climate, ingredient brands, or dietary preferences. Mastering a no-bake recipe means understanding how to troubleshoot consistency issues and how to adapt flavors.
Mastering Your No-Bake Protein Balls
Troubleshooting Consistency:
- If the mixture is too dry/crumbly: The most common issue is dry ingredients overpowering the wet binders. This often happens if the peanut butter was too thick or the protein powder absorbs too much liquid. Add 1 tablespoon of liquid at a time (milk, water, or even a splash more liquid sweetener) until the dough holds together when squeezed.
- If the mixture is too wet/sticky: This usually means too much liquid sweetener or runny peanut butter was used. To correct this, add 1 tablespoon of fine dry ingredient at a time, such as extra protein powder, ground flaxseed, or even oat flour (made by pulsing oats in a blender). If using additional oats, ensure they are pulverized for better absorption.
- The chilling step is non-negotiable for texture: Even 15 minutes in the fridge will dramatically improve the texture for rolling. If you skip chilling, the balls will likely be messy and may flatten slightly during storage.
Flavor Variations: Beyond Peanut Butter and Coconut
The base recipe is highly adaptable. Feel free to swap ingredients to create new flavor profiles or meet specific dietary needs:
- Nut Butter Swaps: Replace peanut butter with almond butter, cashew butter, or sunflower seed butter (for nut-free options). Note that different nut butters have varying oil contents, so you may need to adjust the liquid slightly.
- Chocolate Chip Boost: Stir in 1/4 cup of mini chocolate chips (dark, milk, or white chocolate) along with the coconut for an extra layer of decadence.
- Spice it Up: Add 1/2 teaspoon of ground cinnamon or a pinch of nutmeg to the dry ingredients for a warmer flavor profile, especially appealing in the fall or winter months.
- Nutty Crunch: Add 1/4 cup of finely chopped pecans, walnuts, or peanuts for an enhanced crunch factor.
Dietary and Allergy Alternatives
This recipe is already incredibly versatile, but here are quick swaps for common dietary needs:
- Vegan/Plant-Based: Ensure you use pure maple syrup (not honey) as the sweetener, a plant-based protein powder (like pea or soy), and a non-dairy milk (almond, soy, or oat). The resulting Peanut Butter Coconut Protein Balls will be 100% vegan.
- Gluten-Free: The base ingredients are naturally gluten-free, but always verify that your rolled oats are certified gluten-free to avoid cross-contamination, especially for those with celiac disease.
Storage Tips
These no-bake energy bites are excellent for long-term storage, extending their shelf life far beyond most homemade baked goods.
- Refrigeration: Store in an airtight container for 7 to 10 days. Place parchment paper between layers if you stack them high to prevent sticking.
- Freezing: For long-term storage, freeze the rolled balls solid on a parchment-lined sheet first. Once frozen (about 2 hours), transfer them to a freezer-safe zip-top bag or container. They will last for up to 3 months. Thaw them in the refrigerator for a few hours before eating, or simply enjoy them frozen straight from the freezer for a super-dense, cold treat.
Nutritional Values and Benefits: The Power Behind the Protein Ball
These Peanut Butter Coconut Protein Balls aren’t just delicious; they are specifically formulated to provide sustained energy and satiety. Understanding the nutritional components helps illustrate why these are such a superior snacking choice compared to sugary processed foods.
Note on Nutritional Information: Exact nutritional values will vary widely depending on the brand of protein powder (which can range from 80 calories per scoop to over 150) and whether you use honey or maple syrup, as well as the fat content of your specific natural peanut butter. The following estimates are based on an average yield of 20-22 balls, using standard ingredients.
| Nutrient (Estimated Per Ball) | Approximate Value |
|---|---|
| Calories | 120 – 150 kcal |
| Protein | 5 – 8g |
| Fat | 7 – 9g |
| Carbohydrates | 10 – 14g |
| Fiber | 2 – 3g |
Ingredient Breakdown: Health Benefits
Each core ingredient plays a specific role in boosting the health profile of these Peanut Butter Coconut Protein Balls:
1. Protein Powder (The Muscle Builder):
The primary function of the protein powder is to increase the protein content, making these balls excellent for muscle recovery post-exercise or for keeping you full longer. Protein takes more time to digest than carbohydrates, significantly enhancing satiety. This reduces the likelihood of reaching for less healthy snacks later. You can find more healthy recipe ideas and inspiration, including posts detailing the benefits of healthy fats, by checking out my Pinterest page dedicated to healthy eating.
2. Rolled Oats (The Fiber Source):
Oats are a fantastic source of complex carbohydrates and soluble fiber, particularly beta-glucan. This fiber helps regulate blood sugar levels, supports heart health by lowering bad cholesterol, and provides slow-burning energy, avoiding the crash often associated with simple sugars.
3. Ground Flaxseed/Chia Seeds (The Omega-3 Boost):
These tiny seeds are packed with dietary fiber and healthy fats, especially ALA (Alpha-Linolenic Acid), a type of Omega-3 fatty acid. Omega-3s are essential for brain health and reducing inflammation. They also contribute significant binding power to the no-bake mixture.
4. Natural Peanut Butter (The Healthy Fat):
Peanut butter provides monounsaturated and polyunsaturated fats, which are heart-healthy fats. These fats are vital for absorbing fat-soluble vitamins (A, D, E, K) and providing concentrated energy. The combination of protein, fiber, and healthy fats makes these protein balls incredibly effective at sustaining energy levels throughout the day.
Incorporating these highly nutritious, convenient snacks into your daily routine is a simple way to upgrade your diet. They are a much smarter way to manage hunger and cravings, ensuring you get a balanced mix of macros in a single delicious bite.
FAQs About Peanut Butter Coconut Protein Balls
If you have questions about preparation, storage, or substitutions for these no-bake wonders, you are not alone! Here are answers to some of the most common inquiries regarding Peanut Butter Coconut Protein Balls.
Q: Can I use quick oats instead of old-fashioned rolled oats?
A: It is highly recommended to stick to old-fashioned rolled oats for the best texture. Quick oats are pre-steamed and cut thinner, meaning they absorb moisture too quickly and break down into a mushy consistency when mixed. If you must use them, you may need to reduce the amount of liquid sweetener or milk slightly, or add them partially crushed.
Q: How long do Peanut Butter Coconut Protein Balls last, and can they be frozen?
A: These Peanut Butter Coconut Protein Balls are fantastic for meal prepping. They will last for 7 to 10 days when stored properly in an airtight container in the refrigerator. Yes, they freeze wonderfully! Freeze them individually on a tray first, then transfer them to a freezer bag or container where they will keep for up to three months.
Q: My mixture is too sticky to roll what did I do wrong?
A: Stickiness is usually due to the high fat/sugar content and lack of chilling. If the mixture is extremely difficult to handle, first ensure you have chilled it for at least 30 minutes (the crucial step!). If it’s still too sticky afterward, incorporate 1-2 tablespoons of extra protein powder or oat flour to absorb excess moisture before attempting to roll the Peanut Butter Coconut Protein Balls.
Q: Can I make this recipe nut-free or use a different sweetener?
A: Absolutely! To make the Peanut Butter Coconut Protein Balls nut-free, substitute the peanut butter with sunflower seed butter or a smooth seed butter alternative like tahini (though tahini will change the flavor profile dramatically). Regarding sweeteners, the liquid sweetener is vital for binding. You must use honey, maple syrup, or a similar thick liquid sugar replacement; granulated sweeteners will not work as a binder.
Q: Is the shredded coconut coating necessary?
A: The coating of shredded coconut is optional but highly recommended. It adds the key coconut flavor element and, perhaps more importantly, prevents the sticky protein balls from adhering to your container, your hands, and each other. If you dislike coconut, you can roll them in cocoa powder, finely chopped nuts, or even finely crushed peanut butter cookie crumbs instead.
Q: What type of protein powder works best for these no-bake balls?
A: Most standard whey, casein, or blended protein powders work well and produce the creamiest texture. Plant-based protein powders, like pea or rice protein, also function beautifully but tend to absorb slightly more moisture. If using a plant-based powder, you might need the full 1/4 cup of milk to achieve the correct rollable consistency for the Peanut Butter Coconut Protein Balls.
Conclusion: Your New Favorite No-Bake Snack
You now have the full guide to creating the easiest, most satisfying, and nutrient-dense snack around. These Peanut Butter Coconut Protein Balls combine pantry staples into a portable power bite that truly tastes like dessert. We’ve covered everything from the crucial role of old-fashioned oats and natural peanut butter to the importance of the chilling step in achieving rolling perfection.
By making these no-bake energy bites, you are investing in your health and simplifying your snack routine. They provide a balanced blend of protein, healthy fats, and complex carbohydrates, making them ideal for pre- or post-workout fuel, a quick breakfast component, or a guilt-free late-night treat. The simple combination of creamy peanut butter and tropical coconut is a winner every time.
Don’t wait to incorporate these delicious, high-protein snacks into your week. Gather your ingredients, dedicate a mere 15 minutes to mixing and rolling, and reap the benefits of having healthy, homemade fuel ready to go whenever hunger strikes. If you try this recipe, please let us know how your Peanut Butter Coconut Protein Balls turned out! Share your favorite variations in the comments below, and check back soon for more easy, delicious, and healthy recipes just like this one.
PEANUT BUTTER COCONUT PROTEIN BALLS (NO BAKE)
Ingredients
Equipment
Method
- Prepare the Dry Base: In a very large mixing bowl, combine the 1 1/2 cups of old-fashioned rolled oats, the 1/2 cup of protein powder, the 1/4 cup of ground flaxseed or chia seeds, and the 1/2 teaspoon of salt. Use a whisk or a large wooden spoon to stir these dry ingredients together thoroughly until they are uniformly mixed.
- Add the Wet Ingredients: Pour the 1 cup of creamy peanut butter, the 1/2 cup of liquid sweetener (honey or maple syrup), and the 1 teaspoon of pure vanilla extract directly into the dry mixture bowl.
- Combine and Mix: Begin mixing the ingredients using a strong wooden spoon or a rubber spatula. Continue to fold and press the mixture until all the dry ingredients are moistened by the peanut butter and sweetener. This step requires a good amount of pressure.
- Incorporate Coconut and Test Consistency: Add the 1/2 cup of shredded coconut into the bowl. Mix again until the coconut is evenly distributed throughout the dough. The mixture should be firm, sticky, and hold together easily when pressed between your fingers. If the mixture seems crumbly or too dry to hold a shape, add 1 to 2 tablespoons of milk at a time until the desired consistency is reached.
- Chill the Dough (Optional but Recommended): Cover the mixing bowl tightly with plastic wrap and place it into the refrigerator to chill for 30 minutes. Chilling the mixture makes the rolling process much cleaner and helps the balls maintain their shape.
- Prepare Rolling Station: While the dough is chilling, pour the extra 1/4 cup of shredded coconut onto a shallow plate or a small baking sheet. Line a separate baking sheet with parchment paper.
- Form the Protein Balls: Remove the dough from the refrigerator. Use a small cookie scoop (about 1 to 1.5 tablespoons capacity) or measure out portions with a regular tablespoon. Roll each portion firmly between the palms of your hands to form a smooth, tight sphere.
- Coat the Balls: Immediately roll the formed balls in the plate of extra shredded coconut, pressing lightly to ensure the coconut adheres fully to the surface of the ball. Place the finished coconut-coated balls onto the parchment-lined baking sheet.
- Final Set and Storage: Once all the mixture is rolled, place the sheet back into the refrigerator for another 15 minutes to allow them to fully set before serving. Store the protein balls in an airtight container in the refrigerator for up to 7 to 10 days, or freeze them for up to 3 months.


