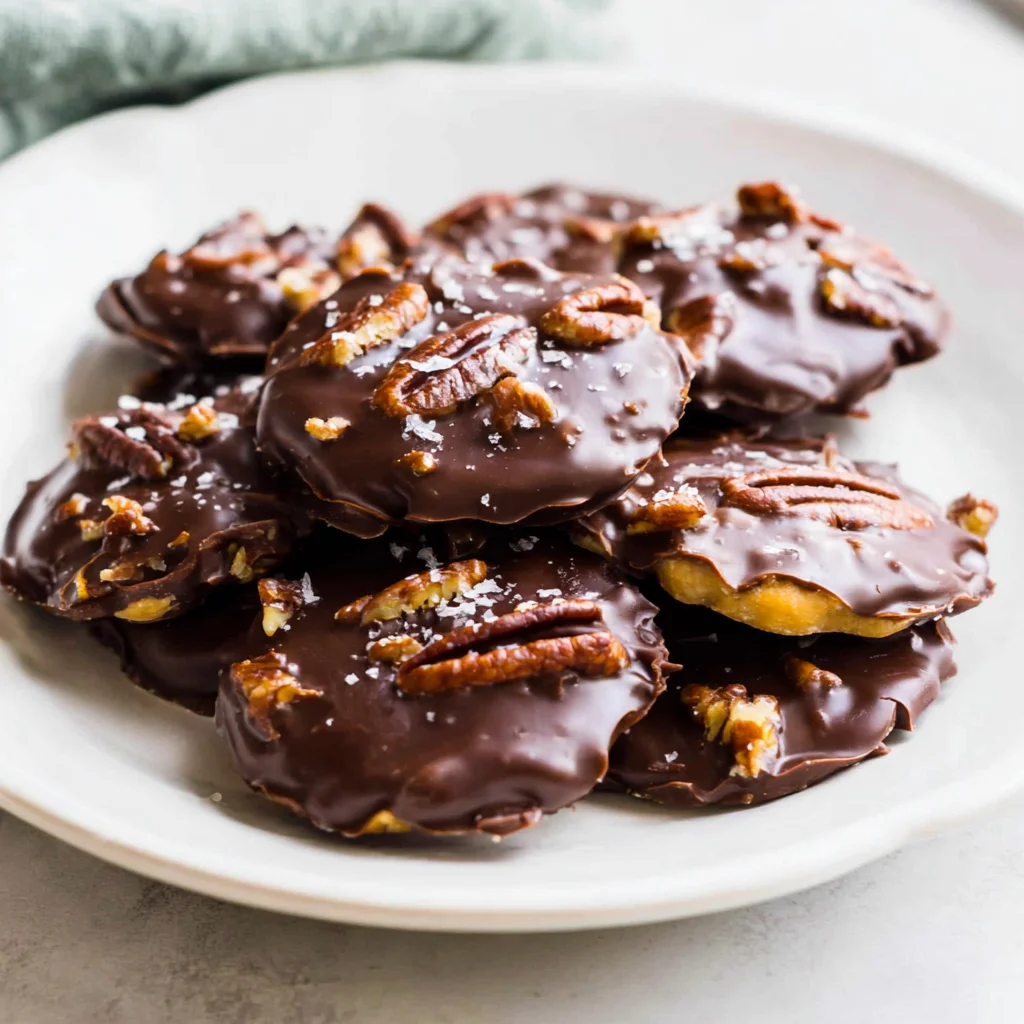
There are few confections as universally beloved and satisfying as the classic Turtle candy. A glorious combination of crunchy pecans, gooey, buttery caramel, and a rich cloak of chocolate, the original commercially produced version is an iconic treat. However, nothing absolutely nothing compares to the depth of flavor and textural perfection achieved when you make Homemade Chocolate Turtles from scratch. This recipe is an endeavor, yes, but it is one that yields professional-grade results, transforming humble kitchen ingredients into decadent, show-stopping holiday treats or the perfect gift for any chocolate lover.
We are going beyond simply melting store-bought caramels here. This comprehensive guide walks you through creating a perfect, chewy, deeply flavored caramel center that doesn’t pull out your fillings, perfectly toasted pecans that add robust flavor, and a smooth, snappy chocolate coating. Mastering the art of Homemade Chocolate Turtles requires patience and precision, especially when handling hot sugar, but the result is a transcendental experience that elevates this simple candy to gourmet status. Get ready to put on your apron, grab your candy thermometer, and embark on a rewarding journey toward making the best chocolate turtles you’ve ever tasted.
Why You’ll Fall in Love with These Homemade Chocolate Turtles
If you typically rely on store-bought versions for your pecan caramel cravings, preparing a batch of Homemade Chocolate Turtles will completely redefine your expectations. The difference is stark, rooted in the quality of the ingredients and the freshness of the final product. Here’s why this specific recipe will become your new confectionery staple.
Unbeatable Texture and Freshness
The core appeal of a great turtle is its textural contrast. Commercial turtles often compromise on one element the pecans might be slightly stale, or the caramel might be overly stiff or sickeningly sweet. With this homemade recipe, you control every component. We start by toasting the pecans, a step that is non-negotiable for releasing their full, warm, nutty aroma and delivering an incredible crunch that contrasts beautifully with the soft center. Furthermore, the caramel, cooked to the exact chewy stage (245°F/118°C), is rich, buttery, and melts slowly in your mouth, avoiding the waxy or grainy texture found in mass-produced alternatives. These Homemade Chocolate Turtles offer a complexity of texture that is genuinely addictive.
The Magic of Homemade Caramel
The heart of a great turtle is its caramel. Using sweetened condensed milk in our homemade caramel recipe is the key to achieving a truly smooth, lush, and stable caramel that resists crystallizing and maintains a beautifully chewy consistency even when cool. Unlike simple sugar and cream caramels, the condensed milk caramel holds its shape better over the pecan clusters, making the assembly phase much cleaner and easier. The depth of flavor, amplified by real butter and a touch of salt and vanilla, is incomparable. It’s a rich, deep, molasses-like sweetness that complements, rather than overwhelms, the other components.
Complete Control Over Chocolate Quality
When you make Homemade Chocolate Turtles, you get to select your chocolate, which is arguably the most fun part. Whether you prefer the creamy sweetness of milk chocolate, the balanced flavor of semi-sweet, or the intense, bitter notes of dark chocolate, choosing high-quality melting wafers or bars ensures a smooth, glossy, and professional finish. You can customize the coating thickness and ensure the chocolate snap is perfect. This level of ingredient control guarantees a superior eating experience, resulting in a batch of candies tailored precisely to your (or your lucky recipient’s) preference.
The Joy of Making Your Own Chocolate Caramel Pecan Candies
While some people might find the idea of making candy intimidating, this process is incredibly rewarding and offers benefits that extend far beyond a delicious final product. Taking the time to craft gourmet sweets like these pecan candies provides a creative outlet and results in impressive gifts or memorable holiday treats.
Perfecting the Art of Candy Making
This recipe provides an excellent introduction to temperature-specific candy making. Using a candy thermometer isn’t just a suggestion; it’s a necessity for achieving the desired caramel texture. Reaching precisely 245°F (118°C) the firm ball stage is the moment where liquid ingredients transform into chewy confectionery gold. Mastering this technique builds confidence in the kitchen and opens the door to creating other delicious homemade treats, perhaps tackling a batch of rich Classic Chocolate Chess Pie or some gooey Chocolate Gooey Butter Cookies using similar flavor profiles.
Impressive Gifting Potential
If you are looking for a show-stopping gift for neighbors, teachers, or family during the holiday season, these Homemade Chocolate Turtles are the answer. They look exquisite, taste luxurious, and carry the undeniable charm of a truly homemade effort. Packaging them in elegant boxes or cellophane bags immediately elevates them above standard store-bought fare. They travel well and maintain their quality when stored properly, making them an ideal treat to prepare in advance.
A Festive Tradition
Making Homemade Chocolate Turtles can become a beloved family tradition. The different phases of the recipe toasting the nuts, stirring the rich caramel, and finally, dipping the clusters into the warm, silky chocolate can be shared activities. The aroma of toasted pecans and bubbling butterscotch filling the kitchen is the very essence of comfort and celebration. Whether you serve them alongside a slice of Pecan Pie Cobbler at Thanksgiving or package them up for Christmas, these turtle candies scream “special occasion.”
Customization and Dietary Control
Making treats at home gives you complete control over the ingredients, which is vital for managing allergies or specific dietary needs (more on variations later). Even if you don’t have restrictions, controlling the amount of sugar and choosing high-quality, pure ingredients (like real vanilla extract and fresh butter) ensures a clean, intense flavor profile that shines through in the final Homemade Chocolate Turtles.
Essential Ingredients and Tools for Perfect Homemade Chocolate Turtles
While the steps for creating these delicious chocolate caramel pecans might seem involved, success largely hinges on having the right, high-quality ingredients and the necessary tools. Do not substitute items, especially when it comes to the caramel ingredients, unless explicitly mentioned in the “Variations” section, as the chemistry of candy making is precise.
The Caramel Center: The Heart of the Turtle
The specific combination of fats and sugars here is what ensures the caramel is both stable and incredibly chewy.
- 1 cup (2 sticks) Unsalted Butter: Use high-quality, unsalted butter. Since the butter is the primary fat and flavor carrier in the caramel, quality matters. Using unsalted butter allows you to control the exact amount of salt added later.
- 1 cup Packed Light Brown Sugar: The molasses content in brown sugar is crucial. It adds depth, a slightly richer color, and a wonderfully complex butterscotch flavor compared to white sugar. Pack it tightly into your measuring cup for accuracy.
- ½ cup Light Corn Syrup: This ingredient serves two primary functions: it prevents the sugar from crystallizing (a common problem in homemade caramel) and adds elasticity, contributing to the desirable chewy texture of the Homemade Chocolate Turtles. Do not substitute with maple syrup or honey, as those have different flavor profiles and sugar compositions.
- 1 (14 ounce) Can Sweetened Condensed Milk: This is the secret weapon for a stable, creamy, and lush caramel. It already contains sugar and milk solids, which help create a dense, luxurious, non-gritty texture when cooked.
- 1 teaspoon Vanilla Extract: Added off the heat, vanilla brightens and rounds out the flavor of the caramel. Use pure vanilla extract for the best results.
- ½ teaspoon Salt: Crucial for balancing the intense sweetness of the caramel. Salt enhances the butterscotch notes and makes the overall flavor more complex and less cloying.
The Turtles Assembly: Nuts and Chocolate
- 2 cups Whole Pecan Halves (approximately 48 to 60 halves): Pecans are traditional for turtles (hence the ‘shell’ appearance). Ensure they are fresh, plump, and whole for the best visual appeal and crunch. Toasting them is mandatory for maximum flavor.
- 2 pounds High-Quality Chocolate for Melting: This quantity might seem large, but it ensures you have enough depth in your melting bowl for easy dipping. Choose high-quality chocolate, preferably in wafer or chip form designed for melting (like Ghirardelli, Callebaut, or Guittard).
- Milk Chocolate: Classic, sweeter flavor.
- Semi-Sweet or Dark Chocolate: Provides a pleasant bitterness that cuts through the rich caramel.
- 2 teaspoons Shortening or Coconut Oil (optional): Added to the melted chocolate, a small amount helps thin the chocolate slightly. This makes dipping easier, resulting in a thinner, glossier, and snappier coating.
Necessary Tools for Candy Making Success
Making candy is chemistry, and having the right equipment ensures accuracy and safety:
- Heavy-Bottomed Saucepan: Essential for caramel. A heavy pot distributes heat evenly, minimizing the risk of the bottom scorching while the rest of the caramel is still cooking. A light or thin pan will almost certainly lead to burning.
- Candy Thermometer: This is the most critical tool. Achieving the precise temperature of 245°F (118°C) is non-negotiable for the caramel’s final texture. Ensure the thermometer is calibrated and its tip does not touch the bottom of the saucepan during cooking.
- Parchment Paper or Silicone Mats: Line your baking sheets generously. Caramel sticks notoriously, and these barriers ensure your Homemade Chocolate Turtles peel off cleanly once set.
- Wooden Spoon or Heatproof Silicone Spatula: Necessary for constant stirring of the caramel. Avoid whisks, which can incorporate too much air and cause crystallization.
- Two Large Baking Sheets: Needed for arranging the pecan clusters and later for cooling the finished chocolate-dipped turtles.
- Microwave-Safe Bowls or Double Boiler Setup: For melting and tempering your chocolate.
- Small Serving Spoon or Teaspoon: Ideal for portioning the caramel over the pecan clusters.
Step-by-Step Guide to Crafting Homemade Chocolate Turtles
Success with Homemade Chocolate Turtles relies on careful execution of each phase. Read through the instructions completely before starting, especially the caramel cooking phase, as you will need to move quickly once the temperature is reached.
Phase 1: Preparation and Pecan Assembly
- Prepare the Surface: Line two large baking sheets with parchment paper or silicone mats. This is crucial for preventing sticking. Have these ready before you start the caramel.
- Toast the Pecans: Preheat your oven to 350°F (175°C). Spread the pecan halves in a single layer on a baking sheet and toast them for 5 to 7 minutes until they smell deliciously fragrant. Keep a close watch; pecans burn quickly. Remove the nuts and allow them to cool completely. Warm nuts soften the caramel too fast.
- Arrange the Clusters: Once the nuts are cool, arrange them onto the prepared baking sheets. Create clusters of three or four nuts, positioned close together to form a small, circular or oval base, resembling a turtle’s shape. Ensure you leave adequate space (about 1 inch) between each cluster for the caramel and subsequent chocolate coating.
Phase 2: Cooking the Homemade Caramel (Candy Thermometer Required)
This phase is where accuracy is paramount. Do not rush the cooking time.
- Combine Wet Ingredients: In a heavy-bottomed saucepan, combine the butter, brown sugar, corn syrup, and sweetened condensed milk. Place the saucepan over medium heat.
- Dissolve the Sugar: Stir the mixture constantly using a wooden spoon or silicone spatula until the butter has fully melted and the sugar has completely dissolved. The mixture should look homogeneous. Ensure no sugar crystals remain on the sides of the pan; use a wet pastry brush to wash down any stray crystals before boiling begins, or they could cause the whole batch to crystallize.
- Bring to a Boil: Attach a reliable candy thermometer to the side of the pan, ensuring the tip is submerged but does not touch the bottom. Bring the mixture to a slow, rolling boil.
- Cook to Temperature: Continue to cook the caramel, stirring frequently, especially the corners and bottom, to prevent scorching. The target temperature is 245°F (118°C). This temperature achieves the ‘firm ball’ stage, which ensures the caramel is firm enough to hold its shape when cool but remains wonderfully chewy. This stage typically takes 15 to 20 minutes of simmering.
- Add Final Flavors: Remove the saucepan immediately from the heat the moment 245°F is reached. Quickly stir in the vanilla extract and salt until they are fully incorporated into the hot caramel mixture.
Phase 3: Assembling and Setting the Caramel Centers
Speed is important here, as the caramel will begin to stiffen quickly.
- Spoon the Caramel: Working quickly while the caramel is still hot and manageable, use a measuring teaspoon or a small serving spoon to scoop a heaping teaspoon of the caramel mixture directly over the center of each pecan cluster. The caramel should gently pool over the nuts, covering the center completely. If the caramel starts to become too stiff before you are finished, you can briefly place the saucepan back on very low heat for 30 seconds to loosen it slightly, but be careful not to cook it further.
- Allow the Centers to Set: Allow the assembled pecan and caramel clusters to cool and set completely. This can take several hours at room temperature, or you can transfer the baking sheets to the refrigerator for approximately 30 to 45 minutes to significantly speed up the setting process. The caramel must be perfectly firm before proceeding to the chocolate dipping stage.
Phase 4: Coating the Homemade Chocolate Turtles with Chocolate
This final step gives your turtles their signature professional shine and snap.
- Melt the Chocolate: Chop the high-quality melting chocolate into small, uniform pieces (if not using wafers). Place the chocolate in a deep, microwave-safe bowl. Microwave the chocolate in 30-second intervals, stirring thoroughly after each interval. Continue until the chocolate is smooth and completely melted, retaining a slight warmth. If using shortening or coconut oil for gloss/thinning, stir it in now until fully dissolved.
- Dip the Turtles: Carefully lift one set caramel turtle off the parchment paper (the caramel should be solid enough not to budge). Dip the bottom of the turtle into the melted chocolate, coating the caramel and pecans fully, or use a fork to hold the turtle and spoon chocolate over the entire surface, ensuring the caramel is fully encased while leaving the pecan tips slightly exposed for that authentic “turtle” look.
- Allow Excess to Drip: Tap the fork gently against the side of the bowl to allow excess chocolate to drip back into the mixture.
- Set the Coating: Return the coated turtle to a clean, parchment-lined section of the baking sheet. Repeat this process for all remaining Homemade Chocolate Turtles.
- Final Set: Allow the finished chocolate turtles to set completely. This can take several hours at room temperature in a cool place, or chill them in the refrigerator for about 20 minutes until the chocolate shell is firm, glossy, and snaps cleanly when touched.
- Storage: Once set, store the Homemade Chocolate Turtles in an airtight container at room temperature (if your kitchen is cool) or in the refrigerator for longer storage.
Tips, Troubleshooting, and Delicious Variations
While the recipe for Homemade Chocolate Turtles is straightforward, candy making can sometimes be tricky. Here are tips to ensure perfection and suggestions for creative variations.
Troubleshooting Common Caramel Issues
- Caramel Is Grainy: This is caused by crystallization. Ensure all sugar crystals clinging to the sides of the pan are washed down with a wet pastry brush before the mixture comes to a boil. Also, avoid stirring vigorously once the mixture is boiling; only stir gently to prevent scorching.
- Caramel Is Too Soft/Runny: You didn’t reach the full 245°F (118°C). This is why a calibrated candy thermometer is essential. If the caramel is too soft, the centers will flatten and ooze when dipped.
- Caramel Is Too Hard/Brittle: The temperature exceeded 250°F (121°C). If you overcooked it, the centers will be crunchy or stiff, not chewy. Unfortunately, once overcooked, you cannot save the caramel; you must start over.
- Caramel Scorched on the Bottom: Use a heavy-bottomed pot and stir the mixture frequently, scraping the sides and bottom, especially as it thickens. Lower the heat slightly if you notice dark spots forming.
Pro Tips for Perfect Dipping and Finish
To achieve a professional, glossy chocolate coating for your Homemade Chocolate Turtles, consider these suggestions:
- Temper Your Chocolate (Advanced): For truly stable, shiny, and snap-heavy chocolate that resists melting at room temperature, you should temper it. While optional for this recipe (especially if using melting wafers), tempering involves heating and cooling the chocolate to specific temperatures to stabilize the cocoa butter crystals.
- Use Melting Wafers: If you are nervous about tempering or standard chocolate seize, use high-quality melting wafers or compound chocolate (often labeled as “confectionery coating”). These contain stabilizers and are designed to melt smoothly and set quickly without extra effort.
- The Sea Salt Finish: Immediately after dipping the turtles, sprinkle a tiny pinch of flaky sea salt (like Maldon) over the wet chocolate. The salt enhances the caramel flavor dramatically, turning them into “Salted Caramel Pecan Turtles.” We share many great holiday ideas on our Pinterest! Follow us on Pinterest for more dessert inspiration!
Flavor and Ingredient Variations
- Nut Substitutions: If pecans aren’t available, or you prefer a different flavor, use walnuts, cashews, or even macadamia nuts. Ensure you toast them properly first.
- Dairy-Free/Vegan Turtles: To make a vegan version, substitute the butter with high-quality vegan butter sticks and replace the sweetened condensed milk with a can of vegan sweetened condensed coconut milk. Ensure the chocolate coating you choose is certified dairy-free.
- Spice it Up: Stir in ¼ teaspoon of ground cinnamon or a pinch of cayenne pepper with the vanilla extract for a warm, spicy note in the caramel.
- White Chocolate Drizzle: Instead of fully dipping, use semi-sweet chocolate for the main coating, and then drizzle the finished, set turtles with melted white chocolate for a beautiful contrast.
Nutritional Insight: Are Homemade Turtle Candies Worth the Indulgence?
It’s important to acknowledge that Homemade Chocolate Turtles are an indulgent confection, rich in sugar and fat. They are holiday treats, not health food staples. However, understanding the components can help appreciate the quality and nutritional benefits found within this delicious dessert.
General Nutritional Breakdown (Estimate per Turtle, assuming 24 total)
| Nutrient | Approximate Value | Contribution |
|---|---|---|
| Calories | 180–220 kcal | Varies based on chocolate type and size. |
| Total Fat | 12–15g | Primary source: Butter and Pecans. |
| Saturated Fat | 6–8g | From butter and cocoa butter. |
| Carbohydrates | 18–22g | Primary source: Sugars (brown sugar, condensed milk). |
| Protein | 2–3g | From pecans and milk solids in condensed milk. |
The Benefits of Pecans and Chocolate
While high in calories, Homemade Chocolate Turtles benefit from two key ingredients known for their positive attributes:
Pecans (Healthy Fats and Antioxidants)
Pecans are more than just a crunchy component; they are a nutritional powerhouse. They are packed with heart-healthy monounsaturated fats (like oleic acid), similar to those found in olive oil. These fats can help lower bad cholesterol levels. Additionally, pecans contain significant amounts of antioxidants, particularly vitamin E, which helps protect cells from damage. They are also a good source of zinc, essential for immune function, and fiber, contributing to digestive health.
High-Quality Chocolate (Antioxidants and Minerals)
The type of chocolate you choose affects the nutritional content. Opting for dark or semi-sweet chocolate significantly increases the flavonoid content, which acts as a powerful antioxidant. Dark chocolate is linked to improved blood flow, lowered blood pressure, and better brain function. Furthermore, chocolate provides essential minerals like iron, magnesium, copper, and manganese. Since we recommend high-quality chocolate for these Homemade Chocolate Turtles, you maximize these potential benefits compared to candies made with lower-grade coatings.
Indulgence in Moderation
The richness of these homemade candies naturally encourages mindful consumption. Because they are so deeply satisfying, one turtle is often enough to curb a sweet craving. Enjoying Homemade Chocolate Turtles as an occasional treat means you benefit from the superior taste experience and the small nutritional boost from the nuts and dark chocolate, without impacting a balanced diet. It’s a prime example of quality over quantity when it comes to dessert.
Frequently Asked Questions (FAQ) about Homemade Chocolate Turtles
How do I store Homemade Chocolate Turtles and how long do they last?
Store your finished Homemade Chocolate Turtles in an airtight container. If kept at a cool room temperature (below 70°F), they will last for about 1 to 2 weeks. For extended freshness, especially if your kitchen is warm, store them in the refrigerator for up to 3 weeks. Always let refrigerated turtles come to room temperature briefly before serving for the best texture.
Can I use a pre-made caramel instead of making my own for this turtle recipe?
While you technically can use pre-made soft caramel candies, the resulting quality will not be the same. This recipe relies on a dense, stiff homemade caramel cooked to 245°F that specifically holds its shape over the pecan clusters. If you must substitute, use a high-quality, dense caramel designed for dipping, but ensure it is firm enough when cool that it won’t flatten out.
Why did my chocolate seize when I was melting it?
Chocolate seizes (becomes grainy and stiff) instantly when it comes into contact with even a small amount of water or steam. Ensure all your bowls and utensils are perfectly dry. Overheating the chocolate can also cause it to seize; always use low power in the microwave and stir frequently, or use a true double boiler setup to maintain gentle heat.
What is the “firm ball stage” and why is 245°F important for these chocolate caramel pecan candies?
The firm ball stage (245°F to 250°F) refers to the concentration of sugar in the boiling mixture. At this precise temperature, the sugar content is high enough that when the caramel cools, it forms a chewy, dense ball that maintains its structure without being brittle. If the temperature is lower, the caramel will be too soft and messy; if it’s higher, it will be too hard and potentially ruin the texture of the Homemade Chocolate Turtles.
Can I freeze these Homemade Chocolate Turtles?
Yes, Homemade Chocolate Turtles freeze exceptionally well! Place the set, finished candies in a single layer in an airtight container, separating layers with wax or parchment paper. When ready to enjoy, thaw them slowly in the refrigerator overnight, then let them sit at room temperature for 30 minutes before serving. This prevents the chocolate from developing condensation spots.
Conclusion: The Ultimate Reward of Homemade Chocolate Turtles
The journey to making Homemade Chocolate Turtles is a rewarding process that culminates in a luxurious, professional-grade confection. From the rich aroma of toasted pecans to the satisfying patience required for cooking the caramel to a perfect 245°F, every step contributes to a candy that is far superior to anything you can buy in a store. These chocolate caramel pecans are a celebration of contrasting textures the crunch of the nut, the satisfying chew of the butterscotch caramel, and the snap of the chocolate coating.
Whether you are making these for a special occasion, packaging them up as heartfelt gifts, or simply indulging your own sophisticated sweet tooth, this recipe delivers on every promise of decadence. Mastering the caramel phase is a skill that will serve you well in countless other dessert ventures, proving that time spent in the kitchen yields priceless results.
We highly encourage you to try this recipe for your next holiday baking session. Share the joy and rich flavor of these incredible Homemade Chocolate Turtles with friends and family, and watch their faces light up. We love seeing your confectionery masterpieces! If you make this recipe, please leave us a comment below and share your experience. Happy candy making!
Homemade Chocolate Turtles (Classic Pecan Caramel Candy)
Ingredients
Equipment
Method
- Line two large baking sheets with parchment paper or silicone mats. This is crucial for preventing the caramel and chocolate from sticking.
- Preheat your oven to 350°F (175°C). Spread the pecan halves in a single layer on a baking sheet and toast them for 5 to 7 minutes until fragrant. Watch closely to prevent burning. Remove the nuts and allow them to cool completely.
- Once cooled, arrange the pecan halves onto the prepared baking sheets in clusters of three or four nuts, positioned close together to form a small base for the turtle shape. Ensure you leave adequate space between each cluster.
- In a heavy-bottomed saucepan, combine the butter, brown sugar, corn syrup, and sweetened condensed milk. Place the saucepan over medium heat.
- Stir the mixture constantly until the butter has fully melted and the sugar has completely dissolved.
- Attach a candy thermometer to the side of the pan, ensuring the tip does not touch the bottom of the pot. Bring the mixture to a slow, rolling boil.
- Continue to cook the caramel, stirring frequently to prevent scorching, until it reaches a temperature of 245°F (118°C). This temperature ensures the caramel will be firm but chewy. This process typically takes 15 to 20 minutes of simmering.
- Remove the saucepan immediately from the heat once the desired temperature is reached. Quickly stir in the vanilla extract and salt until they are fully incorporated into the hot caramel mixture.
- Working quickly while the caramel is still hot, spoon a heaping teaspoon of the caramel mixture directly over the center of each pecan cluster. The caramel should gently pool over the nuts, covering the center completely.
- Allow the assembled pecan and caramel clusters to cool and set completely at room temperature for several hours, or chill in the refrigerator for 30 to 45 minutes to speed up the setting process. The caramel must be firm before proceeding.
- Chop the chocolate into small pieces (if not using wafers). Microwave the chocolate in 30-second intervals, stirring thoroughly after each interval, until the chocolate is smooth and completely melted. If using shortening, stir it in now to thin the chocolate slightly.
- Carefully lift one set caramel turtle off the parchment paper. Dip the bottom of the turtle into the melted chocolate, then use a fork and spoon to drizzle the chocolate over the entire surface, ensuring the caramel is fully encased and the pecan tips are still slightly visible.
- Return the coated turtle to the clean, parchment-lined baking sheet. Repeat this process for all remaining turtles, allowing the excess chocolate to drip off.
- Allow the finished chocolate turtles to set completely at room temperature or chill them in the refrigerator for 20 minutes until the chocolate shell is firm and glossy. Once set, store the Homemade Chocolate Turtles in an airtight container.


