The humble cheese ball is a party staple, but sometimes, a classic needs a fiery update. Enter the Jalapeño Popper Cheese Ball a creamy, savory mashup that takes everything you love about the iconic fried appetizer and transforms it into a show-stopping, easy-to-make dip perfect for any gathering. This recipe combines tangy cream cheese with sharp cheddar, smoky bacon, and just the right punch of jalapeño heat, all wrapped up in a golden, crunchy panko and chive coating.
Forget the deep fryer; this appetizer delivers maximum flavor with minimal effort. It’s the perfect centerpiece for your holiday spread, game day snacks, or simply an elevated weekend treat. The best part? It’s designed to be made ahead of time, allowing you to focus entirely on your guests (or enjoying the compliments). If you’re searching for the perfect appetizer that balances rich, cooling cheese with a satisfying spice, look no further than this definitive guide to creating the perfect Jalapeño Popper Cheese Ball.
Recipe Overview: Jalapeño Popper Cheese Ball
| Yield | Prep Time | Chill Time |
|---|---|---|
| 1 Large Cheese Ball (Serves 10-15) | 20 Minutes | 2 Hours Minimum |
Why You Need This Jalapeño Popper Cheese Ball in Your Life
In the world of appetizers, the cheese ball reigns supreme for its simplicity and universal appeal. But this specific rendition the Jalapeño Popper Cheese Ball transcends the ordinary by introducing complex flavors and textures that keep everyone coming back for more. If you’ve ever hesitated about making a cheese ball, let these reasons convince you that this is the recipe you must try.
The Perfect Blend of Heat and Creaminess
Traditional jalapeño poppers rely on breading and deep frying to achieve their signature crunch. We capture that essence without the grease. The creamy base, composed of super-softened cream cheese, sharp cheddar, and a touch of Parmesan, acts as a cooling counterpoint to the heat of the finely diced jalapeños. We use jarred jalapeños for a consistent, milder heat, ensuring the spice is noticeable but never overwhelming. This precise balance is what makes this specific Jalapeño Popper Cheese Ball so addictive.
Unbeatable Texture Contrast
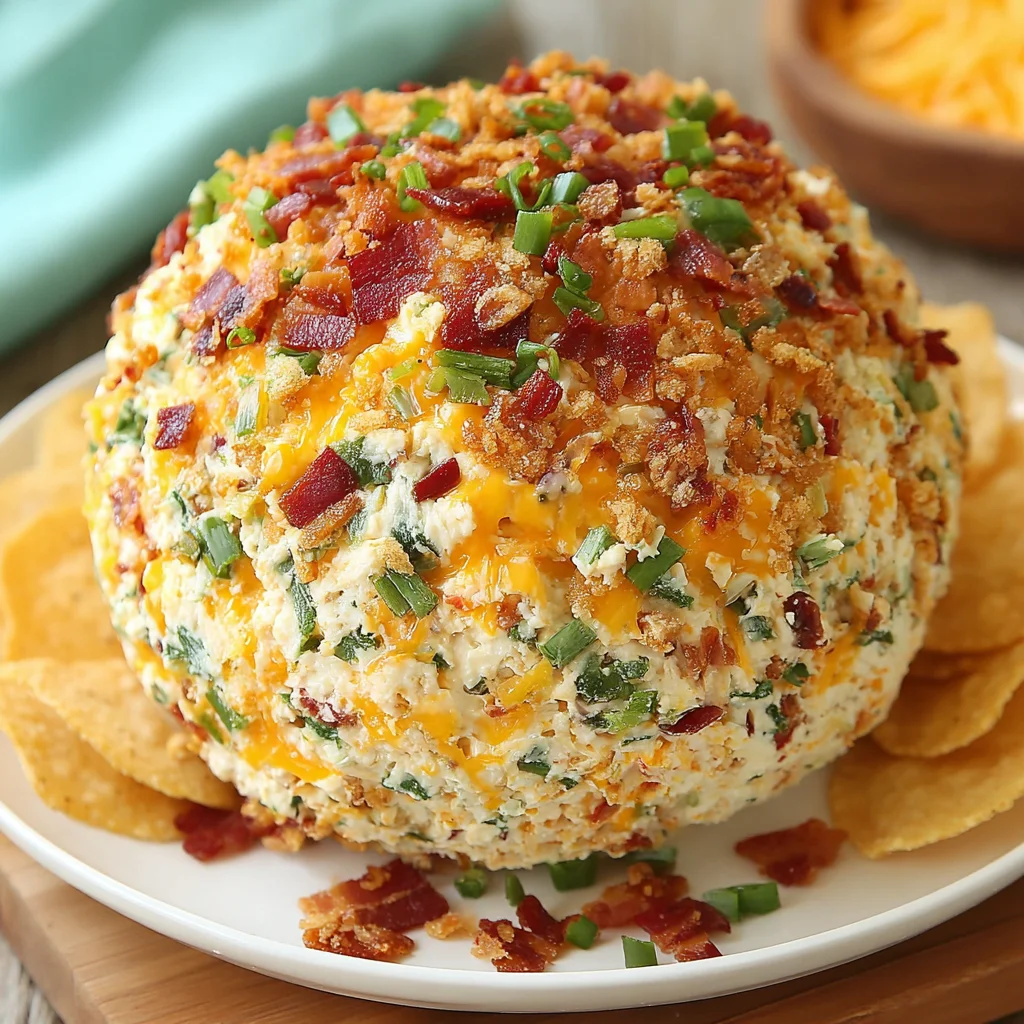
Texture is everything in a great appetizer. Inside the cheese ball, you have smooth, fluffy cheese punctuated by chunks of crispy bacon and reserved shredded cheddar, giving you pockets of pure, melty flavor. The outside, however, is a revelation. By utilizing panko breadcrumbs which are lighter and crispier than regular breadcrumbs and lightly toasting them in butter, we create a golden, crunchy shell. Mixed with fresh chives and extra bacon crumbles, this coating provides a satisfying textural pop that mimics the perfect popper crust, ensuring every bite of the Jalapeño Popper Cheese Ball is a delightful sensory experience.
A Make-Ahead Marvel
Hosting can be stressful, but this recipe is a masterclass in easy entertaining. The vast majority of the work mixing, shaping, and chilling is done hours, or even days, before your event. This long chilling period is not just for firmness; it allows the flavors of the garlic, onion powder, bacon, and jalapeños to fully marry and intensify, creating a much deeper, richer taste profile than dips mixed and served immediately. You only need 10 minutes before serving to roll the perfectly formed cheese ball in its glorious coating.
Furthermore, the visual appeal of the Jalapeño Popper Cheese Ball, studded with vibrant green chives and golden brown panko, makes it an immediate focal point on any appetizer table. Serve it alongside other crowd-pleasers like a rich Creamy Dreamy Pimento Cheese for a full spread of cheesy goodness.
Why You Should Try This Recipe Right Now
If you love the savory, spicy, cheesy complexity of classic jalapeño poppers, translating that flavor profile into a large, shareable cheese ball is simply genius. This recipe takes convenience and flavor to a whole new level, making it essential for your recipe rotation. Beyond the incredible taste, there are practical reasons why this specific recipe stands out.
Simplicity and Speed of Preparation
Despite the sophisticated flavor, the actual active preparation time for the Jalapeño Popper Cheese Ball is incredibly short just 20 minutes! The most crucial step is ensuring your cream cheese is completely softened. This foundational detail ensures a smooth, lump-free base without the need for intense mixing, which can sometimes split the cheese or incorporate too much air. Once the base is creamy, folding in the additions the star ingredients like the crisp bacon and diced jalapeños is quick and easy. This simple process makes it accessible even for novice home cooks.
Ideal for Any Occasion
Whether you’re planning a casual football viewing party, a sophisticated cocktail hour, or a festive holiday gathering, the versatility of the Jalapeño Popper Cheese Ball makes it suitable for all events. It requires no heating element once prepared, making it perfect for potlucks or outdoor entertaining where oven space might be limited. The fact that it improves after chilling means you are never scrambling at the last minute. Consider serving this alongside a contrasting dip, like a tangy Cranberry Pecan Cheese Ball, for maximum variety and flavor balance on your buffet.
Controlling the Spice Level
One of the challenges with traditional poppers is predicting the heat level. This Jalapeño Popper Cheese Ball recipe gives you total control. By using jarred or canned jalapeños, the initial intense heat is mellowed significantly, allowing the savory, vegetal flavor of the pepper to shine without burning your palate. If you prefer more spice, you can easily substitute Pepper Jack cheese for the sharp cheddar in the base, or increase the amount of fresh, seeded jalapeño in the mix. Conversely, for a milder version, simply reduce the quantity of the diced peppers. This adaptability ensures the appetizer pleases everyone at your table.
The long chilling time ensures the Jalapeño Popper Cheese Ball holds its majestic shape beautifully, even when faced with aggressive dippers. This firmness is key to its success as a robust, portable appetizer.
Ingredients and Necessary Utensils for the Best Jalapeño Popper Cheese Ball
Achieving cheese ball perfection starts with quality ingredients and the right tools. We break down the required components and equipment to ensure your Jalapeño Popper Cheese Ball is a masterpiece of flavor and texture.
FOR THE CHEESE BALL:
- 2 (8-ounce) blocks cream cheese: Crucial that this is completely softened to room temperature. If it’s cold, you will end up with lumps, and the mixture will be difficult to beat into a fluffy texture. This is the structural foundation of your cheese ball.
- 2 cups shredded sharp cheddar cheese: Divided. We use sharp cheddar for its robust flavor, which cuts through the richness of the cream cheese. Alternatively, you can use Pepper Jack for an immediate heat boost. Using pre-shredded cheese is fine, but freshly shredded cheese melts into the base better. We reserve 1/2 cup to fold in whole for extra texture and visual appeal.
- 1/2 cup grated Parmesan cheese: Adds a savory, salty, umami depth that elevates the flavor profile beyond standard cheddar cheese balls.
- 1/2 cup mayonnaise or sour cream: This acts as a binder and adds crucial moisture and tanginess. Sour cream provides a slightly more robust tang, while mayonnaise makes the mixture incredibly smooth.
- 1/2 cup crispy cooked bacon, crumbled: Use high-quality bacon. It must be crispy, not chewy. Reserve exactly 2 tablespoons for the final coating to maximize the bacon flavor explosion.
- 1/4 cup finely diced jarred or canned jalapeños: The star flavor. It is absolutely essential that these are drained very well and patted dry. Excess moisture is the enemy of a firm cheese ball. Use a paper towel to press out as much liquid as possible.
- 1 teaspoon garlic powder & 1/2 teaspoon onion powder: These dried spices offer concentrated flavor without introducing the moisture and harshness of fresh garlic or onion.
- 1/2 teaspoon black pepper & 1/4 teaspoon salt: Adjust the salt based on how salty your bacon is. Start low, taste later.
FOR THE CRUNCHY COATING:
The coating is what seals the deal, offering that satisfying crunch synonymous with a popper.
- 1 cup panko breadcrumbs: Panko is non-negotiable here. Its larger, flakier texture provides superior crunch compared to traditional breadcrumbs.
- 2 tablespoons butter, melted (optional): Used specifically for toasting the panko. Toasting enhances the flavor, color, and crunch, adding a professional touch to your Jalapeño Popper Cheese Ball.
- 1/4 cup fresh chives, finely chopped: Adds color, freshness, and a delicate onion flavor that pairs perfectly with the savory base.
- Remaining 2 tablespoons crispy bacon crumbles: Reserved earlier, this ensures the coating is as flavorful as the interior.
Essential Tools and Equipment
While this recipe is simple, having the right equipment ensures success, especially when aiming for that light, fluffy cheese base.
1. Mixing Power: Electric Mixer (Hand or Stand)
While you theoretically could mix the base by hand, an electric mixer is highly recommended, especially when dealing with cold kitchen temperatures. It incorporates air quickly, resulting in a light, airy base. A stand mixer with a paddle attachment or a simple electric hand mixer will work perfectly for blending the cream cheese, Parmesan, and spices until they reach that smooth, fluffy consistency.
2. Large Mixing Bowl & Rubber Spatula
You need a bowl large enough to accommodate all the cheese and subsequent additions. The rubber spatula is crucial for the second step: folding in the jalapeños, bacon, and cheddar. Folding, not beating, prevents the mixture from becoming overly soft or the inclusions from breaking down.
3. Plastic Wrap
This simple item is perhaps the most important tool for the shaping and chilling process. It keeps your hands clean, allows you to apply pressure for a tight, firm shape, and prevents the cheese ball from drying out or absorbing refrigerator odors during its essential chilling period.
4. Shallow Dish or Pie Plate
Used for combining the coating ingredients and, more importantly, for rolling the chilled Jalapeño Popper Cheese Ball. The wide, shallow surface allows for easy, even coverage.
5. Small Skillet (Optional, but Recommended)
If you choose to toast your panko and you absolutely should for maximum flavor a small skillet is necessary. Toasting the panko in butter is a simple technique that elevates the final coating from good to great. Be sure to allow the toasted crumbs to cool completely before mixing them with the chives and bacon.
Using these precise measurements and tools guarantees a consistently perfect Jalapeño Popper Cheese Ball every time. Understanding the role of each component, from the softened cream cheese to the crispy panko, is the secret behind a truly successful appetizer.
Detailed Recipe Steps: Crafting Your Perfect Jalapeño Popper Cheese Ball
Follow these steps precisely to ensure your cheese ball is firm, flavorful, and ready to impress. The key to this long and easy recipe is respecting the preparation and chilling times.
STEP 1: PREPARE THE CHEESE BASE (The Foundation of Flavor)
- Gather and Soften: Ensure your 2 blocks of cream cheese are completely softened to room temperature. This is non-negotiable for a smooth finish. Place the softened cream cheese, the grated Parmesan cheese, and 1 1/2 cups of the shredded cheddar cheese into your large mixing bowl. Remember to reserve the remaining 1/2 cup shredded cheddar for Step 2.
- Add Seasoning: Add the mayonnaise (or sour cream), garlic powder, onion powder, salt, and pepper to the bowl.
- Beat to Fluffy Perfection: Using an electric hand mixer or a stand mixer fitted with the paddle attachment, beat the mixture on medium speed. Start slow to prevent splattering, then increase speed. Beat until all ingredients are completely smooth, light, and fluffy. This usually takes 2 to 3 minutes. Tip: Stop frequently and scrape down the sides of the bowl to ensure every bit of cheese is incorporated and lump-free.
STEP 2: FOLD IN THE FILLINGS (Adding the Signature Popper Punch)
This step requires care. We want the fillings evenly distributed, but we don’t want to overwork the mixture or break up the jalapeño pieces.
- Prep the Jalapeños: Make sure your 1/4 cup of finely diced jalapeños are thoroughly drained and patted dry. Moisture will compromise the texture of your final Jalapeño Popper Cheese Ball.
- Gentle Mixing: Using a rubber spatula, gently fold the prepared jalapeños, the 1/2 cup of crumbled bacon, and the remaining 1/2 cup of reserved shredded cheddar cheese into the cream cheese mixture.
- Stop Mixing: Mix only until the inclusions are evenly distributed throughout the cheese mixture. Practical Tip: Avoid overmixing! If you mix too vigorously or for too long, the cheese base will soften excessively, making shaping difficult and potentially leading to a weeping cheese ball once thawed.
STEP 3: SHAPE AND CHILL THE BALL (The Crucial Firming Stage)
The chilling process is what gives the Jalapeño Popper Cheese Ball its signature firm texture, essential for rolling and serving.
- Prep the Wrap: Lay a large, durable sheet of plastic wrap (about 18 inches long) on your clean counter surface.
- Spoon and Gather: Spoon the entire cheese mixture onto the center of the plastic wrap.
- Shape the Sphere: Use the edges of the plastic wrap to help you gather and compress the mixture into a uniform, tight sphere. Work quickly but firmly. The goal is a perfect, compact ball.
- Wrap Tightly: Once shaped, wrap the cheese ball tightly in the plastic wrap, ensuring you squeeze out any air pockets. The tighter the wrap, the firmer the final product.
- Chill Time: Place the wrapped cheese ball in the refrigerator to chill and firm up for at least 2 hours. For the best texture, aim for 4 hours, or even overnight. The chilling step is absolutely crucial for achieving a firm, rollable texture that won’t collapse when coated or served.
STEP 4: PREPARE THE CRUNCHY COATING (The Popper Exterior)
- Toast the Panko (Recommended for Maximum Crunch): In a small skillet, melt 2 tablespoons of butter over medium heat. Add the 1 cup of panko breadcrumbs and toast, stirring frequently, until they achieve a gorgeous golden brown color and are fragrant (this usually takes about 3–5 minutes). Remove from heat immediately and spread the toasted panko on a plate to cool completely. (If skipping this step, use plain raw panko, though the crunch won’t be as deep.)
- Combine Coating Ingredients: In a shallow dish or pie plate, combine the cooled panko breadcrumbs, the chopped fresh chives (which provide fantastic color), and the remaining 2 tablespoons of reserved crispy bacon crumbles. Mix the coating ingredients well until the chives and bacon are evenly distributed among the panko.
STEP 5: COAT AND SERVE (The Grand Finale)
- Unwrap: Remove the chilled Jalapeño Popper Cheese Ball from the refrigerator and unwrap the plastic wrap. It should feel quite firm to the touch.
- Roll and Press: Place the firm cheese ball into the shallow dish containing the coating mixture. Gently roll the cheese ball, pressing the coating onto the surface firmly with your hands. Ensure the entire ball is evenly and thoroughly covered. Do not leave any creamy spots exposed.
- Serving: The Jalapeño Popper Cheese Ball can be served immediately, or you may refrigerate it again (loosely wrapped) for up to 2 days before serving. Serving it immediately ensures the panko is at its crispiest.
- Presentation: Serve with sturdy crackers (Ritz, Triscuits), toasted baguette slices, pretzel thins, or fresh vegetable sticks (carrot, celery) for a lighter dipping option.
Tips, Troubleshooting, and Delicious Variations
Mastering the Jalapeño Popper Cheese Ball is easy, but a few pro tips can elevate your appetizer from great to legendary. Plus, discover how to adapt this recipe for different dietary needs or flavor preferences.
Troubleshooting Common Cheese Ball Mistakes
1. My Cheese Ball is Too Soft!
This is the most common issue, usually stemming from two causes: 1) The cream cheese wasn’t softened enough initially (leading to over-beating later), or 2) Too much moisture was introduced. If your mixture feels too soft after Step 2, resist the urge to add more dry ingredients. Instead, tightly wrap the ball and chill it for a minimum of 6 hours, or even overnight. The long, slow chill is the cure for softness. Also, ensure you drained the jalapeños properly.
2. The Coating Isn’t Sticking
This happens if the cheese ball isn’t cold enough. If the surface of the ball starts to sweat or become oily as you handle it, the coating won’t adhere evenly. If this occurs, stop rolling, place the ball back in the freezer for 15 minutes, and then resume coating.
3. Making it Ahead
This recipe is perfect for advance preparation. You can prepare the entire Jalapeño Popper Cheese Ball, wrap it tightly, and store it in the refrigerator for up to 4 days before adding the coating. Wait to coat it until 1-2 hours before serving to keep the panko and chives vibrant and crunchy.
Flavor and Ingredient Variations
Spice Level Adjustments
- Extra Mild: Use only Monterey Jack cheese instead of Sharp Cheddar. Substitute a portion of the jalapeños with finely diced green bell pepper.
- Spicy Kick: Use Pepper Jack cheese instead of cheddar. Add a small pinch of cayenne pepper or a dash of hot sauce (like Cholula or Tabasco) to the cream cheese mixture.
- Smoky Flavor: Use chipotle powder instead of or alongside the onion powder. This adds a beautiful, subtle smokiness that complements the bacon.
Cheese and Bacon Swaps
While cheddar is traditional, feel free to experiment:
- Cheese: Substitute the sharp cheddar entirely with Pepper Jack, smoked Gouda, or a mixture of Monterrey Jack and Colby.
- Meat Alternatives: For a non-pork option, use finely chopped turkey bacon or crumbled crispy prosciutto. For a vegetarian version, substitute the bacon with sun-dried tomatoes (pat them dry!) and a generous pinch of smoked paprika.
Coating Innovations
If you don’t have panko, or want an alternative to the traditional popper look, try these coatings:
- Nutty Crunch: Use finely chopped pecans or walnuts, toasted in butter.
- Crispy Fried Onions: Crush up fried onions (like those used in green bean casserole) for a super savory, oniony coating.
- Everything Bagel: Roll the ball in everything bagel seasoning for a garlicky, savory crust.
For more appetizer ideas, especially ones that pair well with this savory dish, check out my Pinterest board for easy party dips and snacks. This Jalapeño Popper Cheese Ball is a fantastic companion to sweet and spicy options like a Sweet and Spicy Cranberry Salsa.
Nutritional Values and Ingredient Benefits of the Jalapeño Popper Cheese Ball
While the Jalapeño Popper Cheese Ball is definitely a decadent party appetizer, understanding its components allows for better planning and appreciation of the flavor complexity.
A Note on Calories and Macros
As a dish centered on cream cheese, cheddar, and bacon, this cheese ball is naturally high in fat and protein, making it extremely satiating. Exact nutritional information varies based on the brands of cheese and bacon used, but here is a general breakdown per serving (assuming 15 servings for the large ball):
| Metric | Estimated Value (per serving) |
|---|---|
| Calories | 250–300 kcal |
| Total Fat | 20–25g |
| Protein | 10–12g |
| Carbohydrates | 4–6g |
This dish is naturally low in carbohydrates, making it suitable for those following lower-carb diets, especially when served with vegetable sticks or low-carb crackers. The high protein and fat content mean a small portion is surprisingly filling, making it an excellent energy source for long parties or game days.
Ingredient Benefits: More Than Just Flavor
1. Dairy Power (Cream Cheese and Cheddar)
The core of the Jalapeño Popper Cheese Ball provides significant nutritional benefits, mainly calcium and protein. Dairy products are essential for bone health. Sharp cheddar and Parmesan are also great sources of Vitamin K2, which plays a role in calcium metabolism.
2. The Spice of Life (Jalapeños)
Jalapeños offer more than just heat; they are rich in vitamins, particularly Vitamin C and Vitamin A, and powerful antioxidants. The compound that gives jalapeños their heat capsaicin has been widely studied for its potential benefits, including temporary pain relief and minor metabolism boosting properties. Even in a small amount used in this recipe, jalapeño contributes a fresh, complex flavor profile.
3. The Role of Bacon and Fats
The fat content from the cream cheese and bacon is essential not just for texture but for nutrient absorption. Fat helps the body absorb fat-soluble vitamins (A, D, E, and K). Bacon provides protein and B vitamins (like B12 and niacin). While bacon should be enjoyed in moderation, the small amount used in this large Jalapeño Popper Cheese Ball recipe ensures that it functions primarily as a potent flavor enhancer.
The combination of savory cheese, spicy pepper, and smoky bacon creates a flavor synergy that is deeply satisfying, proving that balance in taste can be just as important as nutritional balance.
Frequently Asked Questions (FAQs) about the Jalapeño Popper Cheese Ball
Here are answers to the most common questions about preparing and serving the Jalapeño Popper Cheese Ball to ensure your success.
How far in advance can I make the Jalapeño Popper Cheese Ball?
You can prepare the cheese mixture, shape it into a ball, and chill it for up to 4 days in advance. Ensure it is tightly wrapped in plastic wrap to prevent it from drying out or absorbing refrigerator odors. Do not add the panko coating until 1 to 2 hours before you plan to serve the Jalapeño Popper Cheese Ball to maintain maximum crispness.
Can I use fresh jalapeños instead of jarred ones for this recipe?
Yes, you can substitute fresh jalapeños, but be aware they will be significantly spicier and wetter than jarred ones. If using fresh, make sure to completely remove the seeds and white membranes (where most of the heat resides) and finely dice them. You must also pat them very thoroughly dry before folding them into the Jalapeño Popper Cheese Ball mixture to avoid adding excess moisture.
What is the best way to serve a large Jalapeño Popper Cheese Ball?
The Jalapeño Popper Cheese Ball is best served at room temperature or slightly chilled, not straight out of the fridge, as the flavors and spreadability improve when warmer. Place it on a platter surrounded by a variety of sturdy dippers like pita chips, thick-cut baguette slices, robust crackers (like Wheat Thins or Triscuits), and crisp vegetables such as carrots and celery sticks. Provide a serving knife for guests to cut pieces if needed.
Why is softening the cream cheese so important?
Softening the cream cheese ensures that the final mixture is smooth and lump-free. If the cream cheese is cold, you will have to beat it longer and harder, which can introduce too much air, leading to a softer, less stable cheese ball. Room temperature cream cheese mixes easily with the other ingredients, creating a light yet stable base for your Jalapeño Popper Cheese Ball.
What kind of crackers pair best with the spicy Jalapeño Popper Cheese Ball?
Because the Jalapeño Popper Cheese Ball is rich and features a crunchy coating, you need sturdy dippers that won’t break. Water crackers, pretzel thins, hearty whole-grain crackers, or toasted baguette slices provide the best structural support. Avoid overly fragile or very salty crackers, as they might compete too strongly with the savory flavor profile.
Conclusion: Your New Favorite Jalapeño Popper Cheese Ball Recipe
This recipe transforms the appetizer world, marrying the intense, savory spice of a classic jalapeño popper with the effortless elegance of a homemade cheese ball. From the creamy, tangy core infused with garlic and bacon, to the perfectly toasted panko crust studded with fresh chives, every component of this Jalapeño Popper Cheese Ball is designed for maximum flavor and textural satisfaction.
We’ve emphasized the critical steps: ensuring your cream cheese is perfectly soft, draining your jalapeños meticulously, and allowing sufficient chill time these are the non-negotiable details that guarantee a firm, beautiful, and spreadable appetizer. Whether you serve it for a major holiday, a backyard barbecue, or a simple family get-together, this cheese ball will undoubtedly be the star of the table.
The beauty of the Jalapeño Popper Cheese Ball lies not only in its explosive taste but in its simplicity. It’s an easy, long recipe that rewards patience, allowing you to prep days in advance. This frees up your valuable time for other delicious kitchen endeavors, perhaps baking a seasonal favorite like Easy Chocolate Pudding Pie for dessert.
Give this definitive Jalapeño Popper Cheese Ball recipe a try, embrace the heat, enjoy the crunch, and prepare for rave reviews. We encourage you to share your results and any creative variations you discover in the comments below!
Jalapeño Popper Cheese Ball (Easy Make-Ahead Appetizer)
Ingredients
Equipment
Method
- Place the completely softened cream cheese, Parmesan cheese, and 1 1/2 cups of the shredded cheddar cheese into a large mixing bowl. Reserve the remaining 1/2 cup shredded cheddar for later.
- Add the mayonnaise (or sour cream), garlic powder, onion powder, salt, and pepper to the bowl.
- Using an electric hand mixer or a stand mixer fitted with the paddle attachment, beat the mixture on medium speed until all ingredients are completely smooth, light, and fluffy, scraping down the sides of the bowl as needed. This usually takes 2 to 3 minutes.
- Using a rubber spatula, gently fold the drained jalapeños, the 1/2 cup of crumbled bacon, and the remaining 1/2 cup of reserved shredded cheddar cheese into the cream cheese mixture. Mix just until the inclusions are evenly distributed throughout the cheese mixture. Avoid overmixing, as this can make the mixture too soft.
- Lay a large sheet of plastic wrap on your counter surface. Spoon the entire cheese mixture onto the center of the plastic wrap. Use the plastic wrap to help you gather and shape the mixture into a uniform, tight sphere (a ball).
- Wrap the cheese ball tightly in the plastic wrap, ensuring there are no air pockets. Place the wrapped cheese ball in the refrigerator to chill and firm up for at least 2 hours, or preferably up to 4 hours.
- Optional Step for Extra Crunch: In a small skillet, melt 2 tablespoons of butter over medium heat. Add the panko breadcrumbs and toast, stirring frequently, until they are golden brown and fragrant (about 3–5 minutes). Remove from heat and allow to cool completely. (If skipping this step, use plain raw panko.)
- In a shallow dish or pie plate, combine the cooled panko breadcrumbs, the chopped fresh chives, and the remaining 2 tablespoons of reserved crispy bacon crumbles. Mix the coating ingredients well.
- Remove the chilled cheese ball from the refrigerator and unwrap the plastic wrap.
- Place the firm cheese ball into the shallow dish containing the coating mixture. Gently roll the cheese ball, pressing the coating onto the surface firmly with your hands until the entire ball is evenly and thoroughly covered.
- The Jalapeño Popper Cheese Ball can be served immediately with sturdy crackers, toasted baguette slices, pretzel thins, or fresh vegetable sticks.


