Halloween is just around the corner, and what better way to celebrate than with these incredibly delicious and spooky Chocolate Spider Cookies? These aren’t your average chocolate chip cookies; they’re a fun, festive treat that’s perfect for Halloween parties, school bake sales, or simply satisfying your sweet tooth. Imagine the rich, decadent chocolate flavor of a perfectly baked cookie, enhanced by the playful addition of creepy-crawly spider legs. This recipe is surprisingly easy to follow, even for beginner bakers, promising a batch of hauntingly good cookies that will impress everyone. Prepare to be amazed by how simple it is to transform classic chocolate chip cookies into these delightful Halloween treats. The combination of chewy chocolate cookies and the detailed spider decorations makes these cookies a truly unique and unforgettable Halloween experience. Get ready to unleash your inner artist and create a batch of cookies that are as delicious as they are delightfully spooky!
Why You’ll Love This Chocolate Spider Cookies Recipe
This Chocolate Spider Cookies recipe is more than just a Halloween treat; it’s a baking experience you’ll cherish. First and foremost, the taste is undeniably fantastic. The cookies themselves are perfectly chewy, with a deep, intense chocolate flavor from the rich cocoa powder. The generous amount of chocolate chips adds another layer of chocolatey goodness, making every bite an absolute indulgence. But it’s not just about the flavor; it’s the fun factor! Decorating these cookies is an incredibly enjoyable activity, perfect for family baking sessions or a fun Halloween gathering with friends. Getting creative with the spider legs and eyes adds a personal touch, making each cookie unique and special.
Another reason to love this recipe is its simplicity. The cookie dough comes together quickly and easily, even if you’re a novice baker. The instructions are clear and concise, guiding you through each step effortlessly. There’s no need for complex techniques or specialized equipment; just basic baking essentials are sufficient. This recipe is perfect for busy schedules, allowing you to whip up a batch of delicious cookies without spending hours in the kitchen. Finally, the visual appeal is undeniable. These Chocolate Spider Cookies are beautiful, charming, and perfectly themed for Halloween. They’ll be the star of any Halloween spread, impressing guests and sparking conversation. Prepare to receive countless compliments on your baking skills, and be ready to share the recipe with everyone who tries them.
Why You Should Try This Chocolate Spider Cookies Recipe
Beyond the deliciousness and fun, there are several compelling reasons to try this Chocolate Spider Cookies recipe. It’s a fantastic way to get kids involved in the kitchen. Baking together is a wonderful bonding experience, and the decorating process is especially engaging for children. They’ll love creating their own spooky spiders, fostering creativity and a sense of accomplishment. The recipe is also highly adaptable. While the classic version is already delicious, you can easily customize it to your preferences. Want to add nuts? Go ahead! Prefer different types of chocolate chips? Absolutely! This recipe is a blank canvas for your culinary creativity.
Furthermore, these cookies make fantastic gifts. Packaged beautifully in a festive container, they make thoughtful and delicious presents for friends, neighbors, teachers, or anyone you want to share a little Halloween cheer with. Their unique appearance and delicious flavor will certainly be appreciated. In addition to being a delightful treat, these cookies can also elevate your Halloween celebrations. They’re perfect for parties, providing a fun and delicious alternative to traditional candy. The cute spider decorations add a touch of playful spookiness to your festivities, adding to the overall ambiance. Finally, making these Chocolate Spider Cookies allows you to create lasting memories. The time spent baking and decorating together will become a treasured tradition, fondly remembered for years to come. It’s more than just a recipe; it’s a recipe for creating unforgettable Halloween moments.
Ingredients and Utensils for Perfect Chocolate Spider Cookies
Gathering the right ingredients and utensils is key to baking success. Let’s delve into the specifics to ensure you have everything you need to create these amazing Chocolate Spider Cookies.
Ingredients: A Detailed List
- Unsalted Butter (1 cup, 2 sticks): Use softened butter for optimal creaming. This ensures a smooth and fluffy cookie dough. Avoid using melted butter, as it will result in a different texture.
- Granulated Sugar (1 cup): Provides sweetness and helps create a tender crumb.
- Packed Light Brown Sugar (1 cup): Adds moisture and a rich caramel flavor to the cookies.
- Large Eggs (2): Bind the ingredients together and add richness to the cookie dough. Ensure they are at room temperature for best results.
- Vanilla Extract (2 teaspoons): Enhances the overall flavor of the cookies. Use a high-quality vanilla extract for the best taste.
- All-Purpose Flour (3 cups): Provides structure to the cookies. Make sure to measure your flour accurately using the spoon and level method.
- Baking Soda (1 teaspoon): Acts as a leavening agent, helping the cookies rise slightly.
- Salt (1 teaspoon): Balances the sweetness and enhances the overall flavor. Don’t skip the salt!
- Unsweetened Cocoa Powder (1 cup): Gives the cookies their deep chocolate flavor. Use Dutch-processed cocoa powder for a richer, less acidic taste.
- Chocolate Chips (1 cup): Adds extra chocolatey goodness. Feel free to experiment with different types of chocolate chips, such as milk chocolate, dark chocolate, or even white chocolate.
- Black Candy Melts or Decorating Icing: Used to create the spider legs. Choose a high-quality brand for easy melting and smooth application.
- Small Candy Eyeballs (Optional): Adds a fun, spooky touch to your spider cookies.
Recommended Utensils: Tools for Baking Success
- Large Mixing Bowls (2): One for creaming the butter and sugars, and another for combining the dry ingredients.
- Electric Mixer (Handheld or Stand Mixer): Makes creaming the butter and sugars much easier and faster. A hand mixer will work perfectly well.
- Measuring Cups and Spoons: Accurate measurements are essential for baking.
- Whisk: For combining the dry ingredients smoothly.
- Rubber Spatula or Wooden Spoon: For scraping down the sides of the bowl and ensuring all ingredients are well combined.
- Baking Sheets (2): Allows you to bake multiple batches at once without overcrowding.
- Parchment Paper: Prevents the cookies from sticking to the baking sheets.
- Rounded Tablespoon: For scooping the cookie dough onto the baking sheets.
- Wire Rack: For cooling the cookies completely after baking.
- Toothpicks or Piping Bag: For drawing spider legs onto the cookies.
- Microwave-Safe Bowl: For melting the black candy melts.
Detailed Recipe Steps: Creating Your Chocolate Spider Cookies
Following these steps carefully will ensure you achieve perfectly spooky and delicious Chocolate Spider Cookies.
- Preheat and Prepare: Preheat your oven to 375°F (190°C). Line your baking sheets with parchment paper. This crucial step prevents sticking and ensures even baking.
- Cream Butter and Sugars: In a large bowl, cream together the softened butter, granulated sugar, and brown sugar until the mixture is light and fluffy. **Use an electric mixer for best results.** This step is essential for incorporating air into the dough, resulting in lighter and chewier cookies. Cream until the mixture is pale and fluffy, about 3-5 minutes.
- Add Eggs and Vanilla: Beat in the eggs one at a time, ensuring each egg is fully incorporated before adding the next. Then, stir in the vanilla extract. **Don’t overmix at this stage; just combine the ingredients smoothly.**
- Combine Dry Ingredients: In a separate bowl, whisk together the flour, baking soda, salt, and cocoa powder until there are no lumps. **Whisk thoroughly to ensure even distribution of the cocoa powder and leavening agents.**
- Gradually Add Dry to Wet: Gradually add the dry ingredients to the wet ingredients, mixing until just combined. **Be careful not to overmix.** Overmixing develops the gluten in the flour, resulting in tough cookies. Mix only until the ingredients are just combined and no dry flour remains.
- Stir in Chocolate Chips: Gently stir in the chocolate chips. **Avoid overmixing at this point to prevent the chocolate chips from breaking down.**
- Scoop and Bake: Drop rounded tablespoons of cookie dough onto the prepared baking sheets, leaving about 2 inches between each cookie. **This spacing allows the cookies to spread properly during baking.**
- Bake to Perfection: Bake for 9-11 minutes, or until the edges are set and the centers are still slightly soft. **Start checking for doneness around the 9-minute mark.** Baking times can vary depending on your oven, so keep a close eye on them. Slightly underbaked cookies will be chewier, while overbaked cookies will be dry and hard.
- Cool and Transfer: Let the cookies cool on the baking sheets for a few minutes before transferring them to a wire rack to cool completely. **Cooling on the baking sheets helps them set before handling.** This prevents them from breaking or crumbling.
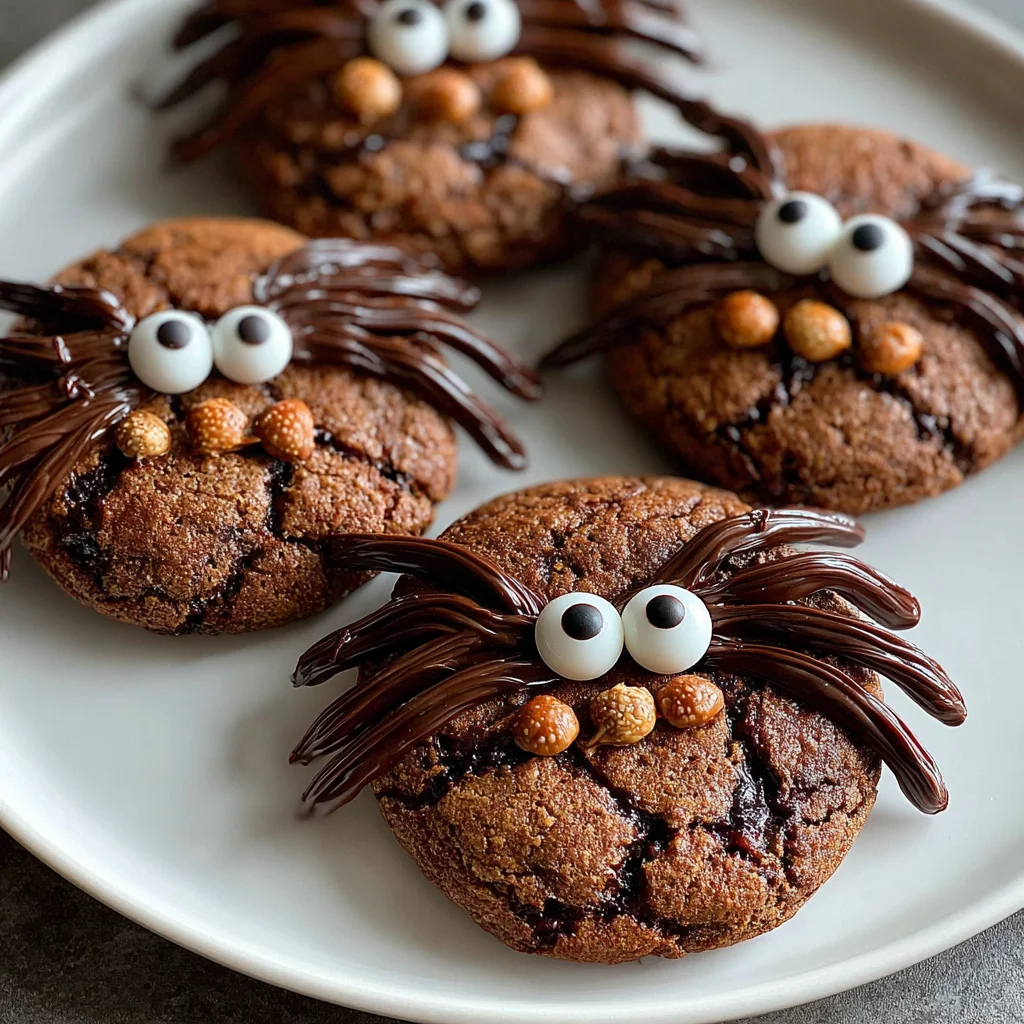
- Create the Spiders: Once the cookies are completely cool, melt the black candy melts according to package directions. Use a toothpick or piping bag to draw spider legs onto the cookies. Add candy eyeballs if desired. **Allow the spider legs to set completely before serving or storing.**
Tips and Variations for Your Chocolate Spider Cookies
Experiment with different variations to customize these Chocolate Spider Cookies to your liking.
- Ingredient Alternatives: Substitute gluten-free flour blend for all-purpose flour to make gluten-free cookies. For vegan cookies, use vegan butter and flax eggs (1 tablespoon ground flaxseed meal mixed with 3 tablespoons of water per egg).
- Flavor Variations: Add a teaspoon of espresso powder to the dry ingredients for a mocha twist. Include chopped nuts (pecans, walnuts, or almonds) for added crunch and flavor.
- Decoration Ideas: Use different colored candy melts to create colorful spiders. Get creative with the spider leg designs, making them long, short, curvy, or even adding extra details. Try using edible glitter for extra sparkle.
- Avoiding Common Mistakes: Don’t overmix the cookie dough, as this can result in tough cookies. Ensure the butter is softened but not melted. Don’t overcrowd the baking sheets, as this can prevent even baking.
Nutritional Information and Health Benefits
While these Chocolate Spider Cookies are a treat, it’s good to understand their nutritional value. Please note that nutritional information is approximate and can vary based on specific ingredients used. A single medium-sized Chocolate Spider Cookie (approximately 30g) might contain:
- Calories: Approximately 150-180 calories
- Protein: Approximately 2-3 grams
- Fat: Approximately 8-10 grams
- Carbohydrates: Approximately 20-25 grams
Benefits of Ingredients: Cocoa powder is rich in antioxidants, which can help protect your cells from damage. Butter provides essential fatty acids. Eggs are a good source of protein. The chocolate chips provide a mood boost, thanks to the endorphin release associated with eating chocolate. Remember, moderation is key when enjoying these delicious cookies.
FAQs about Chocolate Spider Cookies
How long do Chocolate Spider Cookies stay fresh?
Can I freeze Chocolate Spider Cookies?
What kind of chocolate chips are best for Chocolate Spider Cookies?
Are these Chocolate Spider Cookies suitable for kids?
Can I make these Chocolate Spider Cookies ahead of time?
Conclusion: Embrace the Spooky Deliciousness
These Chocolate Spider Cookies are more than just a recipe; they’re a delightful experience that combines delicious baking with creative fun. From the rich chocolatey flavor to the enchanting spider decorations, these cookies are perfect for Halloween celebrations and beyond. We hope you’ll give this recipe a try and share your spooky creations with us! Don’t forget to share your pictures on social media and tag us! Let us know in the comments below how your Chocolate Spider Cookies turned out – and happy baking!
For more delicious Halloween recipes and other sweet treats, check out our other recipes on our blog:seemorerecipes.com/blog/ And for more baking inspiration, check out our Pinterest board here!
Chocolate Spider Cookies
Ingredients
Equipment
Method
- Preheat oven to 375°F (190°C). Line baking sheets with parchment paper.
- Cream together the softened butter, granulated sugar, and brown sugar until light and fluffy using an electric mixer.
- Beat in the eggs one at a time, then stir in the vanilla extract.
- In a separate bowl, whisk together the flour, baking soda, salt, and cocoa powder.
- Gradually add the dry ingredients to the wet ingredients, mixing until just combined. Do not overmix.
- Stir in the chocolate chips.
- Drop rounded tablespoons of cookie dough onto the prepared baking sheets, leaving about 2 inches between each cookie.
- Bake for 9-11 minutes, or until the edges are set and the centers are still slightly soft.
- Cool on baking sheets for a few minutes before transferring to a wire rack to cool completely.
- Once cool, melt the black candy melts or prepare the decorating icing. Use a toothpick or piping bag to draw spider legs onto the cookies. Add candy eyeballs if desired. Let the spider legs set completely before serving.


