
Table of Contents
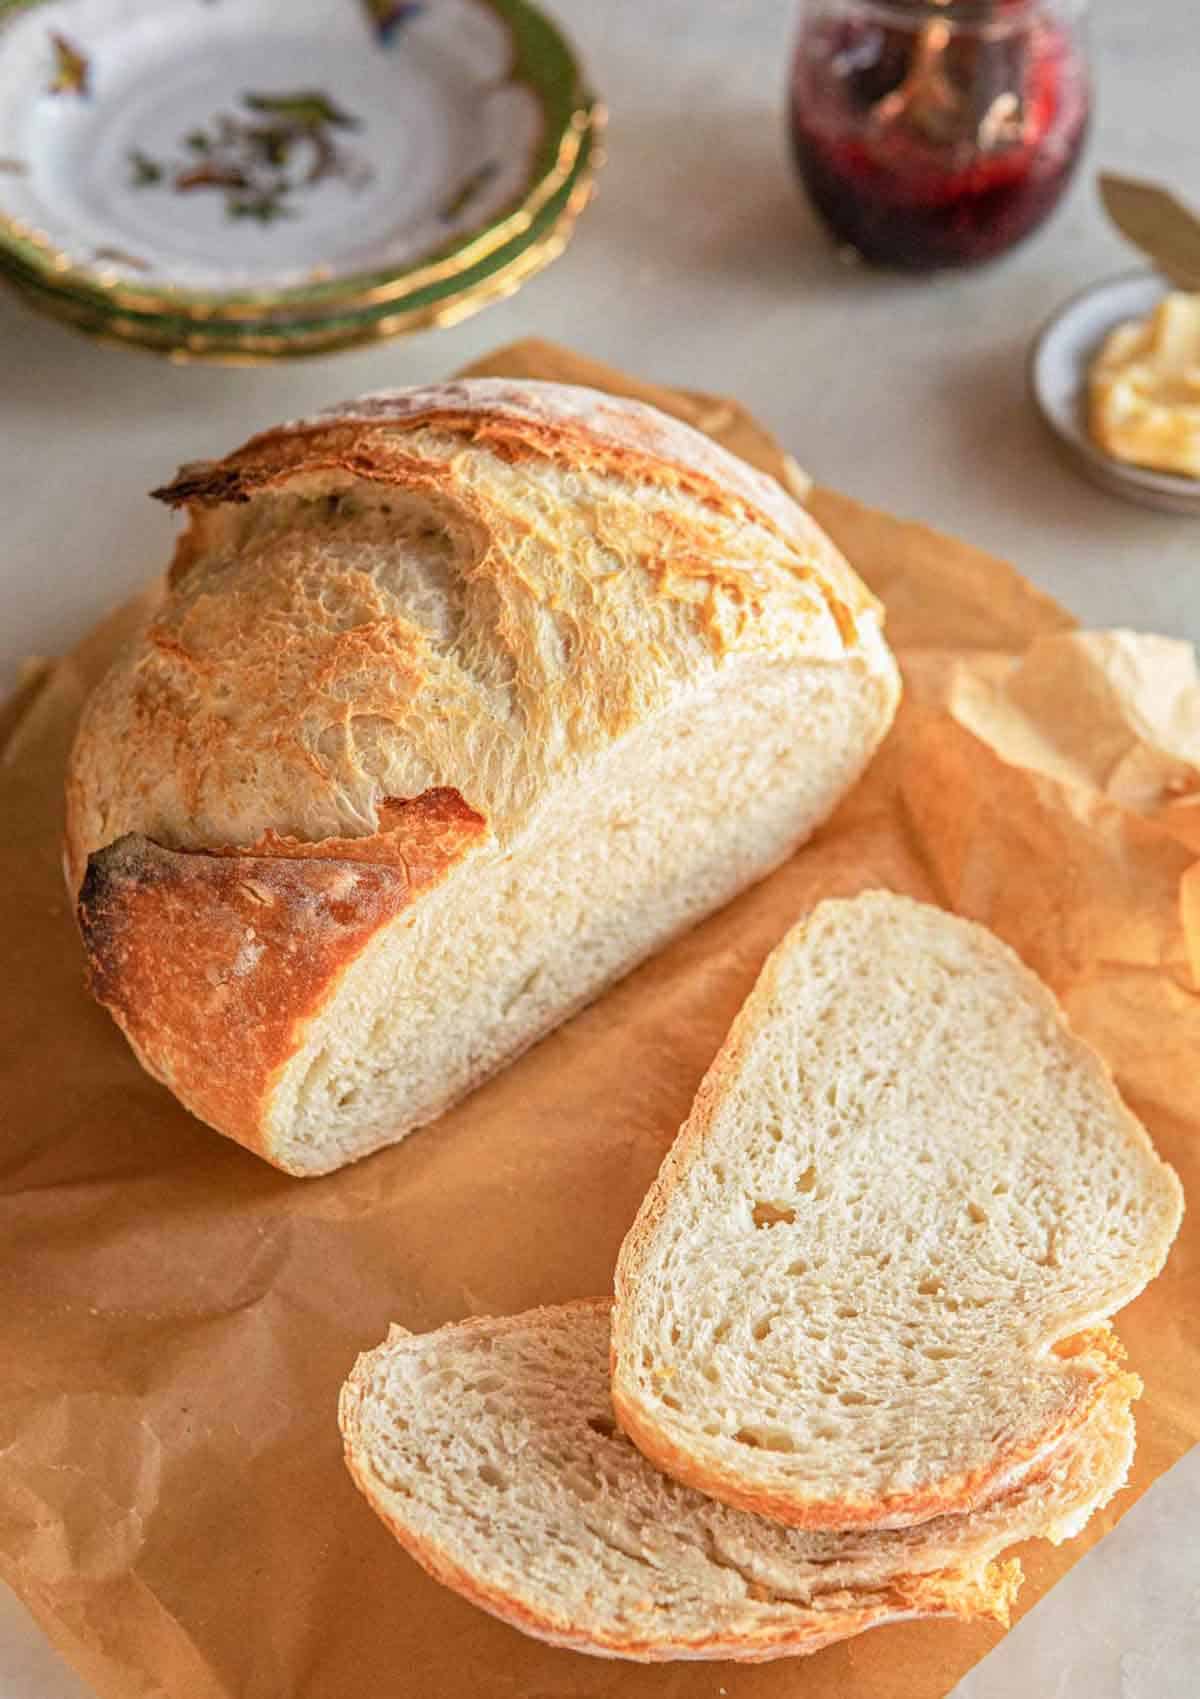
Crafting the perfect loaf of Artesano bread is a rewarding culinary journey. This isn’t your average supermarket bread; Artesano bread, with its rustic charm and deeply satisfying flavor, is a testament to slow fermentation and simple, high-quality ingredients. This comprehensive guide will take you through every step, from preparing the sourdough starter (if you’re feeling adventurous!) to achieving that magnificent, crackly crust. Prepare to be amazed by the unparalleled taste and texture you can achieve at home. Forget store-bought loaves – once you taste homemade Artesano bread, you’ll never go back!
Why You’ll Love This Artesano Bread Recipe
This Artesano bread recipe is more than just instructions; it’s an experience. The aroma alone, filling your kitchen with the yeasty scent of rising dough, is enough to make your mouth water. But the real magic happens when you slice into that golden-brown crust, revealing a tender, airy crumb. This isn’t your typical bread; it’s a masterpiece of texture and flavor.
The beauty of this recipe lies in its simplicity. With just a few basic ingredients, you can create something truly extraordinary. It’s a testament to the power of slow fermentation, allowing the flavors to develop fully and the gluten to create that perfect, chewy texture. And the satisfaction of making your own bread? Invaluable. It’s a process that connects you to the ancient art of baking, transforming a simple loaf into a symbol of culinary accomplishment. The pride you feel holding your freshly baked Artesano bread is unmatched. Imagine the joy of sharing this delicious creation with family and friends – a true testament to your baking prowess.
Beyond the taste and the pride, this recipe is incredibly versatile. You can experiment with different flours, seeds, and herbs to create your own signature Artesano bread. It’s a recipe that grows with you, allowing you to adapt and refine it over time. This isn’t just a recipe; it’s a gateway to a world of baking possibilities. From rustic loaves perfect for dipping in olive oil to gourmet sandwiches bursting with flavor, the possibilities are truly endless.
Why You Should Try This Artesano Bread Recipe
In a world of mass-produced, processed foods, there’s something deeply satisfying about making something from scratch. This Artesano bread recipe is a journey into the heart of wholesome baking, connecting you to the process and the ingredients in a way that mass-produced bread simply can’t. You’ll appreciate the quality of the ingredients, the time it takes to perfect the dough, and the satisfying results.
Beyond the inherent satisfaction of homemade baking, this recipe is surprisingly accessible. While it does require some patience (the slow fermentation is key!), the steps are straightforward and easy to follow, even for beginners. The detailed instructions and helpful tips ensure success, even if you’ve never baked bread before. It’s a chance to challenge yourself, learn a new skill, and impress yourself with what you can create.
Furthermore, this recipe allows you to control the ingredients entirely. You know exactly what goes into your bread – no hidden additives, preservatives, or questionable ingredients. This is a commitment to quality and health, creating a bread that is both delicious and nutritious. It’s a healthier alternative to commercially produced loaves, offering a more natural and flavorful experience. This Artesano bread recipe is an investment in your health and well-being, as well as your culinary skills.
Ingredients and Necessary Equipment for Artesano Bread
Ingredients:
- Flour: 500g strong bread flour (or a mix of bread and all-purpose flour). You can experiment with different flours for unique flavors and textures. Learn more about different types of flour on Wikipedia.
- Water: 300ml lukewarm water. The temperature is crucial for yeast activation.
- Salt: 10g sea salt. Salt controls yeast activity and enhances flavor.
- Yeast (optional): 10g active dry yeast or 20g fresh yeast. If making a true sourdough, skip this and use a sourdough starter (see tips below).
- Sourdough Starter (optional): 200g active sourdough starter (for a pure sourdough Artesano). Follow instructions for feeding and activating your starter before starting this recipe.
- Optional additions: Seeds (sunflower, flax, pumpkin), herbs (rosemary, thyme), olives, dried fruits – let your creativity shine!
Equipment:
- Large mixing bowl: For mixing the dough.
- Dough scraper or spatula: For handling the dough.
- Kitchen scale: For precise measurements. This is highly recommended for bread baking.
- Dutch oven (5-6 quart): Essential for creating that perfect crust. A heavy-bottomed pot works as a substitute, but a Dutch oven is ideal.
- Parchment paper: To line your Dutch oven for easy bread removal.
- Baking sheet: If you’re not using a Dutch oven.
- Banneton basket (proofing basket): Helps the bread retain its shape during the final proof. You can improvise with a bowl lined with a well-floured tea towel.
- Sharp knife or lame (bread scoring tool): For scoring the top of the bread before baking, essential for controlled expansion.
Detailed Steps for Making Artesano Bread
- Autolyse: Combine the flour and water in your mixing bowl. Mix gently until just combined, do not overmix. Cover and let rest for 30-60 minutes. This allows the flour to fully hydrate, improving dough development.
- Mixing: Add the salt and yeast (if using). Mix thoroughly until a shaggy dough forms. If using a stand mixer, use the dough hook on low speed for 5-7 minutes. If mixing by hand, knead for 10-15 minutes until the dough becomes smooth and elastic. If using a sourdough starter, add it at this stage.
- Bulk Fermentation: Place the dough in a lightly oiled bowl, cover, and let rise in a warm place for 4-6 hours, or until doubled in size. Perform a few “stretch and folds” every 30-45 minutes during the first 2 hours to develop gluten strength. This is where the magic of fermentation happens, developing flavor and texture.
- Shaping: Gently turn the dough out onto a lightly floured surface. Shape it into a round or oval loaf. This takes practice, but aim for a taut, smooth surface.
- Proofing: Place the shaped dough in a floured banneton basket or a bowl lined with a floured cloth. Cover and let proof in the refrigerator for 12-18 hours. This slow, cold proof enhances the flavor.
- Baking: Preheat your Dutch oven to 450°F (232°C). Carefully transfer the dough from the banneton to the Dutch oven, ensuring it sits nicely in the pot. Score the top of the dough with a sharp knife or lame, creating decorative cuts that will allow the bread to expand properly during baking. Cover and bake for 30 minutes. Then, remove the lid and bake for another 20-25 minutes, or until the crust is deeply golden brown and the internal temperature reaches 200-210°F (93-99°C).
- Cooling: Carefully remove the bread from the Dutch oven and let it cool completely on a wire rack before slicing and serving. This is crucial for developing the perfect texture. Resist the urge to cut it too soon!
Tips and Variations for Artesano Bread
Using a Sourdough Starter: If you’re a sourdough enthusiast, simply replace the yeast with an active sourdough starter. You’ll need a robust starter, properly fed and bubbly. The fermentation time might vary depending on your starter’s activity.
Alternative Flours: Experiment with different flour blends. Adding whole wheat or rye flour will create a denser, nuttier loaf. A combination of bread flour and all-purpose flour works well too.
Adding Flavor: Incorporate your favorite seeds, herbs, or dried fruits into the dough for extra flavor and texture. Consider sun-dried tomatoes, olives, or a mix of herbs like rosemary and thyme.
Gluten-Free Version: While a truly authentic Artesano bread relies on gluten, you can adapt the recipe by using a gluten-free bread flour blend. Remember that gluten-free baking requires different techniques and might result in a slightly different texture.
Vegan Version: This recipe is naturally vegan if you omit the yeast (using a sourdough starter instead) and avoid any non-vegan additions.
Troubleshooting: If your bread is dense, it may be under-proofed or the gluten wasn’t developed enough during kneading. If the crust is too pale, increase the baking time or temperature slightly. If your crust is too hard, shorten the baking time.
Nutritional Values and Benefits of Artesano Bread
A single serving of Artesano bread (approximately 100g) provides:
- Approximately 250-300 calories
- 7-10g protein
- 2-4g fat
- 50-60g carbohydrates
(Note: These are approximate values and can vary depending on the specific ingredients used.)
Health Benefits: Artesano bread, made with whole grains (if you choose), provides fiber, which is essential for digestive health. The slow fermentation process improves digestibility, making it easier to digest than commercially produced bread. Whole grain Artesano bread also offers essential vitamins and minerals.
FAQ: Common Questions About Artesano Bread
Q: Can I use all-purpose flour instead of bread flour? A: Yes, you can, but the texture might be slightly less chewy. Bread flour has a higher protein content, resulting in a stronger gluten network and chewier texture.
Q: What if my dough doesn’t double in size during bulk fermentation? A: This could be due to several factors, such as too cold of a room temperature, inactive yeast, or insufficient kneading. Check the yeast’s expiration date and ensure your room is warm enough (70-75°F). If you are using a sourdough starter, you need an active and well-fed starter
Q: Why is scoring the bread important? A: Scoring the bread controls the expansion during baking, preventing it from cracking unevenly. It also creates a beautiful aesthetic.
Q: Can I freeze Artesano bread? A: Yes, Artesano bread freezes beautifully. Slice it before freezing for easy reheating. To reheat, toast slices or warm them in the oven.
Q: How do I know when my bread is done? A: The crust should be deeply golden brown, and the internal temperature should reach 200-210°F (93-99°C). You can also tap the bottom of the loaf; it should sound hollow.
Conclusion: Embrace the Artesano Bread Experience
Making Artesano bread is a journey of patience and reward. The process, while requiring time and attention, connects you to the ancient art of baking. The result? A loaf of bread that surpasses any store-bought option in flavor, texture, and overall satisfaction. From the initial mix to that satisfying crusty crackle, this recipe offers an immersive experience that celebrates simple ingredients and mindful baking. Don’t hesitate – try this recipe today and share your experience in the comments below! Share your Artesano bread creations on social media using #ArtesanoBread. Let’s celebrate the joy of homemade baking together! You can also check out some more fantastic bread recipes on Allrecipes.
Artesano Bread
Ingredients
Equipment
Method
- In a large mixing bowl, combine the active sourdough starter (ing_1) with the bread flour (ing_2), water (ing_3), salt (ing_4), and olive oil (ing_5). Mix until a shaggy dough forms.
- Cover the bowl and let the dough bulk ferment at room temperature for 4-6 hours, or until it has almost doubled in size.
- Gently turn the dough out onto a lightly floured surface and shape it into a round or oval loaf.
- Place the shaped dough in a banneton or a lightly floured bowl, seam-side up. Cover and let it proof in the refrigerator overnight (8-12 hours).
- Preheat your oven to 450°F (232°C) with the Dutch oven inside for at least 30 minutes. Carefully remove the hot Dutch oven. Gently place the dough into the Dutch oven. Cover and bake for 30 minutes.
- Remove the lid and bake for another 15 minutes, or until the crust is deeply golden brown and the internal temperature reaches 200-210°F (93-99°C).
Notes
Use a thermometer to check the internal temperature of the bread.
Adjust baking time depending on your oven and the size of your loaf.
Store leftover bread in an airtight container at room temperature for up to 3 days, or freeze for longer storage.


